Demand Center is divided into three tabs:
The Demand Tab
Use the Demand tab to organize and analyze incoming demand items and assign them to approved plans.
The following figure shows an example of a demand view for a plan owner.
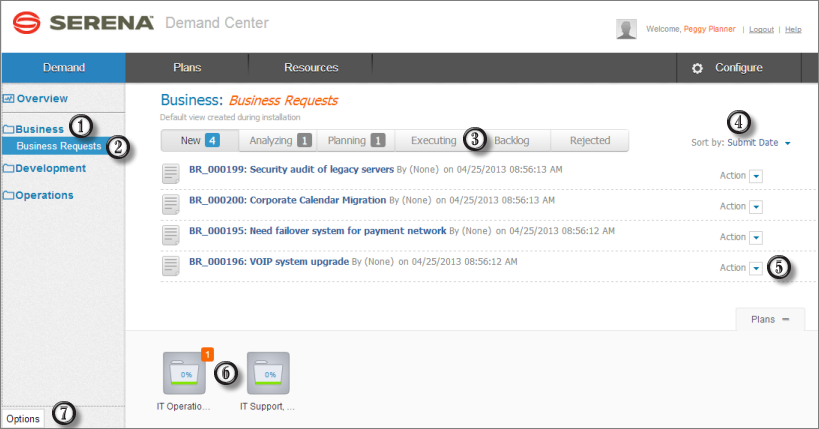
- Demand Categories
Demand categories enable you to organize demand views. Categories, which are created by an administrator, are visible to all users.
Select a category to list its demand views.
- Demand Views
Demand views list items based on specific Listing reports. Reports spanning multiple applications can be added to a view.
- Filters
Filter the list of demand items by status.
- Sorting
Dort the list of demand items by various criteria, depending on the selected filter.
- Action
Use the Action list to move individual items to analysis, a plan or a backlog. Items can also be rejected. If you are viewing the Analysis tab, you can also create a new plan based on a demand item.
- Plan Bins
All plans and backlogs available to you appear as folders in the bottom pane. Collapse the pane to close it.
You can drag demand items into these plans.
- Options
Expand or collapse the demand view list.
The following figure shows an example of the Demand tab overview pages, which shows a graphical view of demand items.
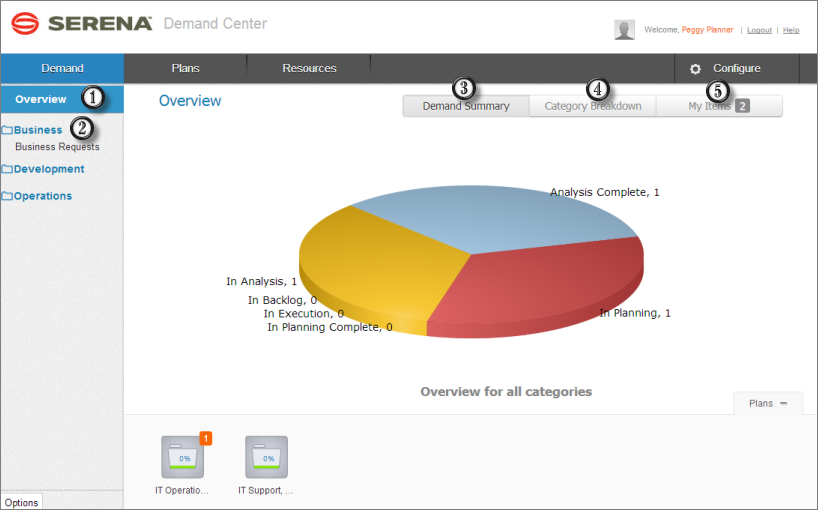
- Click Overview to see status for all demand views.
- Click a category name to see status for all views in the category.
- Click Demand Summary to see the status of all demand items.
- Click Category Breakdown to see the number of demand items that are in analysis or for which analysis is complete, by category.
- Click My Items to see the demand items you need to analyze or move into a plan.
For details, refer to Working With Demand Views.
The Plans Tab
Plan owners can use the Plans tab to rank items assigned to a plan, allocate resource teams to the plan and items in the plan, and adjust scoring and estimates.
Plan owners, reviewers, and other stakeholders also use the Plans tab to move plans through the Demand Plan process.
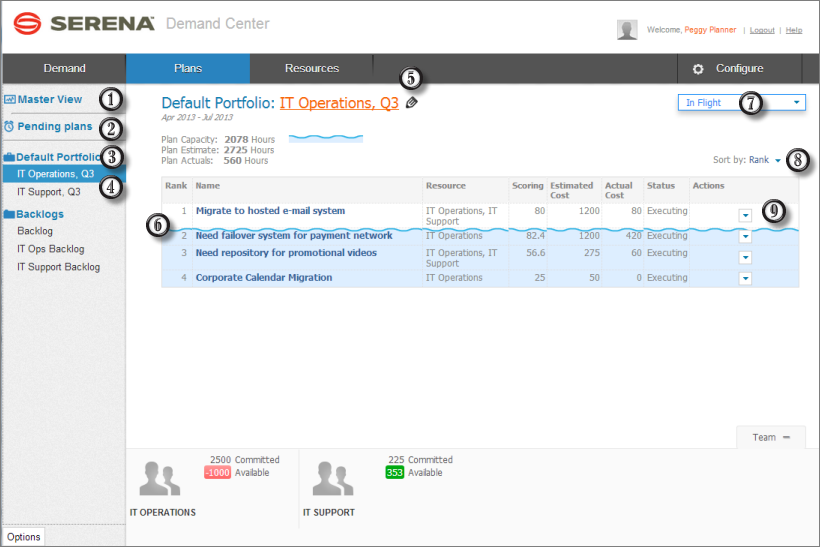
- Master View
Shows a list of enabling you to see the top initiative across all plans. This view is visible to plan owners and others who share the plans.
- Pending Plans
Shows plans that have not yet been approved. Pending plans are visible to users who are selected as plan owners, submitters, concept approvers, analysts, reviewers, and stakeholders.
- Portfolio View
Click to see a time line of selected plans. Select the detailed view to see progress on each plan in the portfolio.
- Plan View
Click a plan to view its assigned items.
-
Edit
Click the pencil icon to edit a plan. You can then allocate resource teams to the plan and share the plan with others. - Ranking
Items are listed by rank. Drag and drop items to change their ranking.
A blue watermark appears under the last item on the list that can be completed with the total resources allocated to the plan. The capacity indicators at the bottom of the page show committed and available hours for individual teams.
- Life Cycle Actions
Use this menu to send the plan through the Demand Plan life cycle. For example, you can send the plan to review, update it to change the plan owner, and more. Options depend on the plan's current state in the life cycle.
- Sort by
Sort the plan items by rank, name, scoring value, estimated cost, or status.
- Plan Item Actions
Select Analyze to adjust scoring and estimates and to allocate an item to a team. Also, mark planning as complete from the Analysis page.
Depending on the status of the item, you can also "split" it into smaller items, move it to another plan or a backlog, return it to analysis, and more.
For details, refer to Working With Plans and Working With Items in Plans.
The Resources Tab
Use the Resources tab to monitor resource team allocations for a specific time frame.
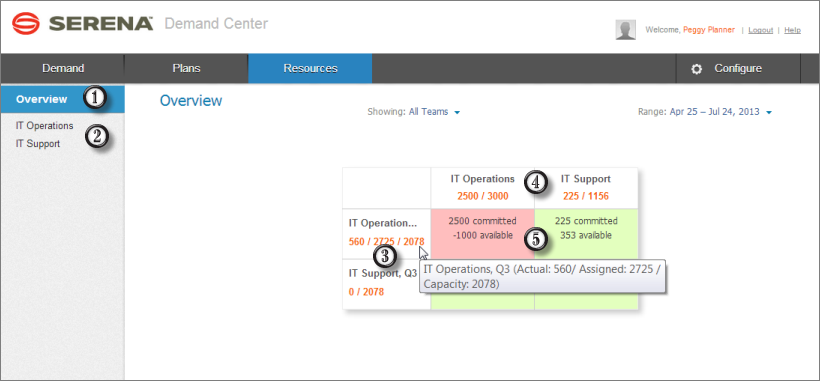
- Overview
Click to see resource allocations for the selected teams and time frame for plans you own or share.
- Resource Teams
Select a team to see a work distribution across all plans, allocation breakdown by plan, and team details.
- Plan Allocation Details
Each plan name cell shows actual hours, allocated hours, and the remaining capacity for all teams allocated to the plan. Hover over the plan name to see details.
- Team Allocation Details
Each team name cell shows allocated hours and the remaining capacity for all plans to which the team is allocated. Hover over the team name to see details.
- Team Allocations Per Plan
See the number of available hours for each team's plan allocation. Green shading indicates a team has available capacity; red shading indicates that a team is over-allocated.
For details, refer to Working With Resources.