Working With Items in Plans

Once demand items have been added to plans, you can drag and drop them to rank them by priority.

You can use the Actions menu to:

Splitting Items

If "split" capabilities have been enabled for your system, you can break large demand items into multiple items. This enables you to more accurately assess the cost of each item and to break tasks into manageable pieces of work to allocate to resource teams. You can also allocate smaller items to different plans or send them to the backlog.

Items can be split when they are assigned to a plan that is not yet in flight.

Tip: For best results, enter tasks on the Estimates tab for the demand item; you can use these tasks as the basis for the smaller tasks.

To "split" demand items:

  1. From the Plans tab, select a plan.
  2. From the actions menu for a demand item, select Split. The Split dialog opens.
  3. Use one of these methods to create new items:
    • If tasks have already been added to the demand item, click Distribute to move all but one task to the New Items list. Be sure to select the Copy scoring values from original item if you want to include this information in the new items.
    • Manually add new items to the New Items list.
  4. Provide a new title for each new item.
  5. Optionally, allocate the items to resource teams. You can also do this after the new items are created.
  6. Click Split. The newly split items are added to your plan. You can then allocate them to teams, move them to other plans, and more.

    In your demand item applications, split items are always added to the same project as the original item from which they were split.

Allocating Resource Teams to Items

Once demand items are in an approved plan, you can allocate resource teams to each item. This task can be performed by plan owners and users who share the plan.
Note: Resource teams must first be added to the plan. For details, refer to Editing a Plan.

To allocate resource teams to plan items:

  1. From the Plans tab, select a plan.
  2. Select the Resource column for a specific planning item. The Estimates dialog box opens to the Resources tab.
  3. Add a row for each task that needs to be completed for each item:
    • Description

      Type a brief description of the task.

    • Estimates

      Provide an estimate in hours for the task. Once you save your changes, this estimate is used to calculate the team's remaining capacity.

    • Resource

      Allocate a resource team to the task.

      Tip: You can search for resource teams by name or skill.
  4. Click OK to save your changes.
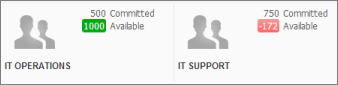
 The Teams pane at the bottom of the plan page shows the number of committed and available hours for all teams allocated to the plan.

    image

    You can also monitor a team's work for all plans on the Resources tab. For details, refer to Working With Resources.

Removing Items from a Plan

Plan owners can remove items from a plan by:

  • Moving them to another plan.
  • Moving them to a backlog.
  • Returning them to analysis.

To remove items from a plan:

  1. From the Planning tab, select a plan.
  2. Find the item to remove from a plan, and then select:
    • Move to Plan
    • Move to Backlog
    • Return to Analysis