Analyzing Demand Items

Before demand items are added to plans, they are typically analyzed to determine business value, scope, and cost.

Other users can share this task if:

Once demand items are sent to analysis, they are "paused" until they are approved as part of a plan or they are rejected. For details, refer to About Demand Item Pausing.

For details, refer to:

Sending Demand Items to Analysis

To send demand items to analysis:

  1. On the Demand tab, select a demand view.
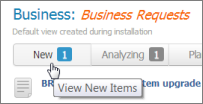
  2. Verify that the display filter is set to "New."

    image

  3. From the Actions menu for an item in the list, select Analyze.
  4. Select a priority and completion date for completing analysis, and then click Next.
  5. Click Start. The demand item is moved to the Analysis view.

Acting on Items in Analysis

When items are being analyzed, the following tasks can be performed from the Actions menu:

  • Analyze

    Opens the Analyzing dialog so the item can be scored.

  • Move to plan

    Move the item to plans you own.

  • Move to backlog

    Move items to a backlog you own. You can also send items to the default backlog if your administrator has shared it with you. For details, refer to Working with Backlogs.

  • New plan from selected

    Propose a new plan based on the item. Once the plan is approved, the item is automatically moved to that plan. For details, refer to Creating a New Plan from a Demand Item.

  • Reject

    Reject items to remove them from all demand views. For details, refer to Working with Rejected Items.

  • View Original Item

    View demand item details.

Scoring and Sizing Items in Analysis

To analyze items in a demand view:

  1. On the Demand tab, select a demand view.
  2. Verify that the display filter is set to "Analyzing."
  3. Select Analyze from the Actions menu for an item in the list. The Analyzing dialog opens.
  4. On the Analysis tab, adjust the analysis priority and expected completion date as needed.
  5. On the Scoring tab, expand each category, and then drag the sliders to score the item for each attribute. (The score is shown on the Plan tab after you click OK.) For details on the scoring calculation, refer to Define a Scoring Matrix.
  6. On the Estimates tab, add each task that needs to be completed for the demand item along with an estimated number of hours it will take to complete the task. These estimates are used to calculate a team's availability when sized items are allocated to teams.
  7. On the Assets tab, add estimated expenditures that are not related to human resources. Examples may be new servers or software expenses.
  8. On the Participants tab, select collaborators who will assist in the analysis process.
  9. When analysis is complete, select Mark as Complete in the upper right corner, and then click OK.

    image

Creating a New Plan from a Demand Item

If a single demand item is large enough to warrant its own plan, you can propose a new plan based on that item.

This feature is available for demand items that are in analysis.

To propose a new plan from an existing demand item:

  1. From the Demand tab, select Analyzing to view items that are in analysis.
  2. From the action menu for a demand item, select New Plan from Selected. The Submit form for the Demand Plan application opens.
  3. Choose to create a normal plan or a pre-approved plan, and then complete the remainder of the form.
  4. Click OK to create the plan.
The originating item is automatically added to the plan. To view normal plans, select the Pending Plans tab on the Plans tab. To view pre-approved plans, select the plan from the portfolio.