Configuration Steps
Update the CM Connection Table
Perform the steps described in Entering the Connection Details for Dimensions CM setting the database name to dvm_demo.
Update the Endpoints
If your sample SBM database is not installed on localhost, you will need to perform the steps described in Updating the Endpoints for dmwebservices to set your server details.
Update the application links in the event mappings.
The Database name needs to be updated in the event mappings. See Updating the Application Links in the Event Mappings, using DVM_DEMO as the database name.
Update the REST GRIDS
If the web services for Development Manager are not installed on the same server as SBM, you will need to update the REST grids, See Reconfiguring the REST Grids.
Update the ALF Events configuration
Perform the steps described in Configuring Dimensions CM for ALF Events.
In the ALF_EVENTS_CONFIG.XML file, the database needs to be set to DVM_DEMO.
|
<!-- Specify a specific database -->
<Database>
<!-- Example database name specification
<base_database_id>@<server>-<db_connection>
(using the wildcard character "*") -->
<Name>DVM_DEMO@*-Dim10</Name>
<!--Specify one or more projects-->
|
|
Set up the Service User in Dimensions CM
On the Dimensions CM server machine, create the OS user SERVICEUSER with the correct serviceuserpassword. Also make sure the other DVM OS users (amy, josh, alexander, etc.) exist on this machine.
Update the Dev Manager connection.xml file
You need to update the connection.xml file to change the database name. For details, See Updating the Connection Details in the Web Services.
Change the connection details to match your Dimensions CM server using the example below:
|
<mapping>
<CMConnection>
<dbConnection>dim10</dbConnection>
<dbName>dvm_demo</dbName>
<password>serviceuserpassword</password>
<server>dvm-cmserver</server>
<username>SERVICEUSER</username>
</CMConnection>
</mapping>
|
|
Updating the Default Build Areas
If you need to perform a build using the sample database you will need to update the default build area(s) you are using.
-
Open the Administration Console. Make sure you are connecting to the correct database:
-
On the login page, select Manual for Connect to.
-
Enter DVM_DEMO for the DB name
-
Under Distributed Development, select Build Administration.
-
Select the project/stream.
-
Select the build configuration.
-
Click the Checkout button in the toolbar
-
Select the area.
-
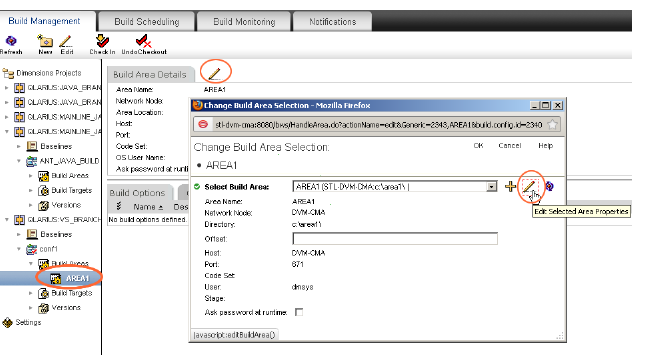
Click the Edit button next to Build Area Details.
-
In the Change Build Area Selection dialog box, click the Edit button.
-
In the Edit Work Area dialog box, change the user to dmsys, and the password to the dmsys password
-
Click OK, and click OK in the Change Build Area Selection dialog box.
-
Click the Check in button in the toolbar.