Demand item applications are those that track incoming requests for work that needs to be planned. These requests can come from any SBM application, and demand "views" can contain demand items from multiple applications.
This section provides guidance on preparing your SBM applications for use with Serena Demand Manager. The information assumes that you have administrative privileges required to perform the tasks and are familiar with SBM components, application customization, and deployment. For assistance, refer to the SBM documentation.
- In
SBM Composer:
- Modify the application workflows for each process app to include design elements that incorporate the planning process. For details, refer to Recommended Demand Item Process Setup.
- Add the Demand Widget to custom state forms. This enables users to view analysis and plan details in individual demand items. For details, refer to Add the Demand Widget to Custom State Forms.
- Add the Pause Status field to each application. This enables you to create reports and notifications that inform users about demand items as they are paused and unpaused. For details, refer to Add the Pause Status Field.
- Configure application workflows for "split" capabilities, which enables planners to create new demand items from smaller items. For details, refer to Configure Demand Item "Split" Capabilities
- In SBM Application Administrator, create notification rules and notifications that inform users about demand items as they are paused and unpaused. For details, refer to Add the Demand Widget to Custom State Forms.
- In SBM User Workspace, create Listing reports that return active items in the Planning state or use other criteria that returns results pertinent to your planning process. For details, refer to Preparing Listing Reports for Demand Views.
Recommended Demand Item Process Setup
While SBM's flexibility provides multiple methods of preparing demand item applications and data for use with Demand Center, the following process is recommended. These changes are made in SBM Composer.
- Planning Item Type
For each application used to populate demand views in Demand Center, add a planning-specific value to the system Item Type field. (This field may have a different display name, but this is the field that determines the application's item types, such as Incidents or Hardware Requests.) For example, you may want to add a "Planning Item" type for items that need to go through the planning process and need to be available in Demand Center.
- Planning State with Routing
Create a state to which planning items can be sent, and then use conditional routing to move planning items to that state. This state can reside anywhere in your workflow, but typically, Planning Items would be routed to this state when they are submitted, as shown in the following example.
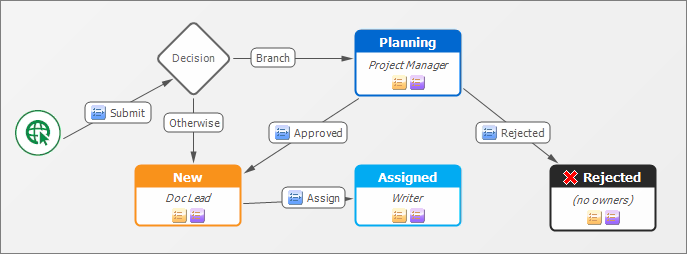
- Post-planning Process
Once demand items have been added to a plan, they follow their regular application process. Be sure to accommodate these post-planning phases of your process. In the example above, a project manager sends approved demand items to a lead, who can then assign them. Items that are not approved are sent to an inactive rejected state.
Add the Demand Widget to Custom State Forms
The Demand Widget displays information about the plan to which a demand item is assigned. The Demand Widget can be added to any custom state form. Plan information is visible to users once demand items are in analysis, as shown in the following example:
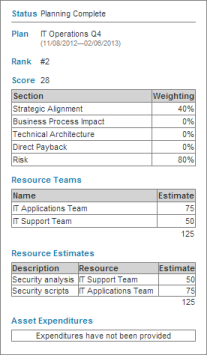
As items are moved to an approved plan, information about the plan is added. This includes plan duration, item rank in the plan, and resource team allocations.
- In SBM Composer, determine which custom state forms should contain the Demand Widget.
- For each form, add the Demand Widget.
Tip: For best results, add the widget in a container that expands all columns or on a separate tab.
- On the JavaScripts tab for the form, select the Include jQuery plug-in check box.
- Deploy the process app.
- Repeat for each demand item application as needed.
Add the Pause Status Field
Demand items are "paused" automatically by Serena Demand Manager once they are moved to analysis or added to a plan. This prevents users and automated processes, such as Web services, from transitioning or closing items until they are in an approved plan.
This feature does not require you to modify your demand item applications, but certain changes will enhance the experience for planners and users who are assigned work items in these applications.
For details on demand item pausing, refer to About Demand Item Pausing.
- In SBM Composer, add the Pause Status system field to all demand item applications. This read-only field contains values that indicate if an item is paused by Demand Manager or unpaused. Deploy each process app to which you add the Pause Status field.
- In SBM User Workspace, create or modify reports in your demand item applications and include the Pause Status field as columns to display in the report or as a search filter.
- In SBM Application Administrator, create notification rules that use the "Any Paused/Unpaused Issues" object. This enables users to receive notifications as items are paused or unpaused by planning activities.
Configure Demand Item "Split" Capabilities
Planners can "split" large demand items into multiple items. This enables them to more accurately assess the cost of each item and to break tasks into manageable pieces of work to allocate to teams.
Items can be split when they are assigned to a plan.
To enable split capabilities, the following steps must be completed for each demand item application.
- In
SBM Composer,
add a Copy transition to the application workflow in your demand item
application, and then set the following properties:
- The internal name must be "application name.SPLIT_COPY."
- The Item Link Type setting on the Post Options tab must be set to a two-way link type.
- Ideally, the "From" state will be the one used to store items while they are being planned. (In the setup described in Recommended Demand Item Process Setup, this is the Planning state.) You can also set this to "Any."
- You can have multiple "split" transitions in a single workflow, but only one "split" transition per planning state. Additional transition names must be prefaced with "application name.SPLIT_COPY", such as "application name.SPLIT_COPY_ONE," "application name.SPLIT_COPY_TWO," etc.
- Deploy your process app.
- In SBM Application Administrator, edit the root-level project for the process app.
- Select the States/Transitions tab, and then edit the Copy transition you created in step 1.
- In the Post Item Project section, select Override, and then Select Project. Select the root-level project for the application.
- Save your changes.
- Edit the project that will contain demand items to be split.
- Select the States/Transitions tab, and then edit the Copy transition you created in step 1.
- In the Post Item Project section, select Override, and then Select Project. Select the project you are editing.
- Save your changes.
- Repeat steps 7-8 for all projects that contain items to be split.