The Notifications view enables you to add, edit, delete, and copy notifications. You can also open the Rules view.
To open the Notifications view, click the Notifications icon on the Administrator Portal.
The Notifications view has the following parts:
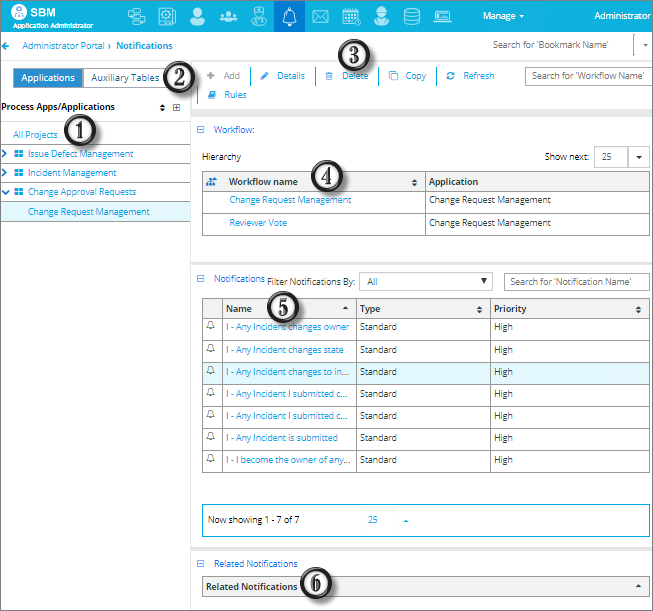
- Applications
To work with notifications based on primary tables, use this list to navigate through process apps and their corresponding applications. Expand and collapse the nodes to navigate through the tree. Click the Process Apps/Applications link to sort the list alphabetically. Select an application to open its associated workflows in the Workflow list.Note: To add a notification at the base workflow level, select All Workflows at the top of the Process Apps/Applications list, and then click Add. You must then select a rule that applies to a specific workflow.
- Auxiliary Tables
To work with notifications based on auxiliary tables, click Auxiliary Tables, and then select a table.
- Notifications Toolbar
- Add
Select a workflow or auxiliary table, and then click to add a notification. For details, refer to Creating Standard Notifications.
- Details
Select a workflow or auxiliary table, and a notification, and then click to edit the notification.
- Delete
Select a workflow or an auxiliary table, select one or more notifications, and then click Delete.
- Copy
Select a workflow or an auxiliary table, select a notification, and then click Copy. For details, refer to Copying Notifications.
- Refresh
Click to refresh the page to its last saved state or to update the page after a deployment or promotion.
- Rules
Click to open the Rules view and manage When rules used by notifications and Termination rules used by escalations. For details, refer to The Rules View.
- Filter Notification By
List all notifications for a selected workflow or auxiliary table, limit the list to those which have no subscribers, return only scheduled report notifications, or return only SLA notifications.Tip: A new scheduled report notification is created for each report that your users schedule. You can edit these notifications to customize the e-mail template that is used for each scheduled report e-mail. Filter your notifications by selecting Scheduled Reports Only, and then click the desired notification to edit the e-mail template that is used for a particular user's scheduled report.
- Search
Select the Search icon to search for workflows or notifications by name. For tips on searching for notifications, refer to Finding Notifications and Rules.
- Add
- Workflow List
When you select an application, this pane lists the workflows associated with that application. Click the column headers to sort the list by workflow name. Select a workflow to view its associated notifications.
- Notifications List
Lists the notifications associated with the selected workflow or auxiliary table. Click the column headers to sort the list by notification name, type, or priority.
- Related Notifications
When you select an escalation notification in the Notifications list, the original notification on which escalation is based is listed in the Related Notifications list. For example, a notification is generated when a critical item is submitted. An escalation is sent if the critical item has not been assigned within two days. When you select this escalation in the Notifications list, the original "Critical Item Has Been Submitted" notification is listed in the Related Notifications list.
- Notification System Settings (not pictured)
Enables on-demand customers to apply notification settings for their SBM instance. On-premise customers apply these settings in the SBM Configurator. For details, refer to Notification System Settings (On-demand Only)