The following tables describe user profile options that may be available to you, based on your privileges and product-access level.
To change user profile options, click the user icon, and then select Settings.
This section describes options on these pages:
General Options
Available to all users.
| Option | Description |
|---|---|
| Display Image (Avatar) | Select a JPG, PNG, and GIF file display in work items. For example, the image is shown in the social view item feed or next to notes you add to an item. For best results, select a square image that is not larger than 100 KB. |
| Full Name | Change your display name as needed. This setting does not impact your login ID, which is determined by your administrator. |
| Phone | Optionally, provide a phone number. |
| Password Settings | When you change your password, you are prompted to first provide your existing password. For details about rules for creating passwords, contact your administrator. |
| Provide at least one e-mail address where
you will receive notifications and messages sent to you from other users.
E-mail addresses are also used to verify e-mail submissions.
Separate multiple addresses with a semi-colon. The first address is used as your "from" address. |
|
| E-mail Aliases | Provide e-mail aliases if you use an
external e-mail client to submit items or attach messages to items as notes.
E-mail addresses are also used to verify e-mail submissions.
E-mail messages are never sent to the provided aliases; they are used solely for verification. |
| E-mail Notification CC-Users | Provide SBM user IDs or names for users who should receive carbon copies of your e-mail notifications. Members of your e-mail CC list only receive carbon copies of notification messages, not e-mail messages sent from work items. |
Display Options
| Option | Description |
|---|---|
| Attachments | Select to show attachments to a work item. Attachments can be files, URLs, and links to other items. |
| Items Per Page | Specify the number of work items you want
shown in search and report results list.
The maximum number of items allowed per page is determined by your administrator. |
| Restore Saved Form Data | Select one of these options for handling
data if you navigate away from a form that you updated without saving:
|
| Notification Polling Interval | Specify the amount of time in minutes the Notifications view will be refreshed with new notifications. For details, refer to Viewing Notifications. |
Section Options
Your privileges determine if the sections in the following table are visible in work items. If so, use the following options to control the display of each section.
| Option | Description | Applies to |
|---|---|---|
| Notes | Controls the display of notes and e-mail messages attached to work items. Choose to sort items by the most recent and set the number of items that are visible. |
Quick forms Custom forms if section added by an administrator |
| Change History | Controls the display of change history
records for work items. Choose to sort items by the most recent and set the
number of items that are visible.
For quick forms, also determines if Time Capture options are shown if they are enabled by an administrator. |
Quick forms Custom forms if section added by an administrator |
| State History | You can disable the state history.
For quick forms, you can move the state history section to the top or the bottom of the form. |
Quick forms Custom forms if section added by an administrator |
| Field Sections | Select or clear the check boxes for
sections you want to appear when you view, update, and transition work items.
Sections options are:
(The Standard section is always visible on quick forms.) |
Quick forms Details reports |
Locale Options
| Option | Description |
|---|---|
| Locale | Change your locale as needed. |
| Date Format | Select your preferred date/time format, or set the format based on your selected locale. |
| Time Zone | Select your preferred time zone. |
| Calendar for Hours of Operation | Select the calendar that determines when notification escalations are sent. This setting also determines how Time Capture entries are distributed if an administrator has not assigned a calendar to your account. Your administrator must grant privileges for you to modify this setting. |
Notification Subscriptions
Subscribe to notifications to receive through channels such as e-mail and to list in the My Notifications view. For details on this view, refer to Viewing Notifications.
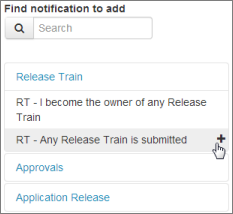
Notifications that you can subscribe to are listed in the left pane and organized by application. You can search for notifications by name, or click each application to see a list of notifications available to you. Hover over a notification, and then click the Plus sign to subscribe.
Most notifications are sent by e-mail, but depending on administrative settings, you may be able to choose to receive notifications through various channels.

Notifications you are subscribed to appear in the My Notifications list. This includes subscriptions set by your administrator.
To remove notifications that you subscribed to, hover over the notification, and then click the X. You can also click Clear All to unsubscribe from all notifications, except for those your administrator requires you to receive. Once you remove a subscription, you will no longer receive e-mail messages or see items pertaining to that subscription on the My Notifications view.
My Projects
Use the My Projects page to specify a set of preferred projects to filter the list of work items returned in these features:
- Searches
Choose to search for items in your preferred projects rather than in all projects.
- +New
Choose to submit items into your preferred projects rather than all projects.
- Feed Creation
You can choose to only return work items from preferred projects of the user viewing a feed.
- Report Creation
The list of projects used for storage is filtered by your preferred list by default.
The left pane lists all of the projects available to you. You can search for a project by name or navigate the project tree.
To add a single project, hover over the project,
and then click the
Plus sign (![]() ).
).
To add a project and all of its subprojects, hover
over the parent project, and then click the check mark (![]() ).
).
To remove a preferred project, hover over the project, and then click the X.
Feeds
Use the Feeds page to add, edit, and delete personal feeds. For details, refer to Working With Feeds.
Branding Configuration
Users with administrative access can change the following settings, which are seen by all Work Center users.
- Header Title
Change the text that appears to the right of the logo. Use the toolbar to apply formatting.
- Image (URL)
Enter a URL to a logo file or image that is accessible to Work Center users. For example, do not enter an URL for a logo that is located in a restricted domain that is not accessible by all users.
- Image Link
Enter the URL for a Web page that opens when users click the logo.
- Footer Text
Add text that appears at the bottom of the interface. Use the toolbar to apply formatting.