From the Object Types main window, select the object type you want to assign an attribute to in the navigation pane.
Click the Attributes tab in the content pane.
Click the  button in the content pane. This will display the options:
-
Single Field
-
Multi Field (block)
Choose the required option. The Assign Attribute dialog box or the Assign Block Attribute dialog box appears.
Enter a name for the attribute or attribute block in the Name field.
Enter a field label for the attribute or attribute block in the User prompt field.
For single-field attributes, follow these additional steps:
a If necessary, change the default value for the maximum character length allowed in the Max length field.
b Select the format for the attribute's value from the Data type list.
c If necessary, change the default values for the display length and height of the attribute in the Display length and Display height fields.
d Optionally, complete the rest of the fields in the dialog box. If you want the dialog box to remain open, select the Keep Open check box.
If the Data type is date, and you want to define validation for the date range:
-
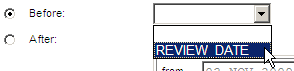
Select before if you want to validate that the entered date must be before another date attribute entered for the object type. Select the attribute from the list:
-
Select after if you want to validate that the entered date should be after another date attribute, and select the attribute from the list.
-
Select Fixed range if you want to validate that the entered date should be between two specified date.
• Use the date picker to select the from date and click the tick in the top right to confirm it
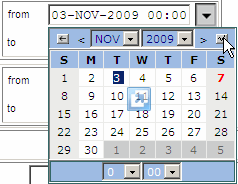
• Use the date picker to select the to date.
-
Select Relative range if you want to validate that the entered date should be between two specified dates relative to the current date (at the time the date is entered).
• Select + or - from the from list, and enter the number of days from the current date.
• Select + or - from the to list, and enter the number of days from the current date.
For block attributes, follow these additional steps:
a Select whether you want users to be able to modify or delete rows from the Block Update Type field.
b In the Attributes in Block fields, add existing single-field, multi-value attributes to the block as necessary to form the multi-field multi-value (block) attribute.
NOTE If a block attribute contains multi-value (MVA) attributes with assigned values defined as mandatory, each populated row must have values assigned to those mandatory attributes when the user enters them. This default behavior is different from previous releases. You can revert to the previous behavior by setting the DM_MANDATORY_MVA_ANY_ROW parameter in the dm.cfg file. For details see the System Administration Guide.
Click OK to commit the details.