When the Process Design pane opens, the Design view displays. Processes are configured on the Design view.
Available Views
The following table describes the views that can be displayed by clicking the associated tab.
| Tab/View | Description |
|---|---|
| Edit | Displays the Edit view where you can change process parameters. |
| Properties | Displays the Properties view where you can create and change process properties. |
| Changes | Displays the Process Changes view. This view provides a record for every process change–property add or delete, and process save or delete. |
A Typical Process Step
Configure processes by dragging each step onto the design space, configuring, and then connecting them. Select a step from the available steps and drag it onto the design space. The Edit Properties dialog box appears. Enter the identifying details of the step and save. Define relationships between steps by dragging connection handles between associated steps.
Process Editor Tools
Graphically, each step, except for the Start step which cannot be deleted or edited, is the same and provides the following tools:
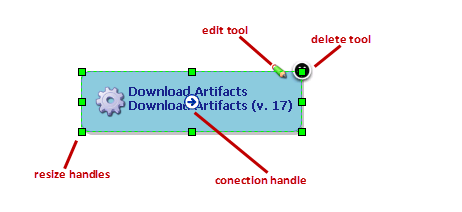
| Item | Description |
|---|---|
| edit tool | Displays the Edit Properties dialog box where you can modify configuration parameters |
| delete tool | Removes the step from the design space |
| resize handle | Enables you to resize the step graphic |
| connection handle | Enables you to create connections between steps |