You can create Kanban boards in the global context (All) or for each application or application group. You are the owner of each Kanban board you create, but you can share the board with co-owners, collaborators, and viewers. For details on the responsibilities of users who share a Kanban board, refer to Sharing a View With Other Users.
To create a Kanban board:
- Select All or a pinned application or application group. This determines where the board you create will be available.
- Select Kanban Boards from the side menu, and then click Create Kanban Board.
-
On the
Feeds tab, add feeds to the board:
- Click New to create a new feed and add it to the board. For details, refer to Creating Kanban Feeds.
- Click Select to add an existing feed to the board.
-
On the
Columns tab, click
Add Column and provide the following:
- Name
Enter the name that will appear above the column.
- Short name
Enter an abbreviation that appears when the column is collapsed. Short names are limited to four characters or less.
- Description
Provide a description for the column.
- Default column for unmapped values
Select this check box on one of the columns to designate it as the default for items with a status value that is not mapped to one of the columns.
- Work in progress limit
Set the work in progress (WIP) limit for the column. The WIP limit acts as a threshold for the number of items that should be added to a column. When the WIP limit for a column is exceeded, the column heading displays the overage to notify the user who is viewing the board.
Add columns for each phase or stage of your process. In the list of columns, hover over a column and click Add sub-column to add more granular stages. Click the minus icon to remove a column, if necessary.
Use the up and down arrows to re-order the columns. Columns at the top of the list appear on the left side of the Kanban board.
- Name
-
When you have finished adding all of your columns, select a column
from the list, and then click
Map Field to map a field to the column.
Provide the following:
- Field Mapped to Kanban Columns
Select a field with values that you want to associate with this column. Note that you can map one field per application—you can change this field later, but any mappings you have defined will be lost if you change it.
Note that you can map Single-Relational fields to columns; however, the Single-Relational must point to an auxiliary table. For example, you can create a Kanban board in which each column represents a different scrum team or Agile sprint (assuming you have auxiliary tables that stores scrum teams and Agile sprints.)
- Kanban Column
The current column is selected in this drop-down list, but you can select another column and change the mapping for it as well. This enables you to define all of the column mappings at once without having to close the dialog box. Note that if you add sub-columns, you will map values to each sub-column (not the parent column).
For example, for items with State field values like Backlog, Assigned, Researching, In Development, Assigned to QA, and Closed, you could create the following mapping:
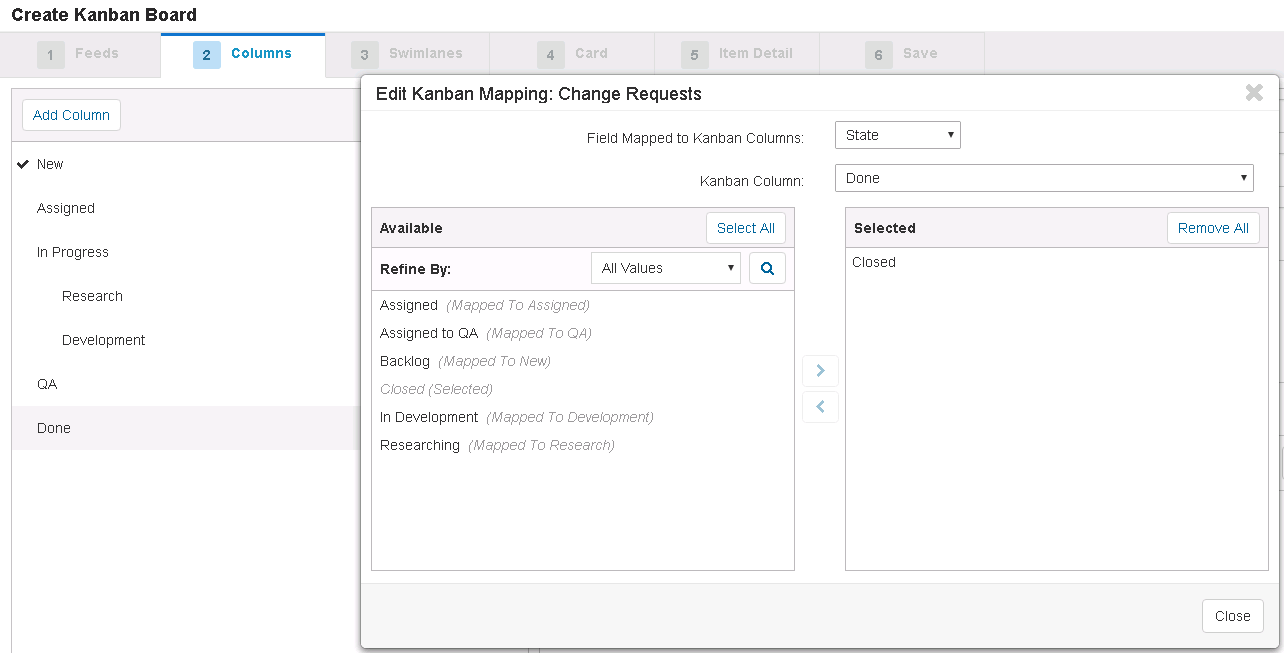
In this example, the In Progress column contains two sub-columns (Research and Development). The Researching and In Development state values that are part of the overall active development phase ("In Progress") are mapped to these sub-columns.
If you need to change any mappings, you can click the pencil icon next to the mapped field or you can click the Map Values button.
- Field Mapped to Kanban Columns
- On the Swimlanes tab, you can optionally select a field to use for grouping cards into different swimlanes on the Kanban board. For example, you can select the SBM Project field to group cards on the Kanban board by project. This helps organize the cards on your Kanban board. Note that you can use Single-Relational fields for swimlanes; however, the Single-Relational must point to an auxiliary table.
-
On the
Card tab, select an application or application
group from the
Application list, and then map work item
fields to the
Title and
Status Indicator fields that are displayed on
each Kanban card. For example:
In the Status Indicator row, click Map Values to Icons. Assign a default icon for items that do not have a status value. For example, assign icons to active and inactive values in the Active/Inactive field to enable the viewer to easily see which items are still open. If you are working with an external data feed, you can map values for the following additional fields:Card Field Title
Title
Status Indicator
Active/Inactive
- Item ID – Provide an ID for the item (required)
- Owner – Provide a value for the owner of the item
- Owner Avatar URL – Provide an image URL for the owner's avatar
- On the Item Detail tab, select an application or application group from the list, and then select the work items fields to display when a user opens a Kanban card. Use the up and down arrows to set the display order. If no fields are selected, a default set of fields is used.
- On the Save tab, provide a name and description for the Kanban board. Users can search for the Kanban board using the information you provide here. Optionally, select users, groups, and resource teams to share the board with. Select the Send notifications about sharing check box to notify users by e-mail that the board has been shared with them.
- Save your changes.
- On the Kanban Boards page, click the star icon to make the board a favorite. You can now access the Kanban board from the side menu.