Use the Work Center Side Menu tab to pin shared views and non-private reports to the Work Center side menu for your users.
You can pin views and reports to the side menu for groups, teams, or users:
- For groups, edit a group, click Group Preferences, and then open the Work Center Side Menu tab.
- For teams, edit a resource team, and then open the Work Center Side Menu tab.
- For users, edit a user, click User Preferences, and then open the Work Center Side Menu tab.
The views and reports that you pin cannot be removed from the Work Center side menu by your users. A lock icon appears next to each pinned view and report in the side menu and hover text explains to the user that the view or report was added by the administrator and cannot be removed.
A user's pinned views and reports are derived from his or her group membership, team membership, or side menu settings that are applied at the user-level. You can add views and reports at the user-level, but you cannot remove or override views and reports that are inherited from groups and teams at the user-level.
Pinning Views and Reports
To pin views and reports to the side menu for a group, team, or user:
- Select an application or an application group from the list. Or, select All to pin views and reports to the side menu in the global context.
- In the
Default view/report drop-down list, optionally
select a view or report that should open in the side menu whenever this
application or application group is opened in
Work Center.
Note: This option overrides the standard behavior in Work Center in which the last view or report that a user accessed from the side menu is automatically selected the next time he or she works in the associated application or application group. Instead of opening the last view or report automatically, the view or report that you select in the Default view/report drop-down list is displayed. If you do not set a default view or report, the standard behavior applies.
A user inherits the Default view/report setting from his or her teams or groups that are assigned a default view or report. However, you can override this at the user-level by editing the user and assigning a different default view or report. Otherwise, the view or report from the group or team with the highest priority is displayed. For details on assigning priority for groups and teams, refer to Prioritizing Groups and Teams.
- Click the
Add button to pin shared views and non-private
reports throughout the side menu as necessary.
When you add a view or report, it is automatically pinned to the Work Center side menu for the group, team, or user you are editing. Views that you add are automatically shared with the users as well.
Note the following:
- Before you can pin a view, it must be shared with at least one user in Work Center. However, the view does not have to be shared with you (the administrator).
- You can pin up to 20 views and reports in each side menu category.
- Any type of report can be pinned as long as it is not a private report.
- If you select an application or application group, you can pin built-in reports.
- If a user does not have permission to run a report, the pinned report will still appear in the user's side menu. When the user attempts to run the report, a message appears that states he or she cannot access the report.
- Use the
Move Up and
Move Down arrows to set the desired order of
each view and report. Note that if you are editing a user, the order of views
and reports is inherited from the settings that are applied to the group or
team; however, users can reorder their side menu items as necessary in
Work Center.
In the event that a user has two or more reports or views that are inherited from different groups, you can prioritize the pinned entries from certain groups or teams. For details, refer to Prioritizing Groups and Teams.
- If you are pinning views and reports while editing a group or a
team, click
Preview User to see what the current side menu
looks like for a given user.
Tip: You can edit the pinned views and reports for a user during preview mode just like you can when you edit the user preferences in Application Administrator and configure side menu settings. This saves you time and lets you see the user's side menu without having to log in as the user.
- Click Save when you are finished.
Removing Pinned Views and Reports
To remove pinned views and reports:
- Select an application or an application group from the list. Or, select All.
- In the list of pinned items, find the view or report that you want to unpin.
- Click one of the following:
- Remove
Removes the view or report from the side menu for the group, team, or user you are editing, but leaves the view or report shared with users. The view can be unshared by editing it in Work Center.
- Remove and unshare
Removes the view from the side menu for the group, team, or user you are editing and makes the view no longer shared.
Once you pin a view in Application Administrator, the list of users that the view is shared with is automatically updated in Work Center. In this example, a backlog view was pinned for the Everyone group in Application Administrator:
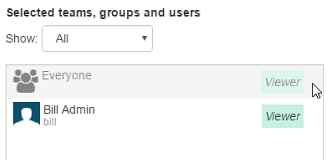
When you edit the view in Work Center and select the Sharing tab, you will see that the user, group, or team that you selected in Application Administrator (Everyone, in this example) appears in the shared column and cannot be removed. An administrator must click Remove and unshare in Application Administrator to remove it. View owners or co-owners can still modify the view access for users, groups, or teams though.
- Remove