The following tables describe user profile options that may be available to you, based on your privileges and product-access level.
To change user profile options, click the user icon, and then select Settings.
This section describes options on these pages:
General Options
Available to all users.
| Option | Description |
|---|---|
| Display Image (Avatar) | Select a JPG, PNG, and GIF file display in work items. For example, the image is shown in the social view item feed or next to notes you add to an item. For best results, select a square image that is not larger than 100 KB. If you do not select an avatar, the first initial of your first name is displayed instead. |
| Full Name | Change your display name as needed. This setting does not impact your login ID, which is determined by your administrator. |
| Title | Enter your current title. |
| Phone | Optionally, provide a phone number. |
| Mobile Phone | Optionally, provide a mobile phone number. |
| Password Settings | When you change your password, you are prompted to first provide your existing password. For details about rules for creating passwords, contact your administrator. |
| Preferred Contact Method | Select your preferred contact method. This enables other users to know which method to use when they want to contact you. |
| Provide at least one e-mail address where
you will receive notifications and messages sent to you from other users.
E-mail addresses are also used to verify e-mail submissions.
Separate multiple addresses with a semi-colon. The first address is used as your "from" address. |
|
| E-mail Aliases | Provide e-mail aliases if you use an
external e-mail client to submit items or attach messages to items as notes.
E-mail addresses are also used to verify e-mail submissions.
E-mail messages are never sent to the provided aliases; they are used solely for verification. |
| E-mail Notification CC-Users | Provide SBM user IDs or names for users who should receive carbon copies of your e-mail notifications. Members of your e-mail CC list only receive carbon copies of notification messages, not e-mail messages sent from work items. |
| Log On as Another User | Users with appropriate privileges can
search for another user in the system, and then log on to
Work Center
as that user. This is convenient for troubleshooting problems reported by
users. All changes that you make to items as another user are recorded in the
Change History section for each item.
To log back in as yourself, search for and select your user name. |
Display Options
| Option | Description |
|---|---|
| Attachments | Select to show attachments to a work item. Attachments can be files, URLs, and links to other items. |
| Auto Requery | Select to automatically update results for Listing reports, including those viewed in the Editable Grid, or items in Knowledge Base folders (on-premise). This option applies when you update an item so that it no longer fits the criteria of the report, and then select Back to Results. For Knowledge Base folders, the update occurs when an item is added or removed from a folder. |
| Subtasks | Select to show subtasks for work items in the Item Details pane. The Subtasks section appears only if you have the privileges to view subtasks and if an item is a subtask of another item or has one or more subtasks associated with it. |
| Version Control History | Select to show version control history associated with work items in the Item Details pane. This option applies to work items that use a version control integration, such as SourceBridge or VersionBridge. (On-premise customers only.) |
| Use Accessible Interface | This option condenses SBM features into a text-rich, vertical format. The Accessible interface is appropriate for mobile device users and users who rely on assistive technologies. |
| Auto Folder Items | Select this check box to automatically
place links to items in the system favorites folders, which include the Inbox,
Submitted Items, Transitioned Items, and Updated Items folders. Clearing this
check box does not remove links to items already contained in the folders but
prevents new item links from being created. You may improve system performance
by clearing the
Auto Folder Items check box.
Note: This option is available only if your administrator has
enabled it.
|
| Items Per Page | Specify the number of work items you want shown in search results, report results, and in the Notifications view. For searches and notifications there is a limit of 40 items per page. |
| Advanced Lookup Defaults | This option sets the default menu choice for the Active/Inactive field in the Relational Field Value Lookup form. This also sets the default choice for the Active/Inactive field in the Manage Data feature in Application Administrator. You can choose to view inactive items, active items, or all items by default. |
| Restore Saved Form Data | Determines if forms are repopulated with
data from the last time that you cancelled out of the form:
|
| Notification Polling Interval | Specify the amount of time in minutes the Notifications view will be refreshed with new notifications. For details, refer to Viewing Notifications. |
| Editable Grid Options |
Set the following options:
|
Note that the Restore Saved Form Data feature is not available in the following situations:
-
If you visit a URL outside of Work Center before completing the submit, update, or transition.
-
If you provide data on a form, and then open your user profile and save changes to your profile.
-
If you select a different transition button when you return to the form. For example, if you click the Update button, add new data to the form, leave the form, return to the item, and then click Assign, the cached data is not restored.
-
If you start to submit an item into one project or auxiliary table and open a submit in a different project or table.
-
If you click the browser's refresh or reload button before completing the submit, update, or transition.
Section Options
Your privileges determine if the sections in the following table are visible in work items. If so, use the following options to control the display of each section.
| Option | Description | Applies to |
|---|---|---|
| Notes | Controls the display of notes and e-mail messages attached to work items. Choose to sort items by the most recent and set the number of items that are visible. |
Quick forms Custom forms if section added by an administrator |
| Change History | Controls the display of change history
records for work items. Choose to sort items by the most recent and set the
number of items that are visible.
For quick forms, also determines if Time Capture options are shown if they are enabled by an administrator. |
Quick forms Custom forms if section added by an administrator |
| State Change History | You can disable the state history.
For quick forms, you can move the state history section to the top or the bottom of the form. |
Quick forms Custom forms if section added by an administrator |
| Field Sections | Select or clear the check boxes for
sections you want to appear when you view, update, and transition work items.
Sections options are:
(The Standard section is always visible on quick forms.) |
Quick forms Details reports |
Locale Options
| Option | Description |
|---|---|
| Locale | Change your locale as needed. |
| Date Format | Select your preferred date/time format, or set the format based on your selected locale. |
| Date Format Type | Appears if you select Use Date/Time Format From Locale. Select the display format to use for date/time values that are based on your locale. Refer to the Sample Date/Time for examples. |
| Time Zone | Select your preferred time zone. |
| Calendar for Hours of Operation | Select the calendar that determines when notification escalations are sent. This setting also determines how Time Capture entries are distributed if an administrator has not assigned a calendar to your account. Your administrator must grant privileges for you to modify this setting. |
| Start of the Week | This setting determines what day is used for the start of each week in calendar reports, date picker popups, and date/time keywords. By default, the locale you select determines what day is used for the start of the week. Otherwise, a specific day is set as the first day of the week. |
Channels
In the Channels tab, you can provide a Recipient ID for one or more user channels that are set up by your administrator. Channels are additional messaging mediums through which you can receive notification messages. For example, if your administrator creates an instant message (IM) user channel and associates it with one or more notifications, you can provide your recipient ID in the Channels tab for that channel, subscribe to notifications that use that channel, and then receive notifications through your IM client in addition to standard e-mail messages.
Notification Subscriptions
Subscribe to notifications to receive through channels such as e-mail and to list in the My Notifications view. For details on this view, refer to Viewing Notifications.
Notifications that you can subscribe to are listed in the left pane and organized by application. You can search for notifications by name, or click each application to see a list of notifications available to you. Hover over a notification, and then click the Plus sign to subscribe.
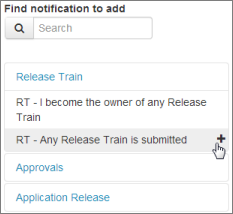
Most notifications are sent by e-mail, but depending on administrative settings, you may be able to choose to receive notifications through various channels.

Notifications you are subscribed to appear in the My Notifications list. This includes subscriptions set by your administrator.
To remove notifications that you subscribed to, hover over the notification, and then click the X. You can also click Clear All to unsubscribe from all notifications, except for those your administrator requires you to receive. Once you remove a subscription, you will no longer receive e-mail messages or see items pertaining to that subscription on the My Notifications view.
My Projects
Use the My Projects page to specify a set of preferred projects to filter the list of work items returned in these features:
- Searches
Choose to search for items in your preferred projects rather than in all projects.
- +New
Choose to submit items into your preferred projects rather than all projects.
- Feed Creation
You can choose to only return work items from preferred projects of the user viewing a feed.
- Report Creation
The list of projects used for storage is filtered by your preferred list by default.
The left pane lists all of the projects available to you. You can search for a project by name or navigate the project tree.
To add a single project, hover over the project,
and then click the
Plus sign (![]() ).
).
To add a project and all of its sub-projects,
hover over the parent project, and then click the check mark (![]() ).
).
To remove a preferred project, hover over the project, and then click the X.
Feeds
Use the Feeds page to add, preview, edit, and delete personal feeds. For details, refer to Working With Views and Feeds.
Branding Configuration
Users granted the Remote Administration privilege can change the following settings, which are seen by all Work Center users.
- Header Title
Change the text that appears to the right of the logo and in the Web browser title bar. Use the toolbar to apply formatting.
Note: The item ID and title are shown on the browser title bar when users open work items from reports, activity views, backlog views, and search results in a new tab. When users open reports in a new tab, the report title is shown as the browser title bar. - Image (URL)
Enter a URL to a logo file or image that is accessible to Work Center users. For example, do not enter an URL for a logo that is located in a restricted domain that is not accessible by all users.
- Image Link
Enter the URL for a Web page that opens when users click the logo.
- Footer Text
Add text that appears at the bottom of the interface. Use the toolbar to apply formatting.
Search Settings
You can change the fields that are displayed for items in Work Center search results by clicking Settings or by managing the Search settings in your user profile. Start by selecting an application, and then select one or more fields that you want to display and move them to the Selected column. Use the arrows to set the display order for the fields.
Side Menu Categories
If you have the appropriate privileges, you can use the Side Menu Categories page to show or hide categories in the Work Center side menu.| Option | Description |
|---|---|
| Available Applications / Application Groups | Select an application or application group from the list. Or, select All to show or hide categories in the global context. |
| Visible Categories | Select or clear the check boxes to show or
hide the corresponding categories:
|