Contents
Overview
Issue Defect Management (IDM) automates the capture, routing, collaboration, and resolution of issues and defects, helping you to better manage your development processes.
The following are some examples of how IDM improves your processes:
-
Issues are efficiently captured and managed to resolution, saving money and minimizing risk.
-
Development activities are coordinated across different people, teams, and systems in a fully automated, repeatable way. No more issues falling through the cracks.
-
Everyone involved in a development project has access to the right information at the right time. Visibility into the process eliminates unproductive e-mail threads and increases stakeholder satisfaction. Complete audit trails keep you in compliance with internal and external regulatory mandates.
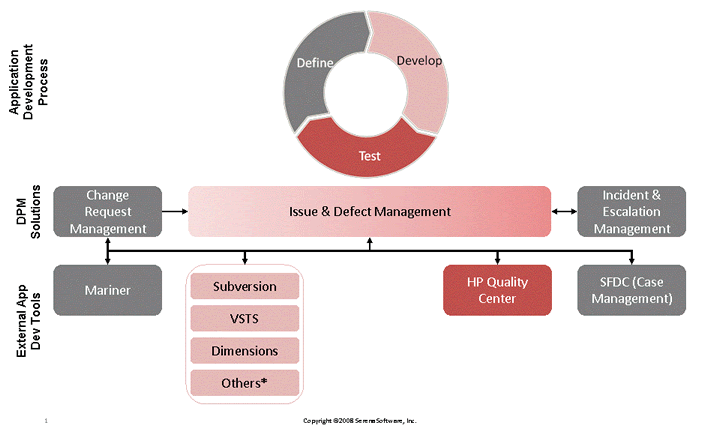
The following diagram shows how the IDM mashup integrates with other Serena mashups to create a full solution to manage your development process.
Use Cases
The following use cases describe typical scenarios for using the issue defect management process.
Use Case 1
A Quality Assurance (QA) tester submits a defect. After evaluating the defect, the team lead assigns it to the appropriate developer.
The developer opens the item, which contains a link to the development Wiki. The Wiki contains information relevant to the item, such as best practices or part specifications.
The developer makes the code change to fix the defect and requests a peer review from the lead developer. The lead developer reviews the code and approves it, moving the defect to QA. A QA tester verifies the fix and closes the defect.
Use Case 2
Heavy-duty testing needs to be performed on a product, and a group of new QA testers are hired to test the product. These testers are unfamiliar with the previous defects opened by the team.
The team wants to prevent a proliferation of duplicate defects, and the team lead requires that the testers verify that an issue has not been previously opened on a particular defect.
To accomplish this goal, the testers perform a search on the submission form to find any related issues. When they find a related issue, they cancel the submit form and add information to the existing issue.
Use Case 3
A manager wants to check the workload of the developers to make sure that the work is evenly balanced. The manager creates a summary report to display the number of issues that are assigned to each developer, along with the sum of the estimated hours to fix the issues. After running the report, the manager can then reassign issues to distribute the workload as needed.
Use Case 4
QA testers submit defects and the defects are placed in a work queue for the development team.
Sarah, a member of the development team, has completed her tasks early and has free time. She reviews the existing defects in the work queue and chooses the ones that she can work on. She assigns the defects to herself and begins to work on them.
Pablo, another member of the development team, reviews the defects in the queue and identifies one of them as a duplicate to an issue that is currently being worked on. He links the duplicate issues and closes one of them.
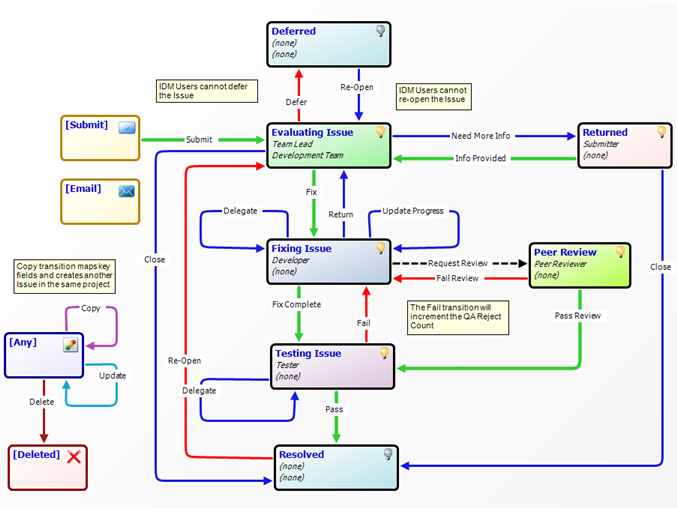
IDM Workflow
The following is the graphical depiction of the IDM workflow. View the mashup in Mashup Composer to explore the mashup in further detail.
For an end user's perspective of the workflow, see Exploring the IDM Workflow.
For an explanation of some of the implementation techniques used in this mashup, see Special Features.
Implementation
The following sections explain how you install and configure the IDM mashup on your system. Choose the appropriate type of installation, either On-demand or On-premise.
On-Demand Configuration
Perform the following procedure to configure the application. These steps are necessary for implementing Issue Defect Management.
To configure the application in an On-Demand environment:
- Import and deploy the mashup as described in Importing and Deploying.
- An IDM Project is automatically created for you. If you want to create additional projects, create them in the Web Administrator.
- In the Web Administrator, create users and make them members of the appropriate group (Administrators, Mashers, Users). The Mashers group is for people who will be using Composer.
- In the Web Administrator, add users to the roles listed in Roles for Issue and Defect Tracking. Every role needs at least one user.
- (Optional) In the Web Administrator, set default values for the Team Lead and Development Team fields. In Serena Mashup Composer, hide the related fields on the Submit and Proceed transition forms. Note: This step allows issues to be routed to the correct Team Lead/Development Team without having users choose a value.
- In the Web Administrator, create additional projects as needed.
- In the Web Interface, create additional artifacts as needed (for example, custom reports).
On-Premise Configuration
Prerequisites:
The On-premise configuration is for users who have a version of Serena Business Mashups installed on their system.
Installing this mashup includes loading the blueprint into Mashup Composer, deploying it to your runtime, and then configuring the mashup using Mashup Administrator.
To install and implement this mashup:
Associating Groups with User Fields
Prerequisites:
This procedure is for an on-premise deployment of your mashup. The mashup must have been deployed to your mashup server before you can edit the fields using Mashup Administrator.
User selection fields allow you to choose a user as a value for that field. The field requires that you choose the groups or users who are available for selection. You choose the groups for selection in the Mashup Administrator.
You can have different values available for these fields based on the project level. In other words, you can use the same workflow yet have it be routed to completely different users based on the default values that you set at the project level.
To assign groups to User selection fields:
- In Mashup Administrator, select the workflow that contains the fields and click Edit.
- Select the Default Fields tab on the Edit Workflow dialog.
- Select the field to associate and click Edit.
- On the Options tab of the Edit Field properties dialog, click Add and choose your group.
- To set a default value for the field, select Allow Override on the Attributes tab and then select the default value on the Options tab.
Importing and Deploying
The following steps explain how to import your blueprint into Serena Mashup Composer and deploy it to your Mashup Server.
To deploy the application:
-
Click
 (Deploy) to deploy the application to your environment.
You are prompted to check in and publish your mashup before it can be deployed to your
environment. The Deploy Mashup dialog allows you to choose a specific environment
for deployment, and it allows you to change your default deployment settings by clicking
Show Options.
(Deploy) to deploy the application to your environment.
You are prompted to check in and publish your mashup before it can be deployed to your
environment. The Deploy Mashup dialog allows you to choose a specific environment
for deployment, and it allows you to change your default deployment settings by clicking
Show Options.
Using the Mashup
There are three basic ways that you will interact with Serena Business Mashups:
- Masher - This user is principally involved in design-time activities using the Composer tool. Example tasks include adding states or transitions to a workflow or modifying an orchestration.
- Administrator - This user is principally involved in runtime configuration activities using Mashup Manager and Mashup Administrator tools (if on-premise) or Web Admin tool (if on-demand). Example tasks include adding users, assigning privileges, or configuring projects.
- End Users - This user is involved in the regular use of a deployed mashup solution.
This user is the one who submits items, transitions items, and runs reports on existing
items. The user accesses Serena Business Mashups through the Web interface. Note: In the following End User section, we walk through the workflow to understand the different options that a user has when moving an item through the workflow. This section can be helpful for Mashers and Administrators to understand the typical movement of items through the workflow from the end user perspective.
The following sections describe how to use the mashup depending on the role that you are performing within Serena Business Mashups.
Mashers
Mashers are responsible for creating and modifying mashups. The main tool for mashers is Mashup Composer.
Typical tasks for mashers include:
- Adding states or transitions to an application workflow.
- Changing the layout of forms used.
- Creating and modifying orchestration workflows.
- Adding auxiliary tables and fields to manage data within a mashup.
If you are a new masher, see Getting Started as a Masher for explanations of basic masher tasks.
The mashup blueprint contains all the information about that you need for the mashup. You can open the mashup in Mashup Composer to inspect the details.
The following sections have information that gives a high-level overview of important parts of the mashup for mashers.
Special Features
This application includes the following special features:
- Tabbed view on the Default State Form. These tabs contain information about the issue as well as space to add information for integrations and connectors. For example:
- The Code tab lists code changes that have been associated with the issue. This tab is used with different connectors available for IDM, such as the Subversion Connector.
- The Related Items tab lists items or issues that are related to this issue. This tab includes items that are in other mashups or applications. For example, if this issue was created from an incident in the Incident Management mashup, the incident is listed on this tab.
- The IDM Configurations auxiliary table that is used by integrations with the IDM workflow. This table holds connection information to third-party tools and applications. Only allow administrators who need to configure the integration information access to this table.
- The SCM Associations auxiliary table is used by the Software Change Management (SCM) connectors or integrations. This table is used to store data such as associations between check-ins and issues.
-
A numeric field that tracks how many times issues have been failed by QA. For details, open the IDM workflow and select the Fail transition. On the Field Overrides tab, select the QA Reject Count field. View the details under the Set to Calculation option.
-
Role restrictions that allow only a Team Lead to defer an issue, and only an IDM Manager or Administrator to re-open an issue residing in the Deferred state. For details, open the IDM workflow. View the Role Restrictions tab for both the Defer and Re-Open transitions.
-
An HTML/Javascript widget that enables users to search for duplicate issues before submitting an issue. For details, select the Submit form from the Visual Designer view in Composer. From the Form or Property Editor, select HTMLJavascriptWidget. The script is in the Content box.
-
A Web page widget that displays the Wikipedia Web page when users are viewing issues in any state. For details, select the Default State form from the Mashup Explorer. From the Form or Property Editor, select WebPageWidget. The Wikipedia URL appears in the URL box.
Administrators
The administrator is responsible for the daily running of Serena Business Mashups. The tools that the administrator uses are primarily Mashup Manager and either Web Administrator (for On-Demand) or Mashup Administrator (for On-Premise).
Key tasks that administrators perform on this mashup include:
- Assigning users to roles
- Assigning default values to fields for a project
- Adding new projects
- Assigning privileges to a user
The following sections give a high level overview of information necessary for an administrator.
Roles for Issue and Defect Tracking
End Users
The end user is the Serena Business Mashup user who works with the deployed mashup through the Serena Web Interface.
The main tasks of the end user include:
- Submitting, transitioning, and updating items.
- Searching for items.
- Creating and running reports on existing items.
For information on user tasks, refer to the Online Help found in the Serena Web Interface.
The following section describes using the workflow from an end user perspective. This overview helps administrators and mashers understand why the workflow was designed the way it was.
Exploring the IDM Workflow
This procedure requires that you have deployed the default Issue Defect Management application into your environment as described in Importing and Deploying.
This procedure demonstrates how you can use the mashup to track an issue or defect. It shows one path through the workflow, with brief descriptions on alternate paths. In this procedure, you will create an issue and transition it through development and testing.
Troubleshooting
The following sections will help you to solve problems associated with implementing this mashup.
If you need additional information to resolve your problems, refer to the following resources:
- Serena Knowledge Base
- Serena Business Mashups Forum
- Serena Business Mashups Documentation
- Serena Support
Installation Issues
Below are some problems that you may experience when installing and deploying your mashup.
Refer to the Serena Support site and knowledge base for additional information on solving installation problems.
Warning When Importing into Mashup Composer
When importing into Mashup Composer, you get a warning that the mashup already exists. This can be due to a previous mashup being built on the same workflow as the new mashup.
If you try to import a mashup that you have already imported on the same computer, Mashup Composer warns you that the version in the Local Cache will be overwritten with the imported mashup. If you import the mashup anyway, any work you've done on that workflow will be lost.
If the mashup has also been checked in to the Mashup Repository, Mashup Composer first warns you that, on checking it in, you will have to choose whether to check in new versions of its design elements created from the local mashup, or overwrite the local mashup with the latest versions of its design elements from the repository.
To avoid loss of any work you've done on the local copy:
- Cancel the import.
- Export the local mashup to a file.
- Restart the import process. You can then access the exported mashup definition file later to recover the work.
Primary Tables with the Same Name
Applications and tables in your deployment environment must be uniquely named. If the deployment fails because an application or table in the environment already has the same names as one of the applications or tables in the mashup you're deploying, rename the conflicting table in Mashup Composer, and try again.
More Information
- Getting Started with Business Mashups (http://help.serena.com/mashups/prebuilt/gsg/index.htm)
- Serena Business Mashups Tutorials for Serena Business Mashups 2009 (http://www.serena.com/serenacourseware/mashups2009/)
- Serena Business Mashups Forum (http://community.serena.com/hives/3ffd5c8258/summary)
- Serena Business Mashups Documentation and Online Help (installed with Business Mashups)
- Serena Support (http://support.serena.com)