Welcome to Serena® Business Mashups
This document describes how to install and set up Serena® Business Mashups, a product of Serena Software, Inc.
Serena Business Mashups enables you to easily create workflows, applications, and mashups. Without requiring technical IT resources, Business Mashups enables business users to build mashups that coordinate execution across applications, platforms, and teams.
Who Should Read This Document?
This document is intended for users who are considering purchasing and implementing Business Mashups. It describes the simplest installation scenario so that users can get up and running quickly. It also provides an introduction to mashups and how to get started with the sample mashups that Serena provides.
For detailed information, refer to the Serena Business Mashups documentation.
Understanding Mashups, Applications, and Orchestrations
To understand and use Business Mashups, you have to understand mashups, applications, and orchestrations. Each of these concepts denotes containers or collections of elements, and each performs a specific function to help you effectively manage your projects.
-
Mashup – A mashup can contain multiple applications and orchestrations, which emit mashup events that execute activities in other tools or applications. A mashup may also contain the Global Application, which contains core database elements, such as system auxiliary tables, and design elements that are not unique to a single mashup, such as JavaScripts.
-
Application – A collection of elements that work together to solve a business requirement, such as managing a team's work tasks or tracking customer support calls. Applications typically contain workflows, fields, forms, roles, projects, reports, and notifications. Once applications are deployed as part of a mashup, they can be configured for your runtime environment using Mashup Administrator. Applications can reference orchestrations.
-
Orchestration – Orchestrations define the interaction of systems and Web services. System-based operations, such as BPEL processes, can be arranged into an orchestration workflow using Mashup Composer. Orchestration workflows can then be linked to mashup events and called by transitions in applications.
In essence, a mashup is a container for multiple applications and orchestrations. Storing multiple applications in a single mashup eases the process of creating and maintaining relationships between applications. For example, you may create relational fields between two applications, which means that these two applications are closely linked and should be treated as a single unit. Using a mashup lets you be sure to deploy the two applications simultaneously.
Understanding the Mashup Design Process
Serena Business Mashups introduces a robust process for creating and maintaining your mashups and applications.
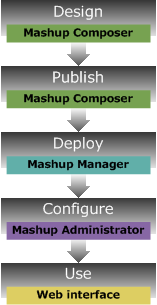
There are five main steps to the process, allowing for control and ease of use. They are design, publish, deploy, configure, and use. Each of these steps occurs in a specific Business Mashups component.
The first step is design. All design tasks take place in Mashup Composer. Application and workflow designers use Mashup Composer to create and edit existing applications and workflows. These changes occur outside the runtime servers, which means that the changes are not applied immediately. The changes have to be published and deployed to the server before the changes will be active.
After the design step, you publish the mashup. This step is performed from Mashup Composer. Publishing takes the completed mashups, moves them into the Mashup Repository, and makes the mashup visible in Mashup Manager. The published mashup is versioned in the database, meaning that the particular set of changes is saved in the database as one version. Administrators can decide which of these versions of a mashup to deploy to the server. This additional versioning feature gives administrators the ability to restore a previous version in case a change has undesired effects.
You deploy the mashup to move the mashup and its applications to Serena Mashup Server. The deployment makes the mashup and its changes active and ready for configuring by the administrators. Depending on how you configure your environments, you can deploy from Mashup Composer or Mashup Manager.
In the configure phase, administrators use Mashup Administrator to configure the deployed mashup. Configurations include two main aspects, permissions and project configuration. Administrators configure the permissions for users and groups, giving them the necessary privileges to perform actions in Business Mashups. Administrators also configure projects and permissions for each project in Mashup Administrator.
After the mashup is configured with the correct projects and permissions, your applications are ready for use. Users can access the mashup through the Business Mashups Web interface.
The following diagram shows the mashup workflow:
About Serena Business Mashups Components
| Component | Description |
|---|---|
| Mashup Composer | Mashup Composer is the design client of Business Mashups. In this client, mashup designers can create mashups from start to finish, determining workflow, tables, fields and forms. Mashup designers can create both applications and orchestrations in Mashup Composer, linking the different processes together within a mashup. The completed mashup is then published to the Mashup Repository. |
| Mashup Manager | Mashup Manager enables developers and administrators to deploy and promote mashups. Mashup Manager hosts the Mashup Repository, which provides versioning capabilities for design elements created in Mashup Composer. |
| Mashup Administrator | This is the client application that mashup administrators use to configure applications, assign roles to users and groups, set overrides, and view the workflows designed in Mashup Composer. Mashup administrators also perform tasks related to projects, folders, and notifications. |
| Web Administrator | This portion of the Web interface enables you to perform basic configuration tasks, such as adding user accounts. |
| Application Engine | This is the running Business Mashups instance to which mashups (previously created in Mashup Composer) are deployed and implemented. |
| Web interface | Using the Web interface, mashup users access and use the mashup created in Mashup Composer. In the Web interface, mashup users track primary items, run reports, manage auxiliary tables, and perform limited administrative tasks. |
| Orchestration Engine | This is the service orchestration environment to which Web service flows are deployed. Workflows designed in Mashup Composer can specify a Web service flow to start in response to certain occurrences in Business Mashups. Event Manager, a participant in the service orchestration environment, initiates the appropriate Web service in response to such occurrences. |
| Single Sign-On Engine | Single Sign-On Engine enables users to log on to one Business Mashups component and be recognized in the other components. More importantly, SSO also enables mashup orchestrations using Web services to use security tokens for unattended execution. See the Serena Business Mashups Installation Guide and the Serena Mashup Administrator Guide for more details. |
Downloading and Installing
You can download Business Mashups in its entirety, which includes all components listed previously, or you can download just Mashup Composer. If you download Mashup Composer, you can design applications and mashups, but cannot publish them to the Business Mashups Repository or deploy them to the Application Engine for running and testing.
These simple scenarios could help you decide what to download and install.
Install only Mashup Composer if:
- You want to design your own workflow without publishing and deploying it to the Web interface.
- You want to explore the concept of roles and how they can be used to restrict workflow transitions.
- You want to design custom forms, and are satisfied with previewing them in Mashup Composer.
Install Business Mashups if:
- You want to access and use the sample mashups in the Web interface.
- You want to evaluate the end-to-end process of designing, publishing, and deploying mashups.
- You want to modify the sample mashups and view your changes in the Web interface.
- You want to explore the Mashup Repository, which is used to store and track versions of design elements created in Mashup Composer.
Installing Serena Mashup Composer
Follow these instructions to install Mashup Composer. Once installed, Mashup Composer provides links to tutorials and other useful information to help get you started with your evaluation.
If you plan to install Mashup Composer and Serena Mashup Server, skip this section and go to Installing Serena Business Mashups
To install Mashup Composer:
| Step | Task | Example |
|---|---|---|
| 1 | Launch the Serena Mashup Composer installer.
Accept the license agreement. |
|
| 2 | Choose the location path to install Mashup Composer and whether to create desktop shortcuts. | 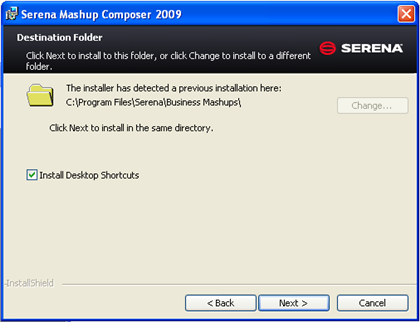
|
| 3 | Click Install on the summary screen to install Mashup Composer. | 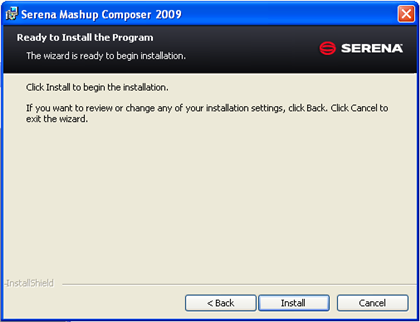
|
| 4 | Click Finish to close the installer dialog. Mashup Composer is installed and links are added to your Windows Start menu. | 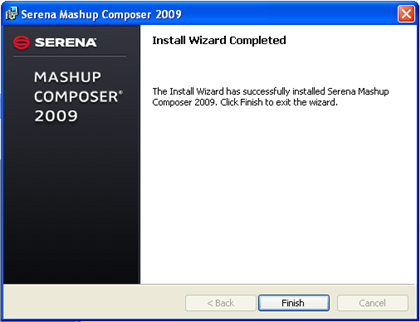
|
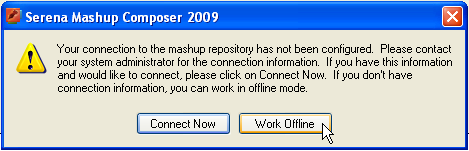
| 5 | Launch Mashup Composer from the Windows Start
menu and click
Work Offline.
The Mashup Repository is not available when you install only Mashup Composer. |
|
| 6 | To get started evaluating Mashup Composer, you can try building an Application Mashup or creating a custom form. Be sure to check the online demos and documentation for more information. | 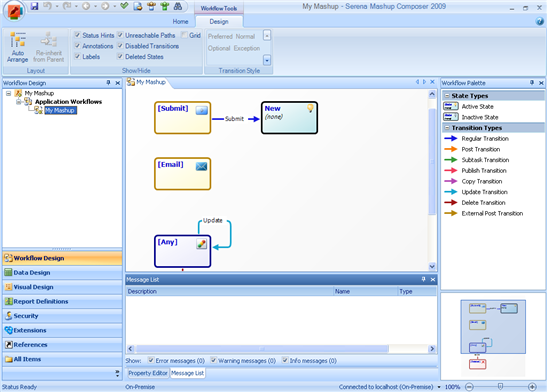
|
Installing Serena Business Mashups
For evaluation purposes, these instructions direct you to install all server and client components on a computer running Windows XP. To get up and running quickly, you will also install the Business Mashups sample database and Microsoft SQL Express on this computer.
You must meet the following software and hardware requirements:
- Microsoft Windows XP SP2
- Microsoft Internet Information Services (IIS) 5
- Microsoft .NET Framework 3.5
- Minimum of 2.2 GB operational disk space
This configuration is for evaluation purposes only. For instructions on installing on the supported production platforms, databases, and Web servers, refer to the Serena Business Mashups Installation Guide.
If you plan to only install Serena Mashup Composer, skip this section and go to Installing Serena Mashup Composer.
To install Serena Business Mashups:
| Step | Action | Example |
|---|---|---|
| 1 | Launch the Serena Business Mashups installer. Accept the license agreement. | |
| 2 | Choose the location to install the product. | 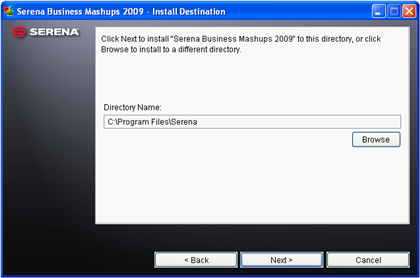
|
| 3 | Select Custom for the type of installation. | 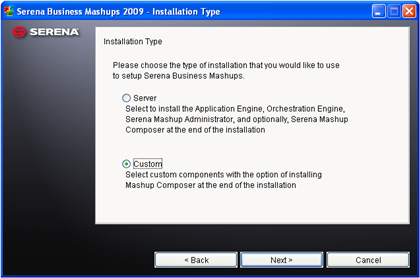
|
| 4 | On the custom screen, accept the default product selections and installation types. | 
|
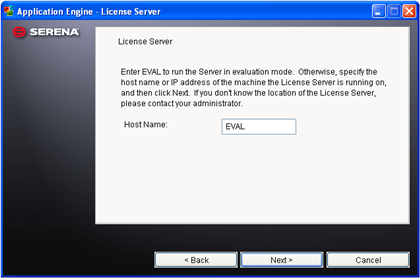
| 5 | Type
EVAL to install an evaluation copy of
Business Mashups.
The evaluation period allows you to use Business Mashups for thirty days. |
|
| 6 | Choose to install the sample database. | 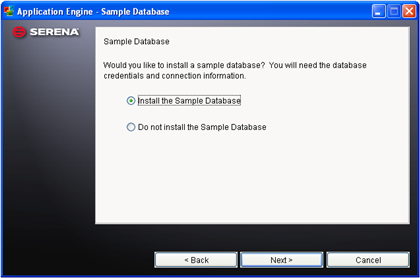
|
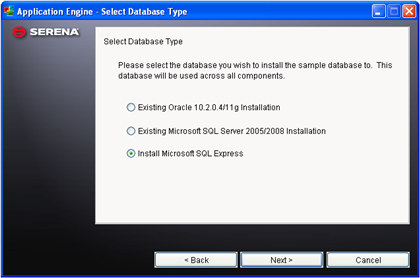
| 7 | If you do not have SQL Server or SQL Express
installed, select
Install Microsoft SQL Express.
The sample database will be installed into the new installation of Microsoft SQL Express. |
|
| 8 | Enter a password to be created for the Microsoft SQL Express database. The password must have a mixture of uppercase text, lowercase text, and numerals. Note the default database user is sa, the default port is 1433, and SBMSQLEXPR is the default instance name. If you already have SQL Server or Express installed, enter your existing database connection information. | 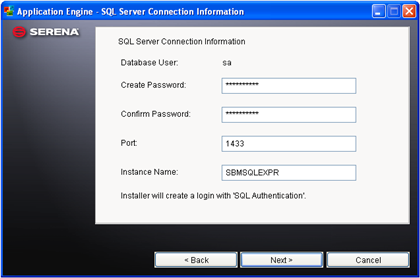
|
| 9 | Choose Default Web Site for your Web server. | 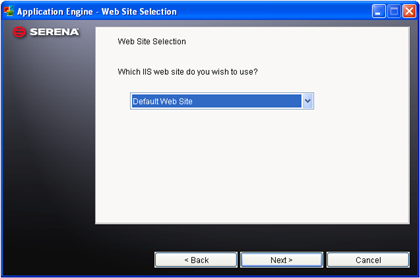
|
| 10 | The installer will automatically start the Serena Common JBoss service after the installation is finished. Accept the default port values for Serena Common JBoss. | 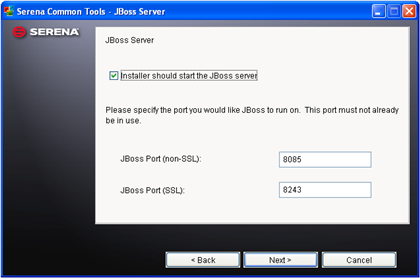
|
| 11 | Enter POP3 mail server information or simply click Next. The POP3 account is used to receive e-mails which can trigger events in the Event Manager. This allows external sources to trigger events in Business Mashups. | 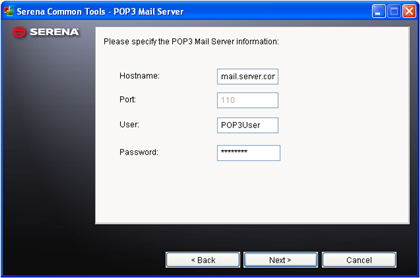
|
| 12 | Enter SMTP mail server information for Serena Common Tools or simply click Next. The SMTP server is used to send e-mails when the Event Manager has unsuccessfully processed an event. You can provide a "From" address for these e-mails. | 
|
| 13 | Accept the default values for the Single Sign-On dialog. | 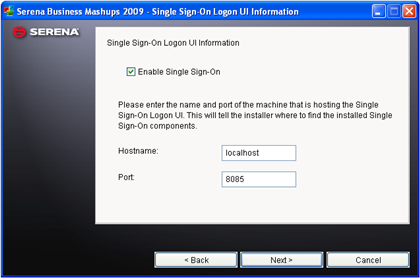
|
| 14 | Click Install to install the product. | 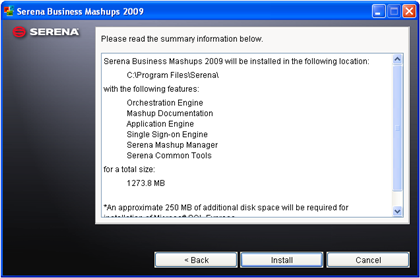
|
| 15 | Allow the installation to complete. A Post Install Summary dialog will appear and provide you the option of installing Mashup Composer. Select the Install Mashup Composer checkbox and click Finish to install Mashup Composer. This will launch the client installer, which contains Mashup Composer. See Installing Serena Mashup Composer for more information. | 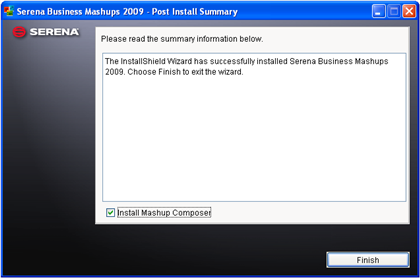
|
Once the Mashup Composer installation completes, continue to the next section to set up IIS.
Configuring Internet Information Services (IIS)
The following instructions describe the specific settings needed for IIS 5 to work with Business Mashups. For details on configuring IIS 6 on Windows 2003 and Windows 2000, refer to the Serena Business Mashups Installation Guide.
You can skip these instructions if you only want to install Mashup Composer.
To configure IIS 5 on Windows XP:
| Step | Action | Example |
|---|---|---|
| 1 | Right-click the Program Files\Serena\Business Mashups\Application Engine directory and then select Properties. | |
| 2 | On the Security tab, select the Internet Guest Account (IUSR_machinename), and then select the Allow Full Control check box. | 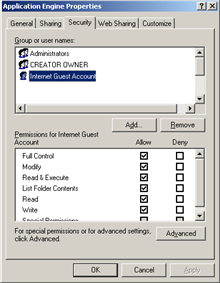
|
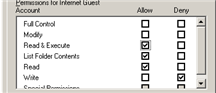
| 3 | Repeat these steps for the
WINDOWS and
WINDOWS\system32 directories, but grant only
Read & Execute permissions for the
Internet Guest Account (IUSR_machinename).
Note: The
List Folder Contents and
Read permissions are also granted with
the
Read & Execute permissions.
|
|
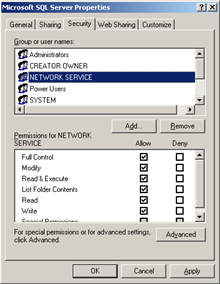
| 4 | Repeat these steps for the C:\Program Files\Microsoft SQL Server directory, but grant full permissions to NETWORK SERVICE. |
|
Verifying Installation
After you have installed all the components, verify that they are installed correctly by accessing each component. If you have problems connecting to a component, restart IIS and Serena Common JBoss:
-
To restart IIS, open a Command Prompt window and type IISReset
-
To restart JBoss, stop and start the Serena Common JBoss service from the Windows Services Manager (Control Panel > Administrative Tools > Services)
Application Engine and Web Interface
-
Navigate to the following URL:
http://machineName/tmtrack/tmtrack.dll?
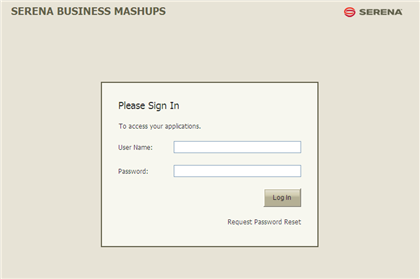
The Serena Business Mashups login page opens.
-
Log on as joe (no password). Click Exit to close the session after you have verified you can log in.
Web Services
-
Navigate to the following URL:
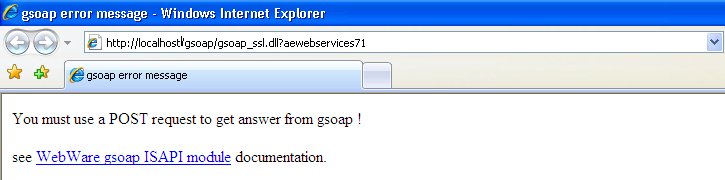
http://machineName:port/gsoap/gsoap_ssl.dll?aewebservices71
-
Verify that the message, "You must use a POST request to get answer from gsoap" appears.
Mashup Manager
-
Navigate to the following URL:
http://machineName:8085/mashupmgr
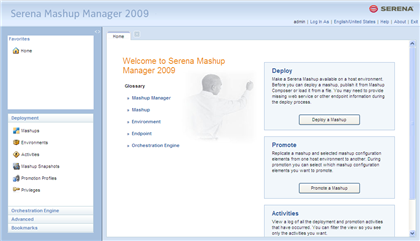
The Serena Business Mashups login page opens.
-
Log on as admin (no password). The Mashup Manager welcome page should appear. Click Exit to close the session after you have verified you can log in.
Mashup Composer
-
Launch Mashup Composer from the Windows Start menu.
-
If you are prompted to connect, click Connect Now.
Otherwise, click the
 button in the upper left corner of the Mashup
Composer window, and then click
Mashup Composer Options.
button in the upper left corner of the Mashup
Composer window, and then click
Mashup Composer Options. -
On the Repository tab, enter your machine name in the Machine Name field. In the Port field, enter 8085. Enter admin in the User Name field. Leave the Password field blank.
-

-
Click Test Connection. If the connection succeeds, you are ready to start developing applications.
Getting Started
The sample database, which was created during installation, includes a set of mashups that you can evaluate and modify in Mashup Composer. After modifying a mashup, you can publish and deploy it so that you can view your changes in the Web interface.
To modify the sample mashups:
| Step | Action | Example |
|---|---|---|
| 1 | From the Mashup Manager navigation pane,
select
Environments.
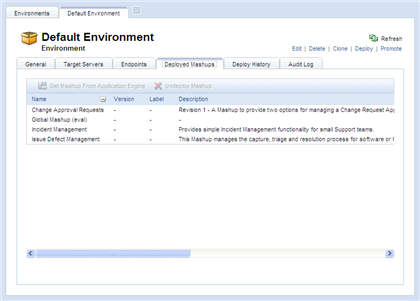
Click Default Environment and then click the Deployed Mashups tab. |
|
| 2 | Select the mashup that you want to modify and click Get Mashup From Application Engine. | 
|
| 3 | In the dialog box that opens, provide a label name (for example, 1.0) and click OK. | 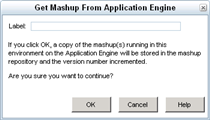
|
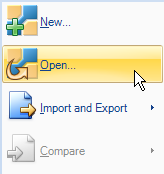
| 4 | In Mashup Composer, click the
button in the upper left corner of the window,
and then select
Open.
|
|
| 5 | In the
Open Mashup dialog, choose
Look In:
Mashup Repository. The mashup you selected
in step 2 should appear. Select the mashup and click
Open.
Note: You must have already connected to the Mashup Repository.
For details, refer to
Verifying Installation.
|

|
| 6 | Modify the mashup and click
Save Locally to save changes to your local
machine.
For details on working with a mashup, refer to the online help in Mashup Composer. |
|
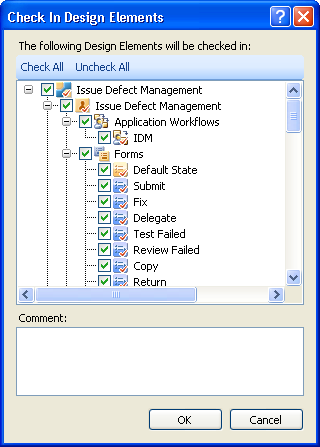
| 7 | To check your changes in to the repository,
click the
button in the upper left corner of the window,
and then select
Mashup Repository >
Check In All.
Enter a comment (optional) and click OK. |
|
| 8 | Click the
button in the upper left corner of the window,
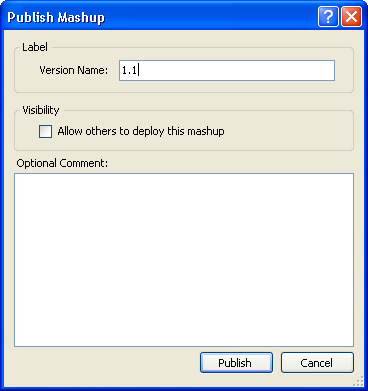
and then select
Publish.
Enter a comment (optional) and click Publish. |
|
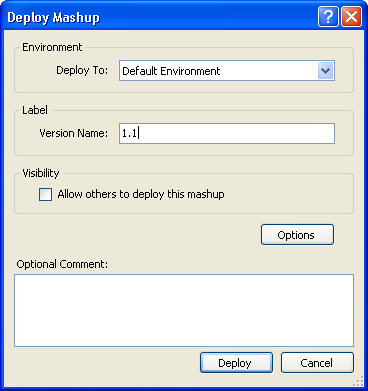
| 9 | Click the
button in the upper left corner of the window,
and then select
Deploy.
The Default Environment should be selected. Click OK. |
|
| 10 | Once the deployment completes, a message
appears in the Message List.
To show the Message List in Mashup Composer, go to the Home tab, Common Views area, and click Message List. |

|
| 11 | You can now view your changes in the Web
interface at:
http://machineName/tmtrack/tmtrack.dll? |
|
| 12 | You can also use the Quick Deploy option instead of checking in, publishing, and then deploying. The Quick Deploy option performs all those same steps and uses the same deployment settings. Once the Quick Deploy is finished, the mashup elements are checked back out so you can continue working on your mashup. | 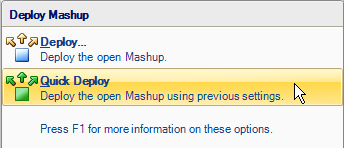
|
Installing Additional Mashups
The ability to load and use other existing mashups is a powerful feature, which gives you great flexibility by finding existing mashups that contain the features that you need. You can download mashups from Mashup Central via Mashup Composer by clicking the Composer Button and selecting New. From there, you can tailor the mashup in Mashup Composer to meet your company's needs. Using existing mashups reduces the amount of time that you have to spend designing your mashups.
There are several existing mashups such as Issue Defect Management (IDM), Employee Time-off, as well as Change Requests and Asset Tracking and Procurement. Some of the existing mashups let you integrate Business Mashups and other third party products, such as the SalesForce.com "Sales Discount Approval" mashup. Explore Mashup Central and discover existing mashups that meet all your business needs.
Resources
- Getting Started with Business Mashups (help.serena.com/mashups/prebuilt/gsg/help.html)
- Serena Business Mashups Web-based Training (www.serena.com/serenacourseware/mashups2009/)
- Serena Business Mashups Documentation (installed with Business Mashups)