You must add status values before creating gates. See Using Version Statuses and Using Snapshot Statuses.
To create a gate:
- Navigate to Management > Applications > [select application] > Environments > [select environment] > View Details > Gates.
- Click the Edit button on the gates page. The Edit Gates dialog box appears.
-
Select a value.
Note: To view and define the available statuses, see Defining Statuses.
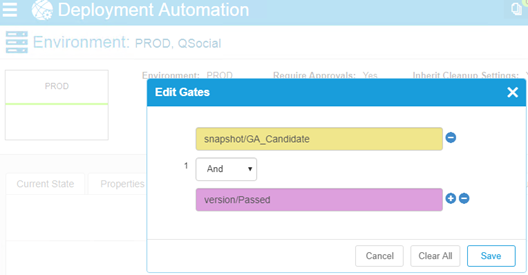
The selection list includes both version and snapshot statuses. Selecting a value provides both And and Or selection boxes as shown in the following figure.
Gate Definition
To use And:
Click the + beside the latest selection and then select And in the And/Or selection box. This adds an additional value to the condition that must be satisfied. For example, defining the gate Passed Tests And Latest means that only component versions with both statuses, Passed Tests and Latest, satisfy the condition and can be deployed into the environment. A single condition can have as many And-ed values as there are statuses defined.
To use Or:
Click the + beside the latest selection and then select Or in the And/Or selection box. Using the Or box adds an additional condition to the gate. Additional conditions are defined in the same way as the first one. A gate with two or more conditions means the component will be deployed if it meets any of the conditions. For example, if you define the gate Passed Tests Or Latest, a component will pass the gate if it has either status (or both). A single gate can have any number of conditions.
To remove a condition:
Click the - beside the latest selection.
- Click Save.
See Defining Statuses for more information about version and snapshot statuses.