You can design component processes to tell Deployment Automation what to do when you deploy components.
You design processes using Deployment Automation's process editor. The process editor is a graphical editor that enables you to drag process steps from a menu of steps onto the design space and configure them immediately. For component processes, you select from a menu of Utility steps and plugin steps. As you place additional steps, you visually define their relationships with one another.
The process designer with a component process is shown in the following figure.
Component Process Design
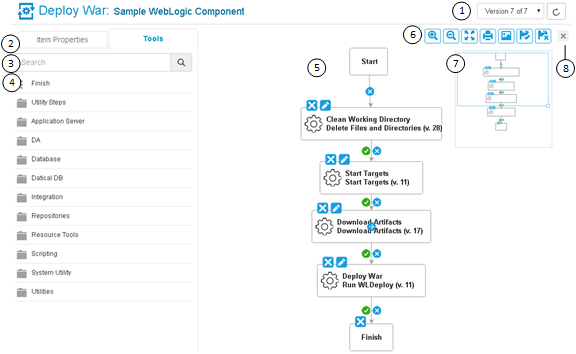
- Select the version of the process design.
- Select the Tools tab to select process steps. The Item Properties tab is automatically put in focus when you define or edit a step.
- Use the Search box to find a step by name.
- Select and drag plugin steps to the design area to add them to your process.
- Connect process steps and edit or delete existing steps or connectors.
- Select from the following in the process designer tools palette:
- Zoom In
- Zoom Out
- Actual Size
- Poster Print
- Save
- Cancel
- Use the thumbnail view to move the whole process design around in the
design area. For example:
- Drag its corner inward and move it over parts of the process design you want to zoom in on.
- Drag its corner outward again to zoom out.
- Click the Actual Size tool in the tools palette to return the process design to its original size.
- Click x to close the overlay and return to the main navigation.