Connections control process flow. The originating step will process before the target step. Creating a connection between steps is a simple process; drag a connection from the originating step to the target step. Connections are formed one at a time between two steps, the originating step and the target step.
To create a connection:
-
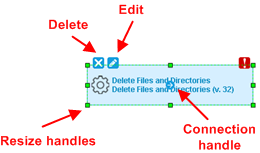
After you have added your steps, the graphical design tools
available for each step except for the
Start step, which cannot be deleted or edited,
is the same and provides the graphical design tools, edit, delete, resize, and
connection handle, as shown in the following figure.
Graphical Design Tools
-
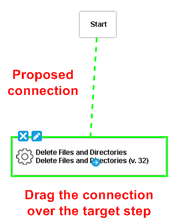
Move your cursor over the step that you want to use as the
connection's origin.
The cursor changes to the connection handle.
Connection Handle

-
Drag the connection tool over the target step.
When the target step is highlighted, release the mouse to create a connection.
Connecting the Steps
-
Release the connection tool over the target step to complete the
connection. Continue with additional steps as needed.
Completed Connection
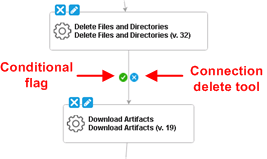
Each connection has a connection delete tool, conditional flag, and might have others depending on the originating step. Remove a connection by clicking the delete tool.
-
After configuring the steps and their properties, to save the
process design, in the process designer tools palette, click the
Save icon (
 ); if you don't want to save your changes, click
the
Cancel icon (
); if you don't want to save your changes, click
the
Cancel icon ( ).
).
If saved, the step is on the design space and ready to be connected to other steps.
-
To close the process designer overlay and navigate elsewhere,
click the Close icon (
 ) in the
upper right of the overlay.
) in the
upper right of the overlay.