After you have scheduled the deployment, you are ready to run the deployment. This initiates the processes that you have already configured and scheduled.
Prerequisites: You must have completed the turnover configuration, including adding the deployment tasks.
Starting the Deployment
To run a turnover deployment:
- Select the turnover you want to deploy.
- Move the turnover through its lifecycle until the Start Deploy option is available.
- Click Start Deploy and enter any comments needed in the Message Log field.
- Check the deployment status.
- After the deployment has been verified, click Deployment Verified and enter any comments needed in the Message Log field.
- After testing is complete, click Complete Testing or Failed Testing and fill out the resulting form as needed.
The deployment is initiated and the deployment tasks associated with the turnovers begin.
Checking Deployment Status
To check the status of the deployment:
- Select the turnover's Deployment Tasks tab.
- Filter the list of deployment tasks by environment or deployment run.
- Refresh the status using the More > Reload Item option until you see a status icon in the Status column.
- For more information, move your cursor over the icon. The status of
the task differs based on the type as follows:
- Manual deployment tasks stay in the Active status until the submitted task is addressed by its owner. Move your cursor over the title column for a task to see the View icon. Click either the Status or View icon to view the pending task.
- Automation deployment tasks show the status as the process for the task is executed and information is retrieved from Release Automation.
If the deployment fails, you should investigate and fix whatever caused the problem, such as the configuration in Release Automation, a selection or sequencing problem in the deployment tasks, or configuration in the target environment itself. If the environment allows redeployment, you can redeploy the turnover to the same environment. If it doesn't allow redeployment, you must return the turnover to construction and progress the turnover back through the process from there.
Deploying to the Next Environment
Use the provided options to transition the turnover through the deployment process. When the deployment is marked complete for an environment, a list appears with the available environments for the next deployment. You will see the upcoming optional and required environments listed, and you can select the one to which you want to deploy, skipping the optional ones if desired. Start the deployment in the next environment and continue until you have completed the deployment to the last environment in the deployment path.
When the deployment is completed in the last environment of the deployment path, a message appears telling you that the turnover has been promoted to all environments and the turnover is now complete.
Viewing the Deployment Runs for the Path
The deployment information about each environment in the deployment path for which you have run a deployment is shown in a tabular report below the deployment path. An example is shown in the following figure.
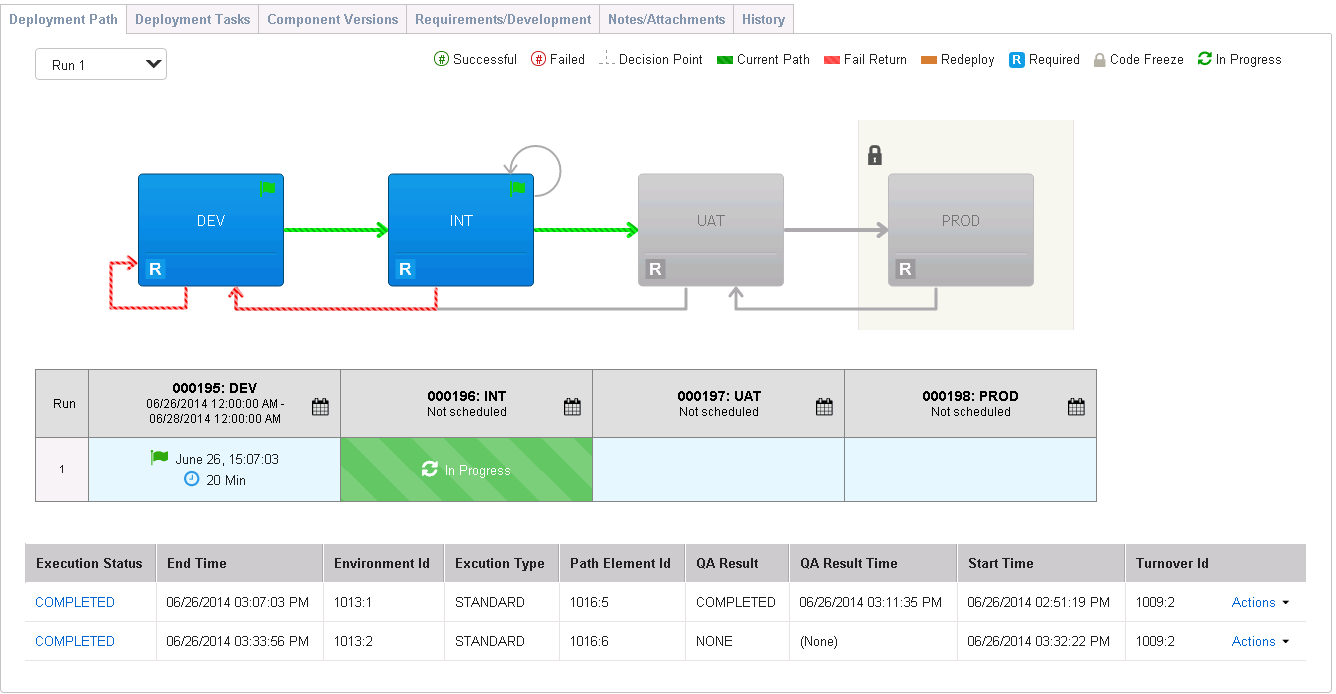
If you do not see the complete report below the deployment path and the environments to which you have deployed are not shown in color, refer to Troubleshooting the Deployment Log.
Related Topics