Setting up a Relational Grid
Before you begin, determine the application and table that are associated with the relational field that you want to display using the grid. You can find these details on the Options tab of the relational field.
To set up a relational grid:
-
Create a
Report Definition in
SBM Composer.
- In the application you noted earlier, right-click on the associated table, and then select Create new Report Definition for this table.
- Drag fields from the Report Palette to define the columns that you want to display, the sort order to apply, and create a search filter to limit the items that are returned in the report.
- Optionally, use a query at runtime parameter in your search filter to dynamically filter the results at runtime.
-
Alternatively, create a report in
SBM Work Center.
- In SBM Work Center, create the report you want to reference.
-
Save the report, and in the
Save As section on the page, type a
report name in the
Title box, and type a reference name in
the
Reference Name box. The reference name
must be unique within an application, but can be the same as the report title.
Restriction:
- The Reference Name box is only present if you have "Regular User" product access with the Remote Administration privilege (granted in SBM Application Administrator) or if you have "Managed Administrator" product access with the Deploy privilege (granted in SBM Application Repository).
- This box is disabled if the Privilege Category is Private.
- In the confirmation message, click Reference Link. A message opens that contains the report URL.
- Press CTRL+C to copy the report URL to the Windows Clipboard.
-
Configure the relational grid widget.
- Drag and drop a Relational Grid widget on to your form.
- On the General tab, click Configure.
- Select the relational field and report definition that you defined earlier, or paste the report URL if you created a report in SBM Work Center. If the target table is in a different process app and the application has not been referenced, you must add an application reference to make the report available. For details, see Creating Application References.
- Select Automatically bind compatible parameters to have SBM Composer attempt to map query at runtime parameters for you.
- Click OK to finish.
-
Configure the report query to filter results.
- Open the Query tab.
- Select a project constraint to limit results to a particular project.
-
Map controls to the widget to enable dynamic filtering. You
can add
EditBox and
Button controls to the form, and then
map a query at runtime field in your report to the EditBox. This creates a
search field that exposes the query at runtime capability.
For example, if your report contains a search filter like:
Title contains '(Query at runtime)'
Add an EditBox (named EscalatedIssue in this example), and then map it to the Title field:
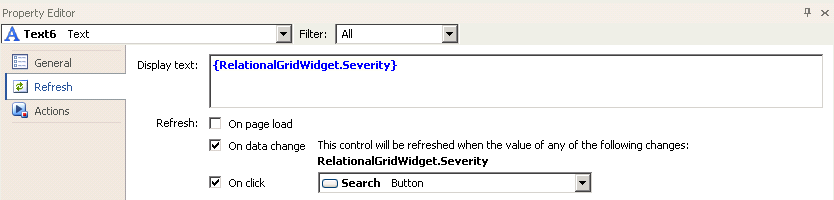
- Open the Refresh tab, select the button control that you added, and then select On click to refresh the widget when the button is clicked.
At runtime, when a user enters text in the search field and
clicks the button, the results will be filtered by the text that is entered.