The Editable Grid has two edit modes, Update only and All transitions. All transitions allows you to select from supported transitions for an item and submit items, while Update only mode uses the update transition when modifying items.
The following screenshot and list describes the actions on this screen.
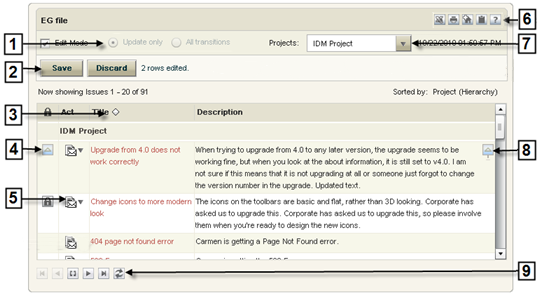
- Switch between edit and view modes.
- More...
- Save or discard changes.
- More...You can undo changes to all items that have not been saved by clicking Discard. These items are marked with the Modified icon (
 ).
Tip: To save and discard changes to individual items in the grid, right click on the Modified icon () in the far left corner of the row,
and then select
Save or
Discard.
Note: If you modify items in the Editable Grid and then navigate away from it without saving or discarding your changes, the modified items remain locked until the timeout period set by your administrator expires or the locks are manually removed. You can remove your own locks, but an administrator must remove locks created by other users.
).
Tip: To save and discard changes to individual items in the grid, right click on the Modified icon () in the far left corner of the row,
and then select
Save or
Discard.
Note: If you modify items in the Editable Grid and then navigate away from it without saving or discarding your changes, the modified items remain locked until the timeout period set by your administrator expires or the locks are manually removed. You can remove your own locks, but an administrator must remove locks created by other users.
- Resize and sort columns.
- More...Resize columns in the report by dragging the column separators, or by right-clicking on a column and selecting Expand Column. Select column headings to sort items based on column data. To return columns to their original size, right click in any column and select Reset Columns.Note: When you create the report, you define the column width, the default sort options, and whether columns are dynamically sortable. See Sorting Options for more information.
- View item status.
- More...
The left column shows an icon which represents the status of the item, such as if it is locked for editing or it has been modified. See the Legend Icons table for more details of each icon.
- Add notes, attach files, add links, and view
item details.
- More...
Add notes, attach files, add URLs, send emails, and create item links by clicking Item Actions
 . You can also view the item's
state change history by selecting
Show State Change. You can also choose to
View Item, which will allow you to view
the details of the item.
. You can also view the item's
state change history by selecting
Show State Change. You can also choose to
View Item, which will allow you to view
the details of the item.In Update mode, when an item is locked after you have edited it, the Edit All Fields selection becomes available from the Item Actions
menu. This option displays a
popup which lets you edit all of the fields within an item.
- Choose from
Report Options.
- More...Depending on your privileges, icons for editing the report, saving it as your home page, copying the URL, and displaying the report in a printable view are located in the upper right corner.Note: The Printable View opens in the Item List view rather than the Editable Grid. In addition, the Details view and Export to Excel are not available for the Editable Grid.
- Navigate to items in a specific project.
- More...
If the report contains items from multiple projects, selecting the specific project in the drop-down list navigates to the results for that project.
- Icons indicate changes and status.
- Changes and edits in the Editable Grid are indicated by icons. The following table describes the meaning of each of the Editable Icons.
- Navigate through report results.
- More...Select from the Paging Icons to navigate through multiple pages or show all results. Requery updates the list to add or remove items as they are changed.Tip: Use the Items Per Page setting in your user profile to change the number of items listed on each page.