The My Calendar page overlays the content pane and displays a private calendar view to which you can add one or more Calendar reports.
Note: You must have privileges to create and view Calendar reports in
order to add them to the
My Calendar view.
To add a Calendar report:
-
Click the calendar icon (
 ) located next to your user
name in the upper right corner.
) located next to your user
name in the upper right corner.
- Click the Add button. The Add Calendar dialog box opens.
- Select an application from the Application drop-down list.
- Enter all or part of a Calendar report name, and press Enter or click the search icon.
-
Select the Calendar report to add. To override the report's
existing color scheme, click
(Default) and pick a color to use for all
events in the report.
Note: Overriding the color is useful if different colors are used for the same field values in different reports. For example, if active and inactive are different colors in different reports, you can override the default colors and apply a new color to each report to simplify the view.
- Click Save.
The selected reports are displayed on your calendar.
Use the following navigation and display options in the My Calendar view:
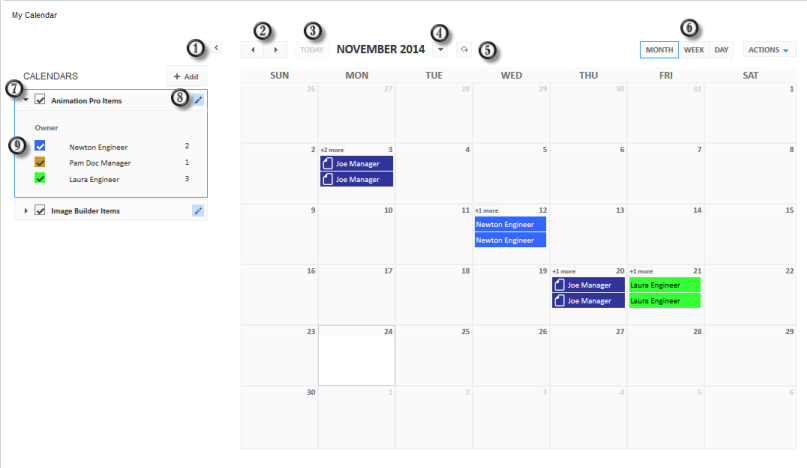
- Click the left arrow to hide the Calendars pane. Click the right arrow that appears while it is hidden to view the Calendars pane again.
- Use the left and right arrows to shift to the next month, week, or day (depending on which option is currently selected in the Initial Time Period setting that is designated in the Calendar report).
- Click Today to view the current day on the calendar.
- Click the down arrow next to the current month, week, or day to display a specific date using a calendar.
- Click the reload button to refresh the calendar's display. This means if a new item meets the report criteria, it will appear in the report. The current display options are not changed.
- Change the calendar view to display by Month, Week, or Day by clicking the corresponding option above the calendar.
- The list of Calendar reports appears on the left. Use the check box
next to the report name to show or hide each report. For example, if you want
to temporarily hide all change requests, clear the check box next to that
report.
Click the report name to expand or collapse its details.
- Click the edit icon to manage the display for a selected report. For example, you can choose to show only this report, change the color, or remove the report from your calendar.
- Use the check box next to each event to toggle the display on or off. For example, if your Calendar report displays the Owner field as an event, you can clear the check boxes next to the user names that appear to temporarily hide items that are owned by those users.
In addition:
- Hover over a displayed item to view the item's details and the event date span of the item.
- In the
Month view, a number indicator (like
+3 more) appears at the top of days that have
additional items that can be viewed. Click the number that appears to switch to
the day view and display the entire list. Click
Month to return to the month view.
Tip: The number of additional items that are displayed depends on the current size of your browser. For example, if five items are currently displayed and you resize the browser to smaller size, less items are displayed and the indicator for the number of additional items to view increases.
- In the Month view, select a cell for a specific day and click Day to view the list of items for that day.
- In the Month view, if days from the preceding or following month are displayed, click them to display either the prior month or next month.
- Click the Copy to URL Clipboard icon to view and copy the URL for your calendar. Use this URL to reference your unique calendar.
- Click X to save your calendar and return to the content pane.