Time capture options enable you to record the amount of time you work on a primary item. If this feature is enabled by your administrator, you can record time when you are viewing an item or during transitions and updates. You may also be required to record time worked on an item before you can complete a transition, if you did not provide a time entry as part of an update while an item resided in a particular state.
Based on your privileges, you can only add, edit, or delete your own time entries, but not the entries of other users. Administrators may edit and delete entries on your behalf, however.
Entries can be in quarter-hour increments in a digit format (4.25 or 4,25, for example, to represent 4 hours and 15 minutes), cannot exceed 30 days, and cannot be in the future. Dates are shown in the date/time format selected in your user profile.
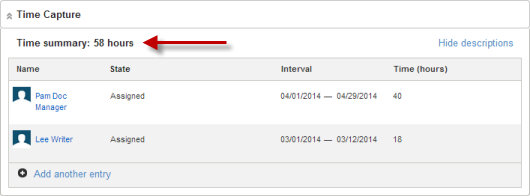
When you are viewing a state form, a time summary shows the total time captured for a particular item for all users. When you are working with a transition form, the summary show entries for the item's current state.
Accessing the Time Capture Options
- When you are viewing an item, Time Capture options are typically available at the bottom of the Change History section. If you cannot see the Time Capture section, verify that the Change History section option is enabled in your user profile or contact your administrator.
- When you are transitioning or updating an item, Time Capture options are available at the top of the form.
Time Capture options are collapsed by default. If you expand them, they remain expanded for all applications and projects.
Setting Time Capture Options
To add a Time Capture entry:
- Open the Time Capture options as described in the previous section.
- Click Add Another Entry.
- Select a state as follows:
- If you are transitioning or updating an item, the item's current state is the only option available. This ensures time is captured for the item's current state.
- If you are viewing an item, the list contains all states the item has resided in. Select a state to capture time for work you completed while the item resided in that state.
- Optionally, provide a description for the entry.
- Place your cursor in the first date box. A calendar opens. Select the start date, which must be the current day or a past date.
- Select an end date in the second date box.
- Type a number in hours representing the time you need to capture.
- To distribute the time across the selected dates, click the clock icon.
- Adjust the time distribution as needed. Time is automatically
distributed based on the calendar an administrator may have assigned to your
resource record. If a calendar is not assigned to your resource record, the
business calendar specified in your user profile is used to distribute time. If
a calendar is not specified in your user profile, distribution is based on a
24-hour/7-day calendar.
Note: If you change the time interval or total number of hours after you adjust the time distribution, time is automatically redistributed and you may need to adjust the distribution again.
- Click Save.
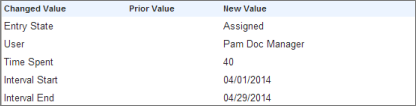
All Time Capture actions are recorded in the item's change history.
Reporting on Time Capture Entries
Summary reports enable you to see data related to time capture entries, including a total number of hours spent on a set of items based on report criteria.
To create a Summary report that shows Time Capture data:
- Follow the steps in Summary Reports to create a Summary Report.
- From the
Select Columns to Display (Groups by Unique
Values) list, select:
- ( Time Capture State )
- ( Time Capture User )
- Specify search criteria to filter the list of items returned by the report.
- In the
Additional Options section, add a column of calculations based
on what you want the report to show. For example:
Total Hours = Sum (Time Spent) returns the total number of hours spent on items meeting the report search criteria.
- Optionally, select the Include Items check box to include the Item ID and title of each item to the report results.
- Provide other report settings, using the information in Summary Reports for guidance.
- Save your report, and then run it.