The Backlog List is populated with work items based on backlog feeds added to your backlog view.
A single work item can be added to multiple backlogs. This enables you to create a hierarchy of backlogs, such as a team backlog, a release backlog, and a product backlog. A single work item may be accepted into each backlog, with different priorities and time frames depending on backlog needs.
- Accept work items into a backlog.
- Prioritize work items in a backlog.
- Sort and filter work items in the Candidates and Accepted lists.
- Remove work items that no longer apply to the backlog.
- Manage accepted work items that are later deleted.
- "Mass update" items in the Candidates and Accepted lists. For details, refer to Updating Multiple Work Items at Once.
Change history records are added to each work item that is accepted, removed, or reprioritized in a backlog.
Accepting Items Into a Backlog
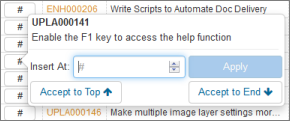
Initially, work items in a backlog are shown in the Candidates area of the Backlog List.
Backlog owners and co-owners can move items to the Accepted area of the list.
- Click Accept to Top.
- Click Accept to End.
- Provide a priority number to insert the work item at a specific location, and the click Apply
To remove items from the Accepted list, drag them back to the Candidates list.
Prioritizing Items in a Backlog
Backlog owners, co-owners, and collaborators can prioritize items in a backlog.
- Drag and drop items in the list to reorder them.
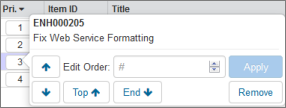
- Click the item's number in the first column, and then do one of the
following:
- Click the arrows to move the item to the new location in the list.
- Provide a new priority number to insert the work item at a specific location, and the click Apply
Sorting and Filtering Backlog Items
To sort items, click the column headers in the Accepted list. Sorting applies to items in the Accepted and Candidates lists.
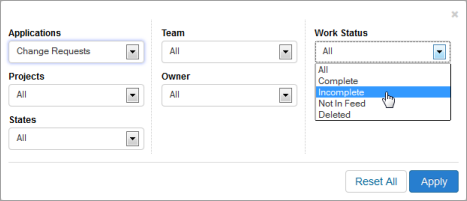
To filter items in the lists, click the Filter Lists arrow. You can then filter the candidates and accepted lists by application, project, state, team, owner, or work status (complete, incomplete, not in feed, or deleted).
Removing Invalid Items From a Backlog
At times, work items that have been accepted into a backlog may no longer meet backlog feed criteria. This typically happens if a feed is removed from a view or if the backlog feed criteria is changed.
Estimates provided for invalid work items continue to be calculated for progress reports until you remove the work items from the backlog.
Invalid work items in the backlog list are indicated by a red flag. Click the item to keep the item in the work item or remove it from the backlog. Estimates are automatically adjusted for removed work items.
Handling Deleted Items
Accepted items that are deleted from the system remain in the Accepted list as an indicator that an item in the backlog was deleted. Estimates and actuals are not included in backlog calculations, however.
Deleted items are only shown when no filter is applied to the list or the list is filtered by the Deleted work status.
To remove the item from the Accepted list, click the item's number, and then click Remove.