Key Benefits
- Enables you to view multiple Calendar reports in a single calendar view.
- Provides a unified view of all changes and releases for the enterprise.
Content Options
The following sections describe the configuration options available in the Content area for Multi-Calendar reports:
Selecting Calendar Reports
You can add any Calendar report that you have privileges to run to a Multi-Calendar report.
To select Calendar reports:
- Enter all or part of the name of an existing Calendar report and click the search icon. Matching results appear in the drop-down list.
- Click Add to add the Calendar report to your Multi-Calendar report. Click Remove to remove the report.
- Use the arrows to change the display order of each Calendar.
Selecting the Initial Date and Time Period
Determine the date on which the report should begin, and specify how the calendar should initially display.
To set the initial date and time period:
- Provide an Initial Date to start tracking. Click the calendar icon to select a specific date or click the Date/Time Keywords link to select a Date/Time keyword, such as Now or Startof_NextWeek.
- Set the Initial Time Period for the calendar to display. This controls whether the calendar initially displays in Days, Weeks, or Months.
Additional Options
The following options are available in the Additional Options area of the Multi-Calendar report form.
- Footer
Optionally, supply a footer for your report.Note: The footer renders some common HTML tags such as <i>, <b>, and <font>. However, this means that character entity references such as >, <, ", and & are not encoded in the footer. Therefore, in order to display <Some Text> in the footer, you must send the following encoded sequence: <Some Text>.
- Optional HTML
Template
This drop-down list contains HTML templates for customizing the look of your report. Provided templates include excellist.htm, which improves the display of Listing report results when they are exported (by right-clicking the report output and then selecting Export to Microsoft Excel), and massselectlist.htm, which provides buttons at the top of the page, enabling you to select or clear the check boxes for all items in the results list. Your administrator can customize report templates, and the templates in the list may or may not apply to the type of report you are creating. Select the template from the drop-down list.
Results
Multi-Calendar reports appear in a single frame in the content pane. The Multi-Calendar report display depends on which Calendar reports were selected on the report form.
Click on items that appear in the report to view an item's details. The item appears in a new content pane. After viewing, updating, or transitioning the item, click the X button to return to the original report.
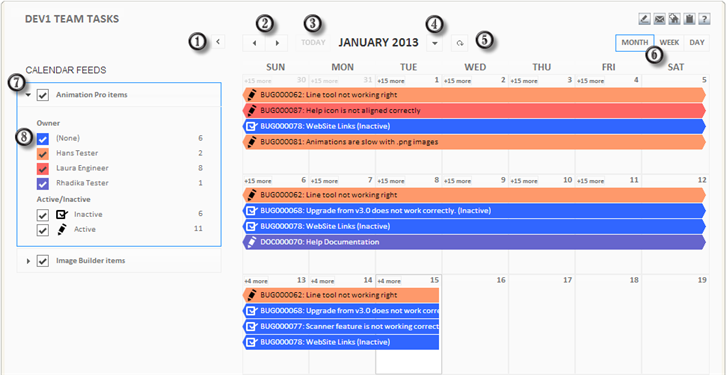
Use the following navigation and display options in the Multi-Calendar report:
- Click the left arrow to hide the Calendars pane. Click the right arrow that appears while it is hidden to view the Calendars pane again.
- Use the left and right arrows to shift to the next month, week, or day (depending on which option is currently selected in the Initial Time Period setting that is designated in the Calendar report).
- Click Today to view the current day on the calendar.
- Click the down arrow next to the current month, week, or day to display a specific date using a calendar.
- Click the reload button to refresh the calendar's display. This means if a new item meets the report criteria, it will appear in the report. The current display options are not changed.
- Change the calendar view to display by Month, Week, or Day by clicking the corresponding option above the calendar.
- The list of Calendar reports appears on the left. Use the check box
next to the report name to show or hide the report. For example, if you want to
temporarily hide all change requests, clear the check box next to that report.
Click the report name to expand or collapse the report's details.
- Use the check box next to each event to toggle the display on or off. For example, if your Calendar report displays the Owner field as an event, you can clear the check boxes next to the user names that appear to temporarily hide items that are owned by those users.
In addition:
- Hover over a displayed item to view the item's details and the event date span of the item.
- In the
Month view, a number indicator (like
+3 more) appears at the top of days that have
additional items that can be viewed. Click the number that appears to switch to
the day view and display the entire list. Click
Month to return to the month view.
Tip: The number of additional items that are displayed depends on the current size of your browser. For example, if five items are currently displayed and you resize the browser to smaller size, less items are displayed and the indicator for the number of additional items to view increases.
- In the Month view, select a cell for a specific day and click Day to view the list of items for that day.
- In the Month view, if days from the preceding or following month are displayed, click them to display either the prior month or next month.