Contents
Welcome
SBM for SharePoint® contains the necessary pieces to enable your Microsoft Office SharePoint Server® installation to integrate with your Serena® Business Mashups installation. This integration enables you to leverage the business process management capabilities of Business Mashups with the documentation management of your SharePoint Server.
With SBM for SharePoint®, your SharePoint sites become more than merely document repositories; they become places where team members can truly collaborate: tracking the progress of a project, managing the documentation approval process, and managing change requests. The site becomes both a portal to your business processes and a repository for your project documentation.
- Serena Web Parts to Create a SharePoint Portal – Using the Serena Web parts and the default SharePoint Web part, you can modify your SharePoint site into a portal to your Mashup Server. This enables you to create a place where end users can get the complete view of your project status without having to leave the SharePoint site.
- SBM Web Services for SharePoint to Allow for Documentation Management – SBM Web Services for SharePoint enhance the communication between your Mashup Server and your Microsoft Office SharePoint Server. This enables users to create, view, and update documents on SharePoint Sites from Serena business process applications. After documents are uploaded to SharePoint, users can interact with documents within SharePoint or from Business Mashups business process applications, thus facilitating easy collaboration among various stakeholders. The documents are versioned using SharePoint, giving you acces to previous document revisions.
- Project OnBoarding Solution for Managing SharePoint Site Creation – Project OnBoarding Solution enables end users to review, approve, and create SharePoint sites. Additionally, it associates these created SharePoint sites to Business Mashups projects. After a project and site are associated, the Business Mashups project can leverage the documentation management features of SharePoint.
Installation
Depending on your version of Microsoft Office SharePoint Server, the installation process is different.
There are four steps for installing :
- Install the SBM Enablement Pack for
SharePoint on your
SharePoint server. The instructions depend your version of Microsoft
Office SharePoint Server:
- For MOSS 2007, see Installing SBM Enablement Pack for SharePoint on MOSS 2007.
- For MOSS 2010, see Installing SBM for SharePoint® on MOSS 2010.
- Configure the SBM Web Services for SharePoint that you installed in step 1. See Configuring SBM Web Services for SharePoint for details.
- Configure your SharePoint Web server to allow access from your Mashup Server. See Allowing Access for Mashup Server for details.
- Populate your Web part gallery with the Serena Web Parts. See Enabling the Serena Web Parts for details.
- Deploy either the Project OnBoarding and Configuration Mashup to allow you to link SharePoint sites with Business Mashups projects. See Integration Guide for SharePoint for details.
About the SBM Enablement Pack for SharePoint
The SBM Enablement Pack for SharePoint refers to the pieces of that must be installed on your SharePoint server. These pieces are required for handling events, using Serena Web Parts, and selecting templates when using the Project OnBoarding Solution.
The main components of the SBM Enablement Pack for SharePoint include:
-
The SBM Web Services for SharePoint are custom Web services that are created for SharePoint. These web services emit events to Business Mashups, which allow you to monitor when items are checked in or altered in SharePoint.
-
The Serena templates are custom SharePoint templates that can be used when you create a new SharePoint site using the Project OnBoarding Solution. These templates create a SharePoint site that is tailored for relating with a Business Mashups project.
-
The Serena Web Parts are custom Web parts that are available to you when you construct a site in template.
Installing SBM Enablement Pack for SharePoint on MOSS 2007
Prerequisites:
To perform this procedure, you must have the permissions to copy files to your Sharepoint server, the permissions to run the SBM Enablement Pack for SharePoint on that machine, the permissions within Sharepoint to configure Web parts and templates, and SharePoint Administrator.
The SBM Enablement Pack for SharePoint requires Windows .NET Framework 3.5. MOSS 2007 only requires .NET 3.0, which means that you may have to install 3.5 before being able to run the installer.
To install SBM Enablement Pack for SharePoint on MOSS 2007, perform the following steps:
Installing SBM for SharePoint® on MOSS 2010
Prerequisites:
To perform this procedure, you must have the permissions to copy files to your Sharepoint server and the permissions within Sharepoint to deploy the solutions, Web parts and templates.
To install SBM for SharePoint® on MOSS 2010, perform the following steps:
Configuring SBM Web Services for SharePoint
The SBM Web Services for SharePoint raise events that occur in SharePoint such as updating a document. These events can be used by Business Mashups to trigger action the workflow.
To activate the SBM Web Services for SharePoint:
-
Activate the SBM Web Services for SharePoint for your site collection:
- In Microsoft SharePoint, open the Site Settings panel ( Site Settings | Modify Site Settings).
- Click Site Collection Features under Site Collection Administration.
- Click Activate next to SbmDocument.
Tip: You must activate SbmDocument on each site collection that you plan to use SBM Web Services for SharePoint. -
Add the connection information to point to your Business Mashups Event Manager.Important:
- You must set the connection information at the root level for the Site Collection. Once you set SBMDocumentContentType settings at the root level it will apply to all subsites. The settings will not work when set at a subsite level and setting at the subsite level will corrupt the main site settings.
- If you have plan to use eventing in multiple SharePoint Web applications, you can use the SBMDocumentContentType to configure the first Web application, but you must manually configure the other Web application as described in Manually Configuring SBMDocumentContentType Settings .
- The SBMDocumentContentType page requires that you enter a password. To use an account without a password, add the user account as described below and enter a placeholder password. After saving the changes, manually edit the web.config file as described below and delete the placeholder password.
For MOSS 2007:-
In Microsoft SharePoint, open the Site Settings panel ( Site Settings | Modify Site Settings on MOSS 2007).
-
Click Sbm Document Settings under Site Collection Administration.
-
On the SbmDocument ContentType screen, enter the connection information to your Orchestration Engine and click OK.
The Business Mashups user account that you entered must have Managed Administration privilege and have access to the projects where the orchestrations will be running. If you have installed the Orchestration Engine on a separate Web server from your Application Engine, remember to enter the host name for your Orchestration Engine and not your Application Engine. The default port is 8085.
For MOSS 2010, you must manually add the connection information described above to the web.config file for each root Web application. See Manually Configuring SBMDocumentContentType Settings for information.
- Configure your orchestrations to make use of these events, such as performing transitions on the Business Mashups item that the document is attached to. See Integration Guide for SharePoint for examples of ways to configure your orchestration.
Manually Configuring SBMDocumentContentType Settings
To manually configure the SBMDocumentContentType settings for your root Site Collections:
-
Find the web.config for the Web application that you have activated. The web.config file is located in the following location where root is the port of your Web application.
C:\Inetpub\wwwroot\wss\VirtualDirectories\root\web.config
- Backup the web.config file before performing the following edits.
-
Find the appSettings section of web.config. The section should look something like this:
<configuration>
  ...
   <appSettings>
    ...
   </appSettings>
 ...
</configuration>
Note: There may be additional sections before or after the appSettings section. -
Define the connection information for your event manager by adding the following keys entries:
<configuration>
  ...
   <appSettings>
    ...
    <add key="SbmEMServicePassword" value="password" />
    <add key="SbmEMServiceUrl" value="http://localhost:8085
           →/eventmanager/services/ALFEventManagerDocLit/" />
    <add key="SbmEMServiceUser" value="username" />
  </appSettings>
 ...
 </configuration>
Change the values below to the SbmEMServicePassword, SbmEMServiceUrl and SbmEMServiceUser for the user account that will raise the events for the event manager.
Note: If you have used the SBMDocumentContentType settings page to configure the settings, the SBMDocumentContentType elements will have already been added to the section as shown above. Modify the values as appropriate. For example, you can change the value="" to signify a blank password. - Save the updated web.config file.
- If you have multiple Web applications, repeat this process for each application.
Allowing Access for Mashup Server
You must configure your SharePoint Web server to allow access for requests from your Mashup Server. This configuration is performed by modifying your crossdomain.xml file on your SharePoint Web server.
The file usually resides in the following directory on your SharePoint server: C:\Inetpub\wwwroot\wss\VirtualDirectories\80.
Add lines like the following to the file, changing server.domainname.com to the server name of your Mashup Server.
<allow-access-from domain="server.domainname.com" />
    <allow-http-request-headers-from domain="server.domainname.com" headers="*" />
For more information, refer to the following page: http://www.adobe.com/devnet/articles/crossdomain_policy_file_spec.html.
Enabling the Serena Web Parts
Prerequisites:
To perform this procedure, you must have the permissions within Sharepoint to populate a Web gallery.
After running the SBM for SharePoint® installer, you must populate the Web parts into your Web part gallery before they available when creating a page in SharePoint.
To enable the Web parts for use in Sharepoint sites by populating them to the Web part gallery:
Uninstalling
Uninstalling requires that you run the uninstall program for your version Microsoft Office SharePoint Server (MOSS) and then you manually remove the Web parts from the gallery.
To uninstall:
Creating a Collaborative Website
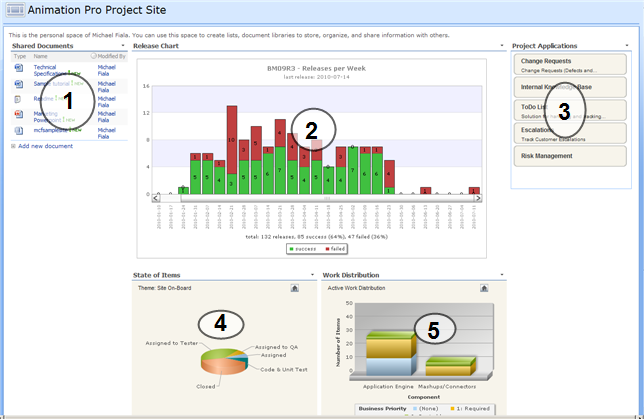
Using the Serena Web parts and the default Web parts available with SharePoint, you can create a SharePoint site where your users have access to all of the latest project information. The Web site can allow all users easy access to important project information, facilitating collaboration among project members.
The following is one example of how you could create a Web site to facilitate collaboration using the Serena Web parts.
-
If documents need to edited, they can be edited from either location, SBM or the other. Any document that is uploaded immediately triggers the "Estimation Workflow", where pertinent parties read the document and then decide on the scope of the change, updating the issues with the appropriate estimates for work.
-
Give the project manager a view of the items at the high level, and enable users to easily assign new incoming defects to the appropriate developer.
-
Links to different applications within SBM.
-
You can use to show the various states of the different items in the project.
-
Use the gadget to look at important items and see who is assigned what on the team.
Serena Web Parts
- SBM Reports allows users to view reports from within their Sharepoint Web page.
- SBM Applications allows users to view all of their applications from within a Sharepoint Web page.
- SBM Selected Applications allows users to view a selected subset of applications from within a Sharepoint Web page.
SBM Reports
The SBM Reports Web part allows you to display multiple reports on different tabs in a single Web part.
To implement and use SBM Reports:
- Add the SBM Reports Web part to
your SharePoint page.
Note: You must install and enable the Web parts before it is available to be added to your Web site.
- Edit the Web Part by selecting Edit | Modify Shared Web Part
- Enter your Mashup Server
information to connect to your and retrieve available reports:
Field Description Server Name Your Mashup Server, omitting http:// or https:// and tmtrack/tmtrack.dll?. For example, enter SBMServerName, Port Number Your Mashup Server port number. The default is 80. Use https Select for secure servers. User Name and Password The Business Mashups user which will be used to log in to Business Mashups and retrieve the reports. - Click Get Reports to retrieve the reports. The response time for populating the reports depends on the number of reports on your Mashup Server. It may take a few minutes to populate the list.
-
In the Reports Section, choose the report to display on each tab. You do this by selecting the report on the left side and then moving the report to the box on the right by clicking the right arrow
 .Important:
When using Serena® Business Mashups 2009 R3 and 2009 R3.x, only Listing type reports are supported in the SBM Reports Web Part.
This means that if you have created a non-listing type report, such as Graphical Distribution report or a Trend report, the report will not appear in the Report list results and you cannot select it to display.
The workaround for is to use either the SharePoint Page Viewer or the Site Aggregator Web parts. Copy the URL to the report and paste it into the SharePoint Web part.
The following table describes how the fields work in the Reports Section:
Field Description Tab Caption Display name for the tab. Note that you can change the tab name after adding it to the list on the right by clicking on the button. Application List Select from the available applications on your Mashup Server. Report Category Select the category that the report is in. Remember that if you are creating a page for other users to view, not to select reports marked as Private as these reports are only available to the user entered above. Report List Select from the available reports in the dropdown list and then click the right arrow
to select it for display.Search You can search for available reports. Select the application that the report is in, and then enter the search words and click Search. The Report List will be filtered to display only the reports with titles that include the search words. Up and Down Arrows Use the up and down arrows to modify the order of the tabs. - You can change additional settings under the Appearance, Layout and Advanced. This allows you to change the size of the display or the title of the Web part.
- Click OK to implement the changes to your Web part.
- For users to access Business Mashups through the Web Parts, they must have a user account. In addition, the user needs the appropriate permissions to view the selected report.
- Depending on your security settings, end users may be prompted to enter their Business Mashups User Name and Password when they access the SharePoint page.
- Depending on the permissions that the end users have, they may be able to edit the Web Part's configuration settings. The end user will be able to choose a different Business Mashups server or report type. If the end user changes the SBM Reports Web Part, they will not have access to the User Name and Password entered by the administrator.
- Choosing a report with the editablegrid.htm template allows you to display a report with the editable grids in your SharePoint site.
- Depending on the type of report, the user may have the ability to drill-down into the report.
SBM Applications
The SBM Applications Web part displays all of the applications that an end user has access to on a Mashup Server. When an end user clicks on an Business Mashups application, the Business Mashups Web interface opens to that application.
To implement and use SBM Applications:
- Add the SBM Applications Web part to
your SharePoint page.
Note: You must install and enable the Web parts before it is available to be added to your Web site.
- Edit the Web part by selecting Edit | Modify Shared Web Part
- Enter your Mashup Server
information to connect to your and retrieve available applications:
Field Description Server Name Your Mashup Server, omitting http:// or https:// and tmtrack/tmtrack.dll?. For example, enter SBMServerName, Port Number Your Mashup Server port number. The default is 80. Use https Select for secure servers. Note: End users will only see applications that they have permissions to access in Business Mashups. - You can change additional settings under the Appearance, Layout and Advanced. This allows you to change the size of the display or the title of the Web part.
- Click OK to implement the changes to your Web part.
- For users to access Business Mashups through the Web Parts, they must have a user account. In addition, the user needs the appropriate permissions to view the applications.
- Depending on your security settings, end users may be prompted to enter their Business Mashups User Name and Password when they access the SharePoint page.
- Depending on the permissions that the end users have, they may be able to edit the Web Part's configuration settings. The end user will be able to choose a different Business Mashups server.
SBM Selected Applications
SBM Selected Applications Web parts gives SharePoint users easy access to Business Mashups applications. When an end user clicks on an Business Mashups application, the Business Mashups Web interface opens to that application.
The SBM Selected Applications Web part is similar to the SBM Applications Web part. The difference is that SBM Selected Applications Web part displays only selected applications where as SBM Applications displays all of the applications available in Business Mashups.
To implement and use SBM Selected Applications:
- Add the SBM Selected
Applications Web
part to your SharePoint page.
Note: You must install and enable the Web parts before it is available to be added to your Web site.
- Edit the Web part by selecting Edit | Modify Shared Web Part
- Enter your Mashup Server
Information to connect to your and retrieve available applications:
Field Description Server Name Your Mashup Server, omitting http:// or https:// and tmtrack/tmtrack.dll?. For example, enter SBMServerName, Port Number Your Mashup Server port number. The default is 80. Use https Select for secure servers. User Name and Password The Business Mashups user which will be used to log in to Business Mashups and retrieve the applications. - Click Get Applications to populate the Select Applications to Display list.
- Select the applications to display. Use the CTRL key when clicking
to select multiple applications.
Note: End users will only see applications that they have permissions to access in Business Mashups.
- You can change additional settings under the Appearance, Layout and Advanced. This allows you to change the size of the display or the title of the Web part.
- Click OK to implement the changes to your Web part.
- For users to access Business Mashups through the Web Parts, they must have a user account. In addition, the user needs the appropriate permissions to view the selected applications.
- Depending on your security settings, end users may be prompted to enter their Business Mashups User Name and Password when they access the SharePoint page.
- Depending on the permissions that the end users have, they may be able to edit the Web Part's configuration settings. The end user will be able to choose a different Business Mashups server or selected applications. If the end user changes the SBM Selected Applications Web Part, they will not have access to the User Name and Password entered by the administrator.
Default SharePoint Web Parts
SharePoint contains two default web parts that can be used to display reports and pages from Business Mashups.
-
Page Viewer Web Part - Use the Page Viewer Web Part to display a report within your SharePoint page. The Page Viewer Web Part isolates the linked report from other content on the Web Part Page through the use of the HTML <IFRAME> element. This element ensures that any HTML elements displayed as content in the Page Viewer Web Part will not conflict with other HTML elements on the Web Part Page.
To add a report using the Page Viewer Web Part, you need the report URL. Log in to Business Mashups and run the report. In the report results, click Copy to Clipboard and copy the URL. In SharePoint, add the Page Viewer Web Part and then paste the copied URL into the URL field of the Page Viewer Web Part Link properties. Append &embedded to the end of the URL, which will allow the report to act correctly when embedded in the page.
Tip: To use the editable grid, remember to select the editablegrid.htm HTML template under Additional Options. Also, remember to manually size the Page Viewer Web Part to be large enough for the reports that users will be running. -
Site Aggregator - Like the SBM Reports Web part, the Site Aggregator Web part allows you to create a multi-tabbed view, where you can display different pages from other Web sites. The Site Aggregator can display all objects (like documents) that have been added to any SharePoint site belonging to the same site collection as the one that the Web part is deployed on.
You can use the Site Aggregator to show the collections of documents that have been stored in SharePoint Document Libraries associated with a particular project, simplifying the steps for user collaboration.
To configure the Web part, enter the URL for the site and the name of the tab.
Note:You may also use the Site Aggregator to display different pages or reports from Business Mashups by entering the Mashup Server URL. The Site Aggregator Web part appends additional information to the URL that you have entered, this may or may not cause a problem with URL in Business Mashups.
For example, if you are creating a personal site in SharePoint and attempt to use the Site Aggregator to display a page from Business Mashups, you will receive an error because the appended string causes a problem. For other sites that were tested, the appended string was ignored by Business Mashups, and it didn't cause a problem. The problem will be obvious because you will receive an error message on the tab, such as:
Invalid Query String:

ReportPage&ReportId=26758&Template=reports%2Frichgraphical&
forceshell/%20?ShowTasks=0&AccountName=COMPANY%5Cusername

(contains illegal '?' character)
To add a report from Business Mashups to the Site Aggregator, follow the previous instructions for the Page Viewer Web part which describes how to insert the report URL.
Known Issues
This section describes known issues in SBM for SharePoint®.
For a list of the latest issues and information about SBM for SharePoint®, refer to the online readme at http://help.serena.com/mashups/2009R3/sharepoint/online_sbm_for_sp_2009R3-02_readme.htm.
Working with Mashups
This section describes known issues when working with mashups.
-
If you modify the Global Mashup and then upgrade SBM, you must re-import the Global Mashup into Mashup Composer before working with the Project Onboarding (POB) mashup; otherwise, you will get validation errors pertaining to the POB mashup.
After the upgrade, use Mashup Manager to get the Global Mashup using the Get Mashup From Application Engine command, and then open the Global Mashup from the repository in Mashup Composer.
Working with Attachments
This section describes known issues when working with attachments.
-
When an attachment is deleted in SBM as a result of the item itself being deleted, the attachment and the associated folder in SharePoint still exist.
The workaround is to manually clean up documents and folders in SharePoint when items are deleted in SBM.
-
The Edit file button should be used separately from the Check Out button. If a user checks out a file and then uses the Edit button to check in a new revision without providing a comment, the file will be added and the previous version of the file will be overwritten, which means that data could be lost.
This problem occurs only when a user checks out a file first when using the Edit button. The workaround is to use the Edit button to upload file content without doing a checkout first.
- When using Mozilla Firefox, you cannot check in an attachment when transitioning an item. If you perform a check-in on a file in Firefox during a Submit or other transition, the OK and Cancel buttons on the form cease to function. The workaround is to perform the transition first and then check in the item.
-
If you click an image that is not part of a transition form, the image covers the transition form, making it impossible to complete the form. (This problem does not occur on the Submit transition because the link is disabled.)
The workaround is to use the browser's back button and then re-perform the transition without displaying the image.