|
Action
|
Procedure
|
|
Rita, the release manager, investigates the problem with the corporate web site of Qlarius Health Insurance and discovers a small defect in main.css, which is related to CR_X. Rita decides that the best solution is to immediately rollback to the previous version of main.css.
|
|
The release manager checks the deployment history
|
Rita, the release manager, checks the deployment history to see if any requests were deployed to the LIVE deployment area after CR_X.
-
Log into the Dimensions CM web client as Rita.
-
Switch to the following stream: QLARIUS:MAINLINE_JAVA_STR
-
Select the Deployment view.
-
To only display information for the current stream do the following:
a In the navigation pane click the filter button in the top right corner.
b Select Show Current Stream.
-
Select the History tab and in the navigation pane select the LIVE stage node.
-
Expand the LIVE stage node and select the deployment area LCL_LIVE_JMAIN_AREA01.
-
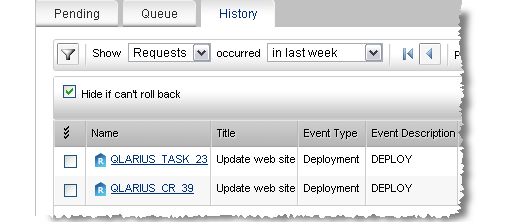
In the content pane use filters to only display requests that can be rolled back:
a From the Show list select Requests.
b From the Occurred list select the period when you performed scenario 1 (Today, in the last week, etc).
c Click the Filter button (located to the left of the Show list).
d Select the option Hide if can't roll back.
-
In the content pane check the history to see if any requests were deployed to the area after CR_X. The content pane should look similar to this:
-
QLARIUS_CR_X is the parent enhancement request.
-
QLARIUS_TASK_X is the child task that was primed from CR_X.
-
No other requests were deployed after CR_X.
|
|
The release manager rolls back the request from the LIVE deployment area
|
Rita rolls back CR_X from the LIVE deployment area.
-
On the History tab select the request QLARIUS_CR_X.
-
On the toolbar click Roll Back.
The Roll Back Area Versions dialog box appears.
-
To roll back the request immediately, check that the option Perform roll back of area versions is set to ’as soon as possible’.
-
In the Reason for roll back field enter: Defect in main.css
-
In the Select area versions for rolling back operations table check that LCL_LIVE_JMAIN_AREA01 is selected.
-
Click Next.
-
A summary of the roll back activity and command that will be performed is displayed.
-
Click Finish.
-
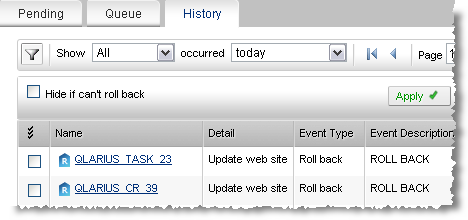
Unselect Hide if can't roll back.
-
Check if the roll back succeeded. The content pane should look similar to this:
The parent request and child task have been rolled back.
|
|
The release manager checks that the previous revision of the item was redeployed
|
Rita checks that the rollback successfully redeployed the previous revision of main.css to the LIVE deployment area.
-
In the My Current Project view expand Deployment Areas > LIVE Stage > LCL_LIVE_JMAIN_AREA01 > Qlarius Underwriter > website
-
In the content pane verify that the previous revision of main.css was deployed.
|
|
The release manager demotes the request to the PRE-PROD stage.
|
Rita demotes request CR_X to the PRE-PROD stage to indicate that it is no longer live.
-
In the Deployment view, on the History tab, select the LCL_LIVE_JMAIN_AREA01 area in the navigation pane.
-
In the content pane select CR_X and on the toolbar click Demote.
The Demote dialog box appears.
-
Check that the option Demote child requests is selected.
-
Check that the To Stage is set to PRE-PROD.
-
Click Next.
-
To deploy the requests now, check that the option Perform deployments is set to ’as soon as possible’.
-
In the Areas(s) for deployment field select the LCL_PP_JMAIN_AREA01 deployment area.
-
Click Next.
A summary of the demote and deployment activity and command that will be performed is displayed.
-
Click Finish.
-
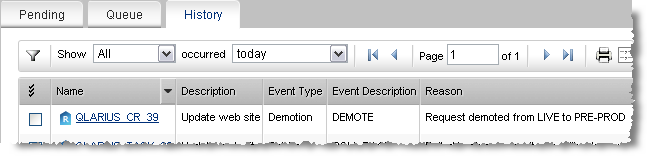
In the navigation pane select the LIVE stage node.
-
In the content pane verify that request CR_X was successfully demoted from LIVE to PRE-PROD. The content pane should look similar to this:
|
|
|
|
The release manager raises a change request to track the defect
|
Rita raises a change request to fix and track the defect.
-
In the Request view, on the toolbar click New and select CR.
The New Request dialog box appears.
-
In the Title field enter a title for the request, for example: Fix main.css.
-
In the Detailed description field enter a description.
-
On the Attributes tab, from the Severity/Priority list select Really Urgent.
-
Click Submit and click Close.
The new request is added to Rita’s request inbox with the following ID:
QLARIUS_CR_n
By default the request is at the DEV stage when it is raised.
|
|
The release manager delegates the request to the team lead
|
Rita delegates the request to the development team lead, Ted, whose team is responsible for maintaining the web site.
-
Select the request and on the toolbar click Delegate.
The Delegate wizard appears.
-
Check that the Capability option is set to Secondary.
-
From the Role to Delegate list select IMPLEMENTOR and click Next.
-
In the ’Candidate users authorized for role assignment’ list select Ted and click Add.
The wizard closes automatically. Dimensions CM sends an email to Ted notifying him that a request has been added to his Request inbox.
|
|
The release manager actions the request to its next state
|
Rita actions the request to its next state, UNDER WORK.
-
Select the request and on the toolbar select Action.
The Action wizard appears.
-
Check that the To next state field is set to UNDER WORK.
-
Click Finish and click OK.
The request is removed from Rita’s request inbox.
-
Log out of the web client.
|
|
The development team lead primes a child task from the request
|
Ted reads the email, views the request in his Request inbox, and primes a child task from the request.
-
Log into the web client as Ted.
-
Switch to the following stream: QLARIUS:MAINLINE_JAVA_STR
-
In the Request view select the Request inbox and then the request that was raised by Rita.
-
On the toolbar click Prime and select Task.
The Prime Request dialog box appears.
-
(Optional) Update the detailed description.
-
Click Submit and click Close.
The new child task is added to Ted’s request inbox with the following ID:
QLARIUS_TASK_n
By default the child task is at the DEV stage when it is raised.
|
|
The development team lead delegates the task to a web developer
|
Ted delegates the task to a web developer, Wendy.
-
Select the child task and on the toolbar click Delegate.
The Delegate wizard appears.
-
Check that the Capability option is set to Secondary.
-
From the Role to Delegate list select IMPLEMENTOR and click Next.
-
In the ’Candidate users authorized for role assignment’ list select Wendy and click Add.
The wizard closes automatically. Dimensions CM sends an email to Wendy notifying her that a task has been added to her Request inbox.
|
|
The development team lead actions the task to its next state
|
Ted actions the task to its next state, UNDER WORK.
-
Select the child task and on the toolbar select Action.
The Action wizard appears.
-
Check that the To next state field is set to UNDER WORK.
-
Click Finish and click OK.
The child task is removed from Ted’s request inbox.
-
Log out of the web client.
|
|
The web developer updates their work area from the stream
|
Wendy reads the email, checks her Request inbox, and updates her work area from the stream to make sure she has the latest version of main.css.
-
Log into the web client as Wendy.
-
Switch to the following stream: QLARIUS:MAINLINE_JAVA_STR
-
Check that Wendy’s work area is correct (see the pre-requisites at the start of scenario 1 on page 513).
-
In the Items view, on the Dirs tab of the navigation pane, expand Qlarius Underwriter and select website.
-
On the toolbar click Update.
The Update from Stream wizard appears.
-
Click Next.
-
Click Finish and then Close.
Wendy’s work area is updated.
|
|
The web developer modifies the item
|
In Wendy’s local work area on your machine edit main.css. For the purpose of this scenario make a minor edit, for example, add a comment to the top of the file.
|
|
The web developer delivers the item and relates it to the task
|
Wendy delivers the modified file to the stream and relates it to the task.
-
In the Items view, on the Dirs tab of the navigation pane, select website.
-
On the toolbar click Deliver.
The Deliver to Stream wizard appears.
-
Check that the Modifications check box is selected.
-
Click Next.
-
Verify that main.css is selected and click Next.
-
In the Relate to request(s) field click Select.
The Select Request dialog box appears.
-
From the Product name list select QLARIUS.
-
From the Type name list select TASK.
-
Click Next.
-
Select the task that is delegated to Wendy and click Finish.
-
In the Deliver to Stream wizard click Finish and then Close.
-
Make a note of the latest revision of main.css (see the content pane).
|
|
The developer verifies that the item was automatically deployed to the DEV areas
|
Deploy by default is enabled for the DEV area so when Wendy delivered the item it was automatically deployed. She checks that the item was successfully deployed.
-
Select the Deployment view and check that only the current stream is displayed.
-
Select the History tab and in the navigation pane select the DEV stage node.
-
In the content pane verify that main.css was successfully deployed to the DEV deployment area LCL_DEV_JMAIN_AREA01.
The Event Result column should display Succeeded.
|
|
The web developer delegates the task to the team lead for peer review
|
Wendy delegates the child task to Ted, her team lead, for peer review.
-
In the Requests view select the Request inbox.
-
Select the child task and on the toolbar click Delegate.
The Delegate wizard appears.
-
Check that the Capability option is set to Secondary.
-
From the Role to Delegate list select REVIEWER and click Next.
-
In the ’Candidate users authorized for role assignment’ list select Ted and click Add.
The wizard closes automatically. Dimensions CM sends an email to Ted notifying him that a task has been added to his Request inbox.
|
|
The web developer actions the task to its next state
|
Wendy actions the child task to its next state, PEER REVIEW.
-
Select the child task and on the toolbar select Action.
The Action wizard appears.
-
In the New State section check that the To next state field is set to PEER REVIEW.
-
Click Next.
-
In the Actual completed date field enter a date.
-
In the Actual development effort (hours) field enter a number.
-
Click Finish.
The task is removed from Wendy’s Request inbox.
-
Log out of the web client.
|
|
The team lead does a peer review and actions the task to its final state
|
Ted has read his email, seen the task in his Request inbox, done a peer review of the file that Wendy modified, and is satisfied with the changes that she made. He actions the task to its final state, CLOSED.
-
Log into the web client as Ted.
-
In the Requests view select the Request inbox.
-
Select the child task and on the toolbar select Action.
The Action wizard appears.
-
Check that the To next state field is set to CLOSED.
-
Click Finish and click OK.
The task is removed from Ted’s request inbox.
|
|
The team lead promotes and deploys the request and task to the SIT stage
|
To perform system integration testing, Ted promotes and deploys the parent request with the task to the SIT stage and its associated deployment area. Deploy by default is enabled for the SIT area.
-
Select the request.
-
On the toolbar click Promote.
The Promote wizard appears.
-
Check that the option Promote child requests is selected.
-
In the Next stage field check that SIT is selected.
-
Click Next.
-
To deploy now, check that the option Perform deployments is set to ’as soon as possible’.
-
In the Areas(s) for deployment field check that the LCL_SIT_JMAIN_AREA01 deployment area is selected.
-
Click Next.
A summary of the promotion and deployment activities and command that will be performed is displayed.
-
Click Finish.
|
|
The team lead verifies that the promotion and deployment were successful
|
Ted verifies that the promotion and deployment operations were executed successfully.
-
Select the Deployment view and check that only the current stream is displayed.
-
Check that the History tab is selected.
-
In the navigation pane select the SIT stage node.
-
In the content pane verify that the request was promoted successfully from DEV to SIT. The Event Result column should display Succeeded.
-
In the navigation pane expand the SIT stage node and select the LCL_SIT_JMAIN_AREA01 deployment area.
-
In the content pane verify that the request and task were successfully deployed to the SIT deployment area.
|
|
Ted performs system integration testing.
|
|
The team lead promotes the request and task to the QA stage
|
System integration testing has been completed successfully so Ted promotes the request and task to the QA stage. Deploy by Default is not enabled so the request and task cannot be automatically deployed to the QA deployment area.
-
On the History tab select the request.
-
On the toolbar click Promote.
The Promote wizard appears.
-
Check that the option Promote child requests is selected.
-
In the Next stage field check that QA is selected.
-
Click Next.
Deploy by Default is not enabled so no deploy options are available.
-
Click Next.
A summary of the promotion activity and command that will be performed is displayed.
-
Click Finish.
-
In the navigation pane select the QA stage node.
-
In the content pane verify that the request was promoted successfully from SIT to QA.
|
|
The team lead actions the request to its next state
|
Ted actions the parent request to its next lifecycle state, IN TEST, so that the QA team can perform testing.
-
On the History tab select the request.
-
On the toolbar click Action.
The Action wizard appears.
-
In the New State section check that the To next state field is set to IN TEST.
-
Click Next.
-
In the Details of solution given field enter: Fixed defect in main.css updated
-
Click Finish.
Dimensions CM sends an email to Tao, the QA manager, notifying her that a task has been added to his Request inbox
-
Log out of the web client.
|
|
The QA manager deploys the request and task to the QA deployment area
|
Tao, the QA manager, reads the email and checks the Pending tab for the QA stage on the Deployment view. Tao sees that the request is ready to be deployed to QA.
-
Log into the web client as Tao.
-
Switch to the following stream: QLARIUS:MAINLINE_JAVA_STR
-
In the Deployment view check that only the current stream is displayed.
-
Select the Pending tab.
-
In the navigation pane select the QA stage node.
-
In the content pane, from the Show list select Requests.
-
Select the request and on the toolbar click Deploy.
The Deploy wizard appears.
-
Check that the option Deploy child requests is selected.
-
Check that the Deploy Stage is set to QA.
-
Click Next.
-
To deploy the request and child task now, check that the option Perform deployments is set to ’as soon as possible’.
-
In the Areas(s) for deployment field check that the LCL_QA_JMAIN_AREA01 deployment area is selected.
-
Click Next.
A summary of the deployment activity and command that will be performed is displayed.
-
Click Finish.
-
Select the History tab.
-
In the navigation pane expand the QA stage node and select the LCL_QA_JMAIN_AREA01 deployment area.
-
In the content pane verify that the request and child task were successfully deployed to the QA area.
|
|
The QA team performs their tests.
|
|
The QA manager promotes the request and task to the PRE-PROD stage
|
QA testing has been complete successfully so Tao promotes the request and task to the PRE-PROD stage. Deploy by Default is not enabled so the request and task cannot be automatically deployed to the PRE-PROD deployment area.
-
On the History tab select the request.
-
On the toolbar click Promote.
The Promote wizard appears.
-
Check that the option Promote child requests is selected.
-
In the Next stage field check that PRE-PROD is selected.
-
Click Next.
Deploy by Default is not enabled so no deploy options are available.
-
Click Next.
A summary of the promotion activity and command that will be performed is displayed.
-
Click Finish.
-
In the navigation pane select the PRE-PROD stage node.
-
In the content pane verify that the request was promoted successfully from QA to PRE-PROD.
|
|
The QA manager actions the request to its final lifecycle state
|
Tao closes the request that is tracking the defect.
-
On History tab select the request.
-
On the toolbar click Action.
The Action wizard appears.
-
Check that the To next state field is set to CLOSED.
-
Click Finish and click OK.
-
Log out of the web client.
|
|
The release manager deploys the request and task to the PRE-PROD deployment area
|
Rita, the release manager, checks the Pending tab for the PRE-PROD stage on the Deployment view. Rita sees that the request is ready to be deployed to PRE-PROD.
-
Log into the web client as Rita.
-
In the Deployment view check that only the current stream is displayed.
-
Select the Pending tab.
-
In the navigation pane select the PRE-PROD stage node.
-
In the content pane, from the Show list select Requests.
-
Select the request and on the toolbar click Deploy.
The Deploy wizard appears.
-
Check that the option Deploy child requests is selected.
-
Check that the Deploy Stage is set to PRE-PROD.
-
Click Next.
-
To deploy the request and child task now, check that the option Perform deployments is set to ’as soon as possible’.
-
In the Areas(s) for deployment field check that the LCL_PP_JMAIN_AREA01 deployment area is selected.
-
Click Next.
A summary of the deployment activity and command that will be performed is displayed.
-
Click Finish and click Close.
-
Select the History tab.
-
In the navigation pane, in the PRE-PROD stage node, select the LCL_PP_JMAIN_AREA01 deployment area.
-
In the content pane verify that the request and child task were successfully deployed to the PRE-PROD area.
|
|
The release team performs their tests.
|
|
The release manager promotes the request and task to the LIVE stage
|
Rita promotes the request and task to the LIVE stage. Deploy by Default is not enabled for the LIVE deployment area.
-
On the History tab, with the PRE-PROD stage node selected in the navigation pane, select the request in the content pane.
-
On the toolbar click Promote.
The Promote wizard appears.
-
Check that the option Promote child requests is selected.
-
In the Next stage field check that LIVE is selected.
-
Click Next.
Rita has the privilege to deploy at the same time as the promotion but chooses not to select any deployment areas.
-
Click Next.
A summary of the promotion activity and command that will be performed is displayed.
-
Click Finish.
-
In the navigation pane select the LIVE stage node.
-
In the content pane verify that the request was promoted successfully from PRE-PROD to LIVE.
|
|
The release manager deploys the request and task to the LIVE deployment area
|
Let’s assume it is now the regular nightly maintenance period when the LIVE deployment area is offline. Rita deploys the request and task to the LIVE deployment area.
-
On the Pending tab select the request and on the toolbar click Deploy.
The Deploy wizard appears.
-
Check that the option Deploy child requests is selected.
-
Check that the Deploy Stage is set to LIVE.
-
Click Next.
-
To deploy the request and child task now, check that the option Perform deployments is set to ’as soon as possible’.
-
In the Areas(s) for deployment field check that the LCL_LIVE_JMAIN_AREA01 deployment area is selected.
-
Click Next.
A summary of the deployment activity and command that will be performed is displayed.
-
Click Finish and click Close.
|
|
The release manager verifies that the deployment operation was successful
|
Rita verifies that the deployment operation was successful.
-
Select the History tab.
-
In the navigation pane expand the LIVE stage node and select the LCL_LIVE_JMAIN_AREA01 deployment area.
-
In the content pane verify that the request and task were successfully deployed to the LIVE deployment area.
Tip: In the content pane you can see the request that was raised to fix the defect and request CR_X, which you rolled back at the start of this scenario.
|
|
The release manager verifies that the fix was deployed
|
Rita verifies that the latest revision of main.css was deployed to the LIVE area.
-
In the My Current Project view, in the navigation pane, expand
Deployment Areas > LIVE Stage > LCL_LIVE_JMAIN_AREA01 >
Qlarius Underwriter > website
-
In the content pane verify that the latest revision of main.css was deployed. This revision has replaced the one that was redeployed by the rollback operation at the start of this scenario.
|
|
End of scenario
|