Getting Started
What is Dimensions CM Pulse?
Dimensions CM Pulse is a tool for developers that visualizes changes in your software projects. Use Pulse to:
- View your streams, branches, and merges on the changeset graph.
- Review the health and quality of changes to help you determine if they are ready to be merged or released.
- Conduct global code reviews.
- Comment on reviews and collaborate with peers to improve the quality of code.
- View recent activity in your streams.
- Use experts to inspect your source code and report back any findings.
- Run reports to display statistics and trends in your streams.
Videos
Click a link like this Video: CM 14 Overview to watch videos of Dimensions CM features in the Serena Documentation Center.
Quick Tour
Watch a quick tour to learn more about the Pulse user interface and navigation.
Home
The Home page displays useful information for the user who is currently logged onto Pulse, including:
- Recent activity by the user such as the results of expert chains they have created and files they have commented on.
- The number of reviews that require the user's attention.
- The number of reviews owned by the user.
- Streams that the user has delivered to recently.
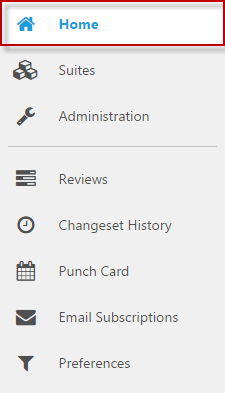
The Home page sidebar has links to information related to the current user, such as a list of reviews, changeset history, email notifications, and user preferences.
To open the Home page for the current user click Home at the top of the sidebar.
Navigate
The navigation path displays your current location in the Pulse hierarchy. For example:
Suites / Suite name / Product name / Stream name
For example, if you are in the QLARIUS:SAVINGS stream, which is in the Qlarius product in the Insurance suite, the navigation path looks like this:
Suites / Insurance / Qlarius / QLARIUS:SAVINGS
The sidebar contains top-level links to the navigation hierarchies in Pulse (Home, Suites, Administration) and links to sub-pages related to the level of the hierarchy in which you are currently located (for example Reviews, Changeset Graph, and Expert Chains.). See the quick tour for more information about navigation.
Search
You can search Pulse for specific items. A search is scoped to where you are in Pulse.
- Select a scope for the search: a suite, a product, a stream, or Home (the current user).
- Click the Search icon (next to your username at the top-right of the page) and enter a string that matches one of the following search types:
- Label: a review's unique label, for example: Q234 (only complete matches are shown).
- Request: a Dimensions CM request, for example: QLARIUS_CR_44 (only complete matches are shown). A Dimensions CM request can be related to one or more reviews.
- Owner: a user who owns reviews, for example: David (you can enter part of a user name).
- Summary: a review's title, for example: Refactoring (you can enter part of the title text).
NOTE Search is not case-sensitive. - Click Search or press Return. The results are displayed in the Search Results page. Click a result to view more details.
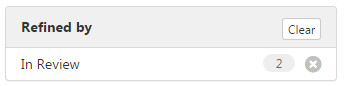
- To refine your search do one of the following:
- Select a filter from one of the results lists. The filter appears in the Refined by box:
- Control-click to select multiple filters from the lists. In the Refined by box click Apply. The box is updated:
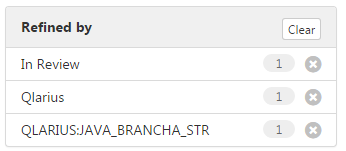
The Search Results window is updated. You can further refine your search by removing filters from the Refined by box. Click Clear to remove all filters.
Organize Work
About Suites and Products
Administrators can organize work into suites and by deciding which Dimensions CM products are registered in Pulse:
- A suite is a collection of related software products, for example, Banking or Insurance. A suite can contain one or more products, for example, Life Insurance and Health Insurance.
- A product is the same as a Dimensions CM product and is a major unit of software development. A product is typically a collection of CM streams, for example, the product Life Insurance contains the streams LIFE:REL1, LIFE:REL1_DISCOUNTS, and LIFE:REL1_PROMOTION.
- A stream is the same as a Dimensions CM stream or project, and represents a branch or isolated feature development.
Use the following workflow to create a suite, add products, and configure streams:
- Create a suite.
- Register one or more products to the suite.
- Register one or more streams with each product (note streams are registered automatically when you deliver to them, so this step is optional).
- Configure settings and defaults for each product.
- Configure automatic creation of reviews and running of expert chains for each stream.
View Activity for Suites, Products, and Streams
When you select a suite, product, or stream its latest activity is displayed in the main window, including information about:
- New reviews that are created after deliveries to streams.
- New changesets that are delivered to streams.
- Changes to reviews' states.
- Comments on reviews.
- Expert chain results.
Create Suites and Register Products
Administrators can create new suites and register Dimensions CM products.
To create a new suite:
- On the sidebar click Suites.
- Click New Suite.
- Enter a title for the new suite.
- Optionally enter a description for the suite. Use the tools to format, and preview, the description.
- Click Save.
To register a single CM product to a suite:
- Select the suite where you want to register the product.
- Click Register Product and select Single Product.
- Enter a title for the product. A Pulse product is the same as a Dimensions CM product, but you can give it a more readable name in Pulse.
- Optionally enter a description for the Pulse product. Use the tools to format, and preview, the description.
- From the Repository Name list do one of the following:
- Select an existing Dimensions CM repository.
- Select Create new repository.
- If you are creating a new repository do the following:
- Enter a title for the Dimensions CM repository.
- Enter the network address of the Dimensions CM server, for example:
dmcm-server.example.com - Enter the CM base database name and connection string, for example:
CM_TYPICAL@DIM14 - Toggle Always use the following credentials to Yes or No and enter a Dimensions CM service user's username and password, having read the options in Credentials used for accessing Dimensions CM repositories.
- From the Product in Repository list select a CM product.
- Click Register.
To register multiple CM products to a suite:
- Select the suite where you want to register the products.
- Click Register Product and select Multiple Products.
- From the Repository Name list do one of the following:
- Select an existing Dimensions CM repository.
- Select Create new repository.
- If you are creating a new repository do the following:
- Enter a title for the Dimensions CM repository.
- Enter the network address of the Dimensions CM server, for example:
dmcm-server.example.com - Enter the CM base database name and connection string, for example:
CM_TYPICAL@DIM14 - Toggle Always use the following credentials to Yes or No and enter a Dimensions CM service user's username and password, having read the options in Credentials used for accessing Dimensions CM repositories.
- From the Products in Repository list select multiple CM products.
- Click Register.
- The new Pulse products are named with titles that correspond to the selected CM products' names. You can change these later.
Register a Stream to a Product
Streams are registered automatically in a Pulse product when anyone makes a delivery to that stream in Dimensions CM, so this step is optional. Administrators can manually register a stream (for example, if you want to add an expert chain before the next delivery to that stream).
- Select the product where you want register a stream.
- Click Register Stream.
- In the Stream Name box start typing the name of a stream. Pulse automatically displays a list of all the streams that match the string (not case sensitive).
TIP Use wildcards to help you find a stream:
- Type '*' at the end of a string to match specific names, for example: DEV:STREAM_A*
- Type '*' to display all the streams in a Dimensions CM product.
- Select a stream.
- Click Save. The stream is registered with the product and you can now:
- Configure the stream to automatically create reviews and run expert chains.
- Add experts to expert chains.
Configure Product Settings and Defaults
Set Default Review Check List and Rules
Administrators can set the default review check list and rules for a product.
You might want different products to show different check lists when users approve or reject reviews, and rules control how reviews move from one state to another (for example, whether all reviewers must approve a review, or just one).
- Select the product where you want to set defaults.
- On the sidebar select Product Settings.
- From the Review Check List select one of the following:
- A review check list name
- Do not use a review check list by default
- From the Review Rules To Use list select a rule.
- Click Save.
Set Default Delivery Filter
Administrators can set the default delivery filter for a product and automatically assign it to any streams that do not have a filter. A product can only have one default delivery filter.
Delivery filters determine which changesets will create a review or run expert chains. For example, you could exclude deliveries of built artifacts made on behalf of your automated CI system in those products where CI was configured.
- Select the product where you want to set defaults.
- On the sidebar select Delivery Filters.
- Select a delivery filter and click Set As Default.
- Click Make Delivery Filter Default.
Manage Suites, Products, and Streams
Administrators can delete suites and products and unregister streams.
- On the sidebar click Suites.
- Do one of the following:
- Select one or more suites.
- Select a suite and then one or more products.
- Select a suite, a product, and then one or more streams.
- Click Delete and confirm.
- Deleting a suite unregisters its contained Pulse products and streams from Pulse but has no effect in Dimensions CM.
- Unregistering a product also unregisters its contained streams from Pulse but has no effect in Dimensions CM.
- Unregistering a stream has no effect in Dimensions CM. The stream will automatically be re-registered on subsequent deliveries to that stream in Dimensions CM (unless the product is also unregistered).
Review Work
About Reviews
Video: Introduction to Peer Review
You can use peer review to:
- Comment on, and review, the changes in your development projects.
- Collaborate with team members.
- Get insight into the health of changes in your changesets and streams, such as the results of expert chains.
- Promote team work and development best practices.
- Vote to approve or reject reviews, which may cause reviews to be marked as approved or sent for rework.
If you are a user with administrator rights you can also:
- Change a review's owner.
- Send a review for rework back to its owner.
- Change a review's state.
- Abandon a review.
The review list displays all the reviews that have been created for the selected user, suite, product or stream. A review page displays information about a specific change. You can control how a review's state is changed with the configurable review rules.
Reviews are also displayed on the activity feed for suites, products, streams, and the Home page.
Review States
Pulse's review states and state changes are:
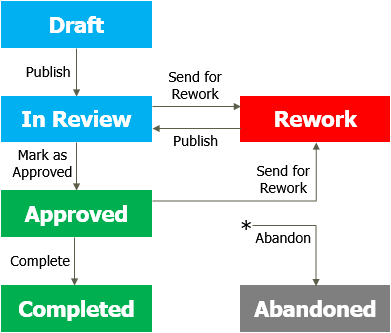
- Draft: the review is being modified by the user who is the Owner.
- In Review: the review has been published. Reviewers can add comments and vote on the review.
- Reviewers vote to approve or reject a review. Depending on the configurable rules their votes may cause a state change, or contribute to a state change in the future. By default the first reviewer to vote on a review changes its state but different rules may be configured in your environment.
- Approved: the review's changes have been accepted.
- Rework: the review has been sent back to its owner with suggestions for improvement.
- Completed: if there are no issues the Approved review is normally marked as Completed by the owner.
- Abandoned: a review can be changed to Abandoned at any time by an administrator. The review is closed and removed from circulation.
Review Roles
A user can hold one of the following roles on a review:
- Owner: normally the user that delivered the changeset that created the review. The owner can be changed by an administrator to any valid user.
- Lead reviewer: can be assigned automatically from the changeset and modified manually. The valid lead reviewers are derived from the real role assignments on the design parts in Dimensions CM that own the items being reviewed. A lead reviewer can add optional reviewers.
- Optional reviewer: normally assigned manually. The valid optional reviewers are derived from the candidate role assignments on the design parts in Dimensions CM that own the items being reviewed. Optional reviewers cannot assign other reviewers.
Delivery filters control which changesets automatically create reviews. Dimensions CM role assignments on the items in the changeset determine which users are automatically assigned as lead reviewers or are available to be assigned as optional reviewers.
Review Rules
A change in a review's state is triggered by one of the following:
- A user with the appropriate role (Owner or Administrator) changes the review state manually.
- A decision made by a rule that has run automatically.
The rules are codified as a script that runs when the following significant events occur:
- A new changeset is associated with a review, which may automatically assign reviewers to the review.
- A user manually changes the state of a review.
- A reviewer votes to approve or reject a review that is at the In Review state.
- The owner of a review is changed.
- The reviewers assigned to a review are changed manually.
- A request associated with a review is actioned to the In Review state in Dimensions CM. This may automatically assign reviewers.
A rule script uses the votes of the lead and optional reviewers, and additional information, to decide whether to change a review's state. You can create, or modify, scripts and set the default rule script for each stream.
If you are using the built-in defaultRule.js rule script the default behavior automatically changes the review state from:
- Draft to In Review when a reviewer is assigned.
- In Review to Approved or Rework after the first vote has been cast by any reviewer.
- Rework to In Review when the request's state changes to In Review in Dimensions CM.
The Review List
A review list displays the following reviews:
- For a suite: reviews for all products and registered streams.
- For a product: reviews for all registered streams.
- For a stream: reviews for that stream only.
To open the review list:
- Select a suite, product, or stream.
- On the sidebar select Reviews.
Each row in a review list is a separate review and includes the following information:
- The review's label (number and title).
- The date the review was created.
- The stream associated with the review
- The user who created the review.
- The review's current state (mouse over the icon to display).
You can select a filter to modify the type of reviews that are displayed.
- Open a review list.
- From the Reviews list select a filter.
You can also sort the reviews by category, and in ascending or descending order.
- Open a review list.
- Click Sort by.
- Select a category.
- Optionally select, or unselect, Sort descending.
Review Pages
A review page displays the following information:
- The review ID and title.
- The associated stream or project.
- A summary of changes to the review such as: the results of expert chains, comments that have been made, changes to the review's state, and votes by reviewers.
- The review owner and the lead and optional reviewers. If you are a lead reviewer, and a review is at the In Review state, you can add and remove optional reviewers.
- Related Dimensions CM requests.
- The results of experts that ran for changesets.
- The associated changesets. Multiple changesets are associated with a review if users have made several deliveries to a stream using the same request.
- A list of all the files associated with the changesets. The files are also listed in in the sidebar, which provides quick navigation between files.
- The contents of all the files.
Changes to files and folders, and to lines and characters in files, are displayed visually:
- Green background: added
- Red background: deleted
- Yellow background: changed
You can show an entire file or only the changes that have been made to it.
- If a review has a large number of files they may not all load. Scroll down to the file that you want to inspect, or select it in the list, and click Show Differences.
- If a file is binary, or very large, its content will not be displayed in the review page. However you can download it and use a third party comparison tool.
View Files
The Contents section, and the sidebar, display all the files and folders in the review. Click a file or folder to view its contents. The current version is displayed in the right column and the previous version in the left column.
If a review is associated with multiple changesets you can filter the files that are displayed.
- In the Changesets section select two changesets to compare with each other.
- Click View. The Contents section, and the sidebar, update and only files that have changed between the selected changesets are now displayed.
Open CM Related Requests
If there are CM requests related to a review, click to open them in the Dimensions CM web client.
Watch a Review
You can optionally watch a review when it is at specific states. When changes are made to the review you will be notified by email. You can select the notifications that you receive.
- To watch a review click Watch.
- To stop watching a review click Unwatch.
Publish a Review
When a review is created its initial state is Draft. If you are the review owner, or a user with administration privileges, you can publish the review so that it is available to your team. The owner is normally the user that delivered the changeset that created the review.
- On the review list page select the review.
- Click Publish.
- Click Publish Review. The review is now at the In Review state.
Add and Remove Reviewers
Each review can have reviewers with these roles:
- A review owner: normally the user who delivered the changeset that created the review.
- One or more lead and/or optional reviewers.
A review owner, or a user with administrator privileges, can add and remove lead and optional reviewers. A lead reviewer can add and remove optional reviewers. Only an administrator can changed a review owner.
To add reviewers to a review:
- Open a review.
- In the Reviewers section click Add and then Lead Reviewer or Optional Reviewer.
- Select more or more reviewers.
- Control click to select multiple users.
- Use Search to find users.
- Click Add Reviewers.
To remove reviewers from a review:
- Open a review.
- In the Reviewers section select more or more reviewers.
- Click Remove and confirm.
Add Comments to Files in Reviews
You can add comments to specific files in a review and collaborate with team members. This is different to adding a comment to an entire review.
- On a review page find a file.
- The files in a review are listed in the Contents section and the sidebar.
- The current version of the file is displayed in the right column and the previous version is displayed in the left column.
- In the left or right column click and drag to select the line numbers where you want to add a comment.
- In the Comments box enter your comments.
- Optionally format the comment (see the markdown reference).
- To display how your comment will look click Preview.
- To continue editing click Edit.
- To add the comment click Comment. Your comments are now visible to your team and responses are displayed in the same comment box.
- Comments are only displayed on review pages and are not added to files.
- You can add comments when a review is at specific states.
- You can edit your own comments until there is a reply.
Approve or Reject a Review
You can vote to approve or reject a review. Depending on how the rules script for this stream is configured, your vote may trigger the rule script to move the review to its next state.
- At the top of a review click Approve or Reject.
- Enter the reasons why you are voting to approve or reject the review.
- Optionally format your comment (see the markdown reference).
- To display how your comment will look click Preview. To continue editing click Edit.
- If a check list is presented, select items that have influenced your voting decision.
- Click Approve or Reject.
Mark a Review as Approved
If you are a user with administrator privileges you can bypass reviewer voting and mark a review as Approved.
- Open a review.
- Click Action
 and select Mark as Approved.
 - Click Approve Review.
Change a Review’s Owner
If you are a user with administrator privileges you can change a review's owner.
- Open a review.
- Click Action and select Change Owner.
- Select a user.
- Click Change Owner.
Send a Review for Rework
If you are a review owner, or a user with administrator privileges, you can send a review back to its owner for rework with suggestions for improvement, and bypass reviewer voting.
- Open a review.
- Click Action and select Send for Rework.
- Click Send for Rework.
Abandon a Review
If you are a review owner, or a user with administrator privileges, you can abandon a review. Abandoning a review indicates that it is no longer active and stops further review activity. This action cannot be reversed.
- Open a review.
- Click Action and select Abandon Review.
- Click Abandon Review.
Close a Review
If you are a review owner, or a user with administrator privileges, you can close a review. Closing a review prevents further changes being made to it. Only close a review if you are sure that no further work is required.
- Open a review.
- Click Close Review and confirm.
Add Comments to an Entire Review
You can add comments to an entire review when it is at specific states. Comments appear in a review's activity feed. This is different to adding comments to a specific file in a review.
- Open a review.
- Click Action and select Comment on Review.
- Optionally format your comment. To display how your comment will look click Preview. To continue editing click Edit.
- When you have finished click Add Comments.
Check the Health and Quality of Work
About Health and Quality
Pulse enables you to check the health and quality of the changes in your software products. You can:
- Visualize streams, branches, and merges.
- Run expert chains to check the health of source code and builds.
- Review changes to determine if they are ready to be merged or released.
- Run reports to display statistics and trends in your streams.
Changesets
Pulse uses Dimensions CM changesets to visualize information about changes. A changeset is a logical grouping of changes that is automatically created every time you deliver changes in a stream or project to a Dimensions CM repository. A changeset enables you to identify, work with, and track, sets of changes. Every changeset that you deliver creates a new version of a stream or project.
Video: Introduction to Changesets
View Changeset Information
There are multiple ways that you can view the information in changesets:
- Changeset Graph: visualizes your changesets and streams of development.
- History view: displays the history of changes in chronological order.
- Contributors view: displays all the developers who have made deliveries to the repository.
- Punch Card view: displays the busiest delivery periods by the day of the week and time.
You can view changeset information for suites, products, and streams. The Home page displays changeset information specific to the user who is currently logged in.
Filter Changeset Information
You can filter the changeset graph, or any information view, to:
- Limit the data that is displayed.
- Focus on a specific feature or set of streams and projects.
- Focus on a specific period of time.
- Select a suite, product, or stream.
- Open the changeset graph or one of the information views.
- At top right click the date filter.
- In the Stream Name box enter a wildcard to match stream and project names, for example, QLARIUS:JAV*. You can use multiple comma-separated wildcard strings. The strings to be matched should include the product name.
- From the Start Date and End Date lists do one of the following:
- Select a predefined date range.
- Select Since or Until and use the date picker to manually select a date range.
TIP- Start Date displays all data that matches the wildcard from the date that you specify.
- End Date displays all data that matches the wildcard up to and including the date that you specify.
- Click Apply. The graph or view refreshes and only displays data that matches the filters that you specified.
View Changesets on a Graph
A changeset graph visualizes streams and their change history across multiple releases A graph provides development teams and release managers with a visual understanding of what changes are being worked on, where, and why. Experts provide feedback on the health of changes and an indication of release readiness.
A changeset graph enables you to:
- Visualize all your streams and projects in one place including branches and merges. Each circle or group represents a changeset or a group of changesets.
- Review the health and readiness of your changesets and determine if they are ready to be merged or released.
- Watch in real time as streams are branched, merged, and moved through the lifecycle.
Changeset health is displayed visually:
- Grey circle: the changeset has no associated expert results

- Yellow circle: the expert results have warnings

- Red circle: the expert results have errors or an expert may have failed

- Green circle: the expert results are successful

- Purple circle: an expert has aborted

- Orange circle: an expert run has been requested or is in progress

- Blue circle: the changeset is selected and its details are displayed in a pane at the bottom

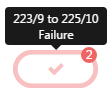
- Tick (inside a circle or group): the review was marked as approved

- Cross (inside a circle or group): the review was sent for rework

- Clock (inside a circle or group): an expert chain is in progress

- Solid small circle (inside a circle or group): the changeset has a review

- Hollow small circle (inside a circle or group): the changeset does not have a review

Mouse over a stream's label to view its changeset history:
Click a stream's label to display its details.
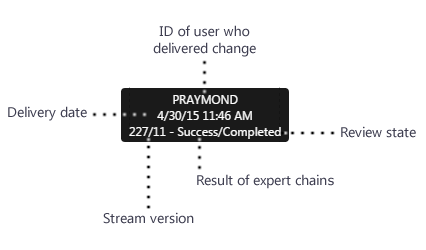
Mouse over a circle, or a group, to display the following information:
- An individual changeset displays the ID of the user who delivered the change, the date it was delivered, the stream version, the result of the expert chains, and the changeset's review state:
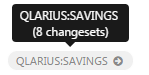
- A group of changesets displays: the stream version range, and the result of the expert chains that ran on the most recent changeset:
To display a changeset graph:
- Select a suite, product, or stream. The graph is scoped to the suite, product, or stream that you select.
- On the sidebar select Changeset Graph.
- (Optional) Filter the information that is displayed.
View Changeset Details
In a changeset graph click any changeset to view more details. A pane at the bottom displays information about the changeset including:
- The changeset number and description.
- The stream or project version that owns the changeset.
- The user whose delivery created the changeset.
- The date and time the changeset was created.
- The review created by the delivery. Mouse over to display it's current state.
- The result of the expert chain that ran on the changeset.
- Control-click to select and view the details of multiple changesets.
- Click a review to open the review page associated with a changeset.
- (Administrators only) If a changeset did not create a review automatically, click Create Review to create one manually.
Group Changesets
You can view changesets individually or grouped by days or weeks. Groups take up less space on the graph and look like this:
 The number of changesets contained in a group is displayed at the top right.
- Open the changeset graph.
- From the Changesets Graph list select one of the following:
- Individual Changesets
- Grouped by Days
- Grouped by Weeks
View Changeset History
The changeset history view displays changes to suites, products, and streams in chronological descending order. For each changeset the following information is displayed:
- The changeset number and description.
- The stream or project version that owns the changeset.
- The user whose delivery created the changeset.
- The date and time the changeset was created.
- The review created by the delivery. Mouse over to display its current state. Click a review to open the review page associated with the changeset.
- The changeset's current expert run state.
- Select a suite, product, or stream. The view is scoped to the suite, product, or stream that you select.
- On the sidebar, select Changeset History.
- (Optional) Filter the information that is displayed.
Display Delivery Activity
You can display the days and hours when deliveries were made to CM. Larger circles indicate higher activity.
- Select a suite, product, or stream. The view is scoped to the suite, product, or stream that you select.
- On the sidebar select Punch Card.
- (Optional) Filter the information that is displayed.
List who has Made Deliveries
You can display the developers who have contributed deliveries to CM in descending order (high to low). The colors on each horizontal bar represent the states of the experts that ran on the changesets:
- Green: success
- Yellow: unstable
- Red: failure
- Blue: no experts ran
Mouse over a colored section of a contributor's bar to display its percentage of the total number of changesets that have been delivered. The contributor's total number of deliveries is displayed to the right of their bar. The total number of contributors and deliveries for all developers is displayed at the top of the page.
- Select a suite, product, or stream. The view is scoped to the suite, product, or stream that you select.
- On the sidebar select Contributors. A list of contributors is displayed.
- (Optional) Filter the information that is displayed.
About Experts and Expert Chains
Experts examine source code and built artifacts and report back any findings. The set of experts available in Pulse can be extended or updated by installing plugins. Experts are triggered when a delivery is made to a stream or according to a schedule. You can configure experts to run in a sequence, called an expert chain. You can configure multiple independent chains to run on a stream, for example, the first chain runs on every delivery and performs brief static analysis. A second chain is scheduled to run at midnight every day and performs more thorough analysis and deployment.
Experts have these attributes:
- Execution state: can be Success, Failure, Unstable, or Aborted.
- Measurement: a set of single-valued judgements about source code. For example, 24,847 might be a measurement of lines of code, and High might be a measurement of the security risk level.
- Finding: when issues are identified, experts annotate the source code and provide a "severity" level to indicate how serious an issue is. Annotations are displayed in tabular form in the Experts section of a review page and some experts also annotate the files in the Contents section. Some findings may include a link to a web page that provides more details. See Inspect Expert Results.
The following experts are included with Pulse:
- Changeset Summary: counts the number of files added, deleted, and modified in each changeset.
- Checkstyle: enforces coding standards.
- Jenkins: a continuous integration server that you can use with Pulse to execute, and report on, builds of changesets as they are delivered.
- Kiuwan: measures, analyzes, and verifies the quality of your code.
- PMD: analyzes source code and finds common programming bugs.
- SDA Deployment: imports and deploys a component using Serena Deployment Automation.
- SDA Generic Process: runs a generic process in Serena Deployment Automation.
- SonarQube: inspects the quality of your code.
- Dependency Vulnerabilities: finds third party dependencies in your code that may have known security vulnerabilities.
- CM Build: if your team uses Dimensions Build and you have existing build configurations, enables you to run the configurations in Pulse.
For details about each expert and how to configure them see Configure Experts.
To add an expert to a chain see Create Expert Chains.
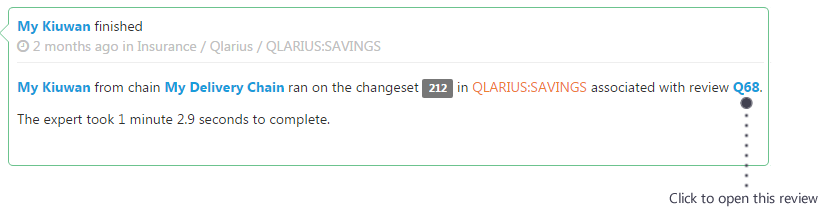
Expert results are displayed in the activity feed of suites, products, and streams and include:
- The name of the expert.
- The expert's run state, for example: Success, Running, or Failure.
- A summary of the findings including the name of the expert chain, the changeset number, and the stream or project name.
- The review where the chain ran (click to open it).
- The time taken to run the expert.
- A link to the expert's web page (where applicable).
Inspect Expert Results
You can inspect an expert's results in an activity feed and a review page.
- Select a suite, product, or stream.
- Scroll down the Activity feed until you find an expert that you want to inspect. A typical expert result looks like this:
- To display the expert's full results click the review link. The review page opens.
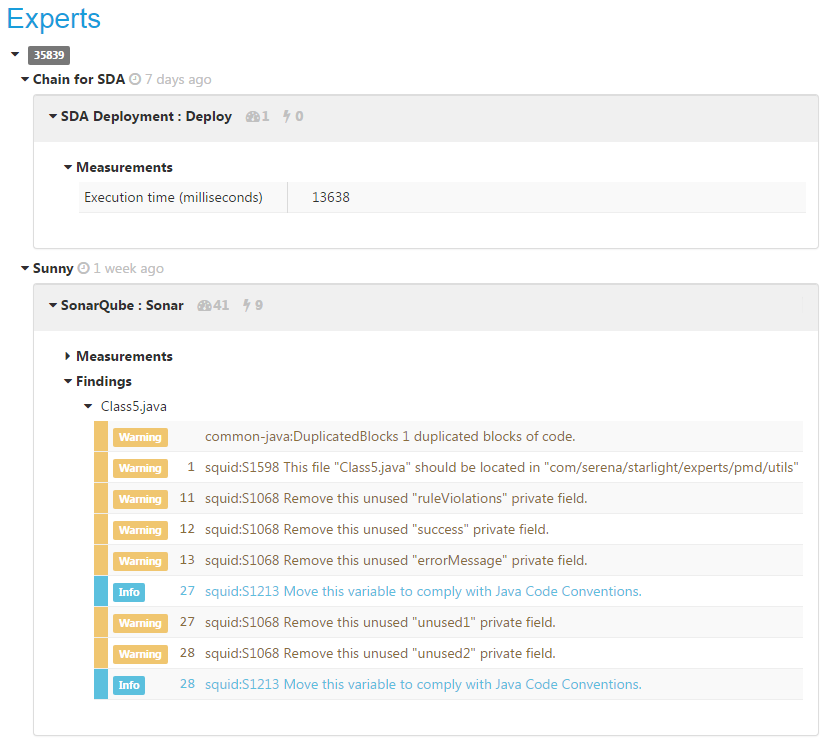
The Experts section displays results for all the experts that ran on this review. Expand each expert to view its findings. Some findings may include a link to a web page that provides more details. A typical Experts section looks like this:
The Contents section displays a list of all the files in the review and the number of expert findings for each file. A typical Contents section looks like this:
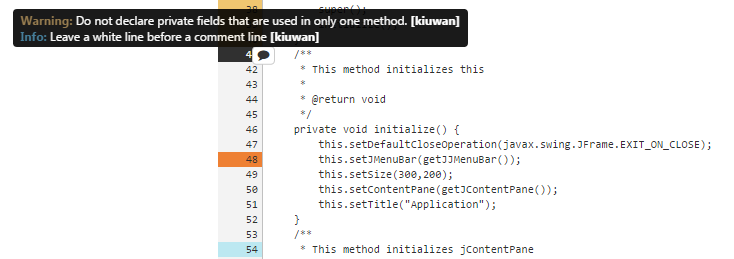
- To view an expert's findings for a specific file, in the Contents section select the file and click Show Entire File.
- Scroll down the file until you see results that you want to inspect. Each line number with a result has a color that represents one of these categories:
- Blue: information
- Dark Orange: error
- Orange: warning
A line may have multiple results.
- Mouse over a line number to display information.

Create Expert Chains
In each stream administrators can create expert chains and add multiple experts.
- Select a stream where you want to create an expert chain.
- On the sidebar select Expert Chains.
- Click New Expert Chain.
- In the Title box enter a name that describes the function of the chain.
- In the Note box optionally enter information about the chain.
- In the When to Run section select a schedule for the chain to run, for example, when every changeset is delivered to the stream.
- (Optional) You can restrict when this expert chain runs. In the Matching Paths field enter Ant style patterns (one per line) that at least one path in the changeset must match to trigger the chain. Leave blank to run the chain on all changesets.
- (Optional) You can limit the content that is fetched from the stream when this expert chain runs. In the What to Analyze field select Fetch stream content and enter Ant style patterns (one per line) to specify paths. Leave blank to include all the stream's content.
- To add an expert to this chain click Add Expert and select an expert type.
- In the Experts in Chain section configure the expert you just added. Each expert type has different parameters, some of which are mandatory. For details about each expert, and how to configure them, see Configure Expert Plugins.
- Add and configure more experts as required.
- To change the running order of experts in this chain, drag and drop experts.
- Save the new expert chain.
Manage Expert Chains
Administrators can delete and edit existing expert chains:
- Select the stream containing the expert chain that you want to delete or edit.
- On the sidebar select Expert Chains.
- To delete one of more expert chains, select them from the list, click Delete, and confirm.
- To edit an expert chain, select it and click Edit.
- Edit the chain's settings, add and remove experts, and change their running order (see above).
- Save the changes.
- Activity events involving the deleted chain.
- Findings or measurements that the deleted chain added to reviews.
- Any panels that contain measurements from the deleted chain.
About Reports
Reports display statistics and trends that are generated from the activity in your streams. Reports are scoped to the suite, product, or stream from where you run them. If you are an administrator you can create and manage reports.
- Suites can only run reports created at the suite level.
- Streams can run all reports created at all levels.
To run a report:
- Select the level at which you want to run the report (a suite, product, or stream).
- On the sidebar select Reports.
- From the Reports list select a pre-defined report.
- (Optional) Select a time period for the report (start and end dates).
- To refresh the report click Refresh.
Create Reports
You can create a new report and add multiple panels. Each panel can have one of the following display types:
 |
Metric: a chart with a single value, for example, the number of deliveries made. |
 |
Line Chart: an illustration of data points at successive time intervals. Mouse over a time interval to display the data for each value. |
 |
Pie Chart: a circular statistical graphic that is divided into sectors to illustrate numerical proportion. Mouse over a sector to display its value. The value in the middle is the first metric's numeric value as a percentage of the total. |
 |
Bar Chart: a diagram in which the numerical values of variables are represented by the height or length of lines, or rectangles of equal width. |
 |
Table: a set of data arranged in rows and columns. |
- Select the level where you want to create the report (a suite, product, or stream).
- On the sidebar select Reports.
- From the Actions menu and select Create View.
- In the Title box enter a name for the new view.
- In the Note box optionally enter information about the report.
- Click Save.
- To add a panel to the report do the following:
- Click Add panel.
- Enter a name for the panel.
- Select a display type.
- Select a width for the display (as a percentage of the width of the main window).
- Select one of these metric types:
- Review Metrics
- Expert Metrics (only available for streams)
- Click Add metric and select one from the list. You can add multiple metrics to these display types: pie charts, bar charts, and tables.
- Click Save.
- To add more panels repeat the previous step.
- Drag and drop panels to change their positions in the report.
Manage Reports
Administrators can delete and edit reports.
- Select the suite, product, or stream where the report is located.
- On the sidebar select Reports.
- From the Reports list select a report.
- To delete the report, from the Actions menu select Delete and confirm.
- To edit the report's title and description, from the Actions menu select Edit Title & Notes.
- To edit a report panel click Edit in its title bar. Modify the settings and click Save.
- To remove a panel click Delete in its title bar and confirm.
- Drag and drop panels to change their position in the report.
Create Reviews and Run Expert Chains
About Creating Reviews and Running Expert Chains
Administrators can configure changesets to automatically create reviews and run expert chains. The first delivery of a changeset to Dimensions CM creates a new Pulse review whose title is the same as the delivery change comment. If the review is related to a specific request, subsequent deliveries that use the same request are grouped under the same review.
Use this workflow for each changeset:
- Register a stream to a product.
- Create a custom delivery filter to control which paths in the changesets delivered to the stream create reviews and run expert chains.
- Configure the changeset to automatically create reviews and run expert chains.
- Add experts to expert chains.
Create Delivery Filters
Delivery filters enable administrators to control how reviews are created, and expert chains are triggered, for a stream. Every path in a changeset is matched against the include and the exclude patterns in a stream's delivery filter. If one or more paths pass through the filter, the changeset delivery creates reviews and runs expert chains. The default delivery filter for a product is used by any streams in that product that do not have an assigned delivery filter.
- Select the product where you want to create a delivery filter.
- On the sidebar select Delivery Filters.
- Select New Delivery Filter.
- In the Title box enter a name for the new delivery filter.
- In the Note box optionally enter information about the filter.
- You can use the Changeset Path Filtering section to control which paths create reviews and run expert chains.
In the Include these paths box do one of the following:- To only create reviews and run expert chains for specific paths, enter Ant style patterns (one pattern per line),
for example:
**/*.java**/*.jsp - To create reviews and run expert chains for all changesets, leave blank.
- To prevent specific paths from creating reviews and running expert chains, enter
Ant style patterns (one pattern per line), for example:
**/.DS_Store**/tmp/** - To create reviews and run expert chains for the included changesets, leave blank.
- To only create reviews and run expert chains for specific paths, enter Ant style patterns (one pattern per line),
for example:
- If you have a system that delivers changes using specific user names, for example a build process, you can ignore
those changesets. In the Exclude changesets delivered by these users box enter the user names (login IDs)
on separate lines. For example,
regbuildexcludes all deliveries by the user with the login ID regbuild. Leave this box blank to disable it. - To ignore changesets with specific text in their delivery comments, in the Exclude changesets with these
messages box enter message patterns, where
*is a wildcard character and each pattern is on a separate line. For example,*NO_REVIEW*excludes deliveries where the message contains the keyword NO_REVIEW. Leave this box blank to disable it. - Click Save.
- To make this the default delivery filter for this product, on the Delivery Filters page select the filter. Click Set As Default and then Make Delivery Filter Default. A product has one default delivery filter.
Automatically Create Reviews and Run Expert Chains
Administrators can control which changesets delivered to streams automatically create reviews and run expert chains.
- Select the stream that you want to configure.
- On the sidebar select Stream Settings.
- To control which changesets delivered to this stream create reviews and run expert chains, apply a delivery filter:
- Toggle Filter Changesets Being Delivered to Yes.
- From the Delivery Filter list select a filter. You can select the product's default filter or any other filter.
- To enable all changesets that pass through the selected delivery filter to create new reviews, toggle Create/Attach to a Review to Yes. Otherwise, toggle the switch to No.
NOTE If an existing review is associated with a Dimensions CM request, a new changeset is attached to that review (instead of creating a new one) when the following conditions are met:
- The review is at the Draft or Rework state.
- The review has the same owner as the user delivering the new changeset.
- The changeset uses the same request or has the same review label in its changeset delivery message.
- The changeset is associated with the same stream.
- To specify a review check list to be used with new reviews created in this stream, from the Review Check List To Use list select the product's default review check list or any other list. You can also choose not to use a check list with this stream.
- To specify the review rules for this stream, from the Review Rules To Use list select a rule. You can select the product's default review rules or any other review rules script from the list.
- Click Save.
Set User Preferences
Subscribe to Review Notifications
You can select the review email notifications to which you are subscribed. Notifications are sent when an event takes place on a review, for example:
- A review that you own changes state.
- You become the owner of a review, or are added as a reviewer.
- A review that you own is voted on.
- A review that you own is commented on.
- Click Home.
- On the sidebar select Email Subscriptions.
- Select, or unselect, review notifications.
- Click Save.
Set Changeset Graph Defaults
You can set defaults for how the changeset graph is displayed.
- Click Home.
- On the sidebar click Preferences.
- In the Changeset Graph Defaults section, from the Display Scale list select one of the following:
- Changeset: display individual changesets.
- Daily: groups changesets by days.
- Week: groups changesets by weeks.
- Select a Zoom Level.
- Click Save.
Set View Defaults
You can set defaults for how Views are displayed. Views include Reports, the Changeset Graph, Changeset History, Contributors, and Punch Card.
- Click Home.
- On the sidebar click Preferences.
- In the Default Time Period for Views section select the default Start Date and End Date range for the data that is displayed.
- Click Save.
Administer Pulse
To administer Pulse you must be logged in as a user with administrator privileges.
Configure the Avatar Server
Administrators can configure where Pulse obtains user avatar images.
- Select Administration | Avatars.
- Select one of the following sources for avatar images and user information:
- Disabled: all avatars display the default user picture.
- Serena Business Manager: use an SBM server to find avatar images and full names. Set the SBM server.
- LDAP Server: use the LDAP settings, see below.
- Gravatar: use an email address suffix. Set the suffix.
- If you selected LDAP, specify the following information:
- Server URL
The URL of the LPAP server, for example:
ldap://domain-controller.example.com:389 - Username
The bind user to perform searches as, for example:
cn=binduser,ou=Organizational Unit 1,ou=Organizational Unit 2,dc=example,dc=com - Password
The password of the LDAP bind user. - Base DN for search
The base DN to search from, for example:
dc=example,dc=com - Avatar image attribute
The LDAP attribute containing avatar image data, for example:
thumbnailPhoto - Follow LDAP referrals
To enable searches to follow LDAP referrals, toggle Follow LDAP referrals to Yes. - Search filter
The LDAP search filter to match objects, for example:
(&(objectClass=person)(sAMAccountName={0}))
- Server URL
Configure Specialized Services
Administrators can configure the servers that provide specialized services to Pulse, such as Serena Business Manager.
- Select Administration | Servers.
- In the Serena Business Manager URL box enter the URL for the SBM user workspace, for example:
http://sbm-server.example.com/tmtrack/tmtrack.dll? - In the Email Address Domain Suffix box enter the suffix that is automatically appended to user names to form email addresses, for example:
@example.com. - Click Save.
Administer Email Notifications
Administrators can manage the review email notifications that users can subscribe to, and unsubscribe from. If a notification is disabled, users will not see the notification listed in their subscription preferences. If a notification is available, users can choose if they want to subscribe to it.
- Select Administration | Notifications.
- For each notification type select one of the following:
- Disabled: the notification is not available for users to subscribe to.
- Send notification: the notification is sent to users by default though they can unsubscribe from it.
- Do not send notification: the notification is not sent to users by default though they can subscribe to it.
- Click Save.
Manage Review Check Lists
When a user votes to approve or a reject a review they are typically required to select items from a check list. Administrators can create different types of check lists to satisfy different levels of severity. For example:
- Secure: a complex check list with high levels of tightly controlled compliance, for example, for licensing.
- Minimum: a small list with low levels of compliance, for example, for in-house testing.
For each stream the same check list is used for approvals and rejections, however, you can associate a different review check list with each stream.
To create a review check list:
- Select Administration | Review Check Lists.
- Click New Check List.
- Enter a name for the check list.
- Enter items that you want your reviewers to select when voting to approve or reject reviews. Review check lists may contain up to ten items. For example:
- Coding standards
- Export compliancy regulations
- Software complexity rules
- Click Save.
To delete review check lists:
- Select Administration | Review Check Lists.
- Select one or more check lists.
- Select Delete and confirm.
You can also select the default check list for a product.
Manage Users
Administrators can manage the registered users. Users are registered automatically in Pulse when they log in, so it is normally only necessary to use Administration | Users to configure which users are administrators in Pulse. A user can be one of the following types:
- Standard User: can use peer reviews and changeset views.
- Administrator: can change a user's type and administer the system. There can be multiple administrators.
Add or remove administrator privileges:
- Select Administration | Users. A list of all the currently registered users is displayed including their user name, full name, email address, and user type.
- Select one or more standard users. From the Actions menu select Add administrator privilege.
- Select one or more administrators. From the Actions menu select Remove administrator privilege.
Manage Experts
Administrators can check what experts are installed, enable and disable experts, and view the results of recent runs.
- Select Administration | Experts. The Experts page displays all the experts that are currently installed in your CM environment.
- (Optional) For each expert do the following:
- Enable or disable the expert.
- View the last 10 runs.
A set of experts is installed with Pulse. For details about installing additional experts see the Dimensions CM Administrator's Guide.
Add and Modify Connections to CM Repositories
Administrators can add and modify connections to multiple repositories (Dimensions CM base databases).
- Select Administration | Repositories
- Do one of the following:
- To add a new repository select New Repository.
- To edit the connections for an existing repository, select it from the list. Click Connection Details.
- In the Title box enter, or modify, the name of the Dimensions CM repository.
- In the Server box enter, or modify, the network name of the Dimensions CM server, for example:
dm-server.example.com - In the Dimensions CM base database name box enter, or modify, the database connection, for example:
CM_TYPICAL@DIM14These two values, separated by the @ symbol, are the same information that you enter in the DB name and DB connection boxes when you log into a Dimensions client. - In the Credentials section toggle the option Always use the following credentials to Yes or No. For details about using this option see Select Credentials for Accessing Dimensions CM Repositories.
- Click Save.
Select Credentials for Accessing Dimensions CM Repositories
When Pulse accesses a Dimensions CM repository it presents a set of credentials. The credentials used for each repository depend on how you set the option Always use the following credentials in the repository definition in Pulse:
- Yes: the specified CM user account is used to connect to that Dimensions CM repository, which allows connections and caches to be pooled across users. Audit trail and user access control is the same as for the Dimensions CM user.
- No: the credentials of the logged in Pulse user are used to connect to that Dimensions CM repository. Audit trail and user access control is the same as for the Pulse user. The specified Dimensions CM username and password is used for non-interactive connections to that repository when a logged in Pulse user is not available.
Set Repository Defaults
Administrators can set repository defaults, such as integrations with Dimensions CM requests.
- Select Administration | Repositories.
- Select a CM repository.
- Select Defaults.
- In the Reviewer Role in CM section enter a Dimensions CM role. Users that hold this role can be selected as reviewers in Pulse. If you do not specify a role the default REVIEWER is used.
- In the Integrating with CM Requests section do the following:
- In the In Review state name in CM box enter a comma separated list of CM request states that can add reviewers to associated Pulse reviews. Pulse listens for Action Request notifications from Dimensions CM. When a request enters one of these named states in CM, its Reviewer role assignment is copied to Pulse, and its review rules are executed.
- In the Rework state name in CM box enter the CM state to which requests are actioned when any associated Pulse review is sent for rework.
- In the Approved state name in CM box enter the CM state to which requests are actioned when any associated Pulse review is sent for rework or marked as approved.
- Actioning a request to In Review causes the review rules to run and will typically change the review's state to In Review.
- These integrations are optional. Leave blank to disable an integration.
- Leave all boxes blank unless your CM request lifecycle includes an In Review state.
- If you do not want to automatically copy role assignments to Pulse, or push states from Pulse, do not use this integration. Users can make changes manually in Pulse and Dimensions CM without this integration.
- Leave the boxes blank to disable the integration between Pulse reviews and Dimensions CM requests.
NOTE - Click Save.
Other Administration Information
For information about the following Pulse administration topics see the Dimensions CM Administrator's Guide:
- Location of Serena common tools and Serena Pulse data folders.
- Customizing rule scripts.
- Setting the JDBC URL.
Markdown Syntax
About the Markdown Syntax
Markdown is a syntax used to format information in plain text. You can use Markdown in any external text editor and copy the contents to Pulse, retaining a consistent look for all comments. The formatting is created with special sequences of punctuation characters in plain text.
Character Formatting
*This is italicized*, and so is _this_ |
This is italicized, and so is this |
**This is bold**, and so is __this__ |
This is bold, and so is this |
***Italics and bold*** together, as is ___this___ |
Italics and bold together, as is this |
Inline Code and Code Blocks
`Back-quote character` (also known as backtick |
Back-quote character (also known as backtick or grave) is used for inline code |
Use 4 space indent for code blocks. |
Use four space indent for code blocks. Some code line 1 Back to normal text again. |
Line Breaks and Paragraphs
Normally a single newline |
Normally a single new line is ignored.
|
End a line with two spaces |
End a line with two spaces to cause an explicit line break. |
Separate paragraphs. |
Separate paragraphs. With a blank line. |
Add a > to the beginning of a line to create |
Add a > to the beginning of a line to create a block quotation
Multiple quoted lines will wrap together. |
Simple Lists
- Use a minus sign for a bullet |
|
1. Numbered lists can use |
|
Links
Basic link to http://example.com. |
Basic link to http://example.com.
|
Inline link to [An Example Web Site](http://example.com/). |
Inline link to An Example Web Site. Numbered reference link to An Example Web Site. Named reference link to An Example Web Site. |
Headers and Rules
Header 1 |
Header 1 |
Header 2 |
Header 2 |
A horizontal rule is three or more hyphens, |
A horizontal rule is three or more hyphens, asterisks, or underscores
on the same line with no other characters.
|
Configure Experts
About Configuring Experts
Pulse includes bundled and built-in experts:
- A built-in expert can only be upgraded or replaced when you update Pulse. It is core to the product and is not expected to change without changes to Pulse.
- A bundled expert is a standard expert that is shipped with Pulse. You can overwrite it as long as the newer version is backwards compatible with your version of Pulse.
- Additional and upgraded experts will be made available by Serena Software for download from the SerenaCentral.com community web site.
- You can write your own expert implementations if you have site-specific requirements or in-house utilities that you want to integrate with Pulse.
Except where specified all experts listed are either bundled or built-in.
Each of the expert descriptions contains:
- An Overview of the expert: what it does and why you would use it.
- An optional Prerequisites section listing external tools that the expert depends on.
- A Configuration section that describes any global server configuration files that must be set up, the fields that you enter when configuring an expert chain, and whether the expert needs to be in a chain that uses a workspace.
Where the notation ${dataDir} is used in the following descriptions it refers to the Pulse data
directory on the Pulse server, for example, C:\ProgramData\Serena\Pulse or
/opt/serena/dimensions/cm/pulse_data.
Changeset Summary Expert
Overview
The Changeset Summary expert is a built-in expert that counts the number of files added, deleted, and modified in each changeset. To track of the number of changes, which indicates the level of code churn, you can configure this expert to run on every changeset.
This expert has no prerequisites or configuration and does not require a workspace because it uses the changeset information.
Checkstyle Expert
Overview
The Checkstyle expert is a bundled expert that uses the Checkstyle development tool to check that Java code adheres to a defined coding standard.
Use Checkstyle to help you comply with Java coding standards by automating code checking. Checkstyle is highly configurable and can support most coding standards, for more information see: http://checkstyle.sourceforge.net
This expert has no prerequisites (the Checkstyle 5.7 libraries are embedded in the expert so there are no external tools to install).
Configuration
Server Configuration Files
To customize the Checkstyle rules to be checked by this expert, create an XML configuration file in
${dataDir}/conf/experts/com.serena.starlight/checkstyle/ on the Pulse server.
If you name the file config.xml it will be the default.
Checkstyle expert searches for a configuration file in the following sequence:
- If the field Configuration File Name specifies a filename, looks for that file in
${dataDir}/conf/experts/com.serena.starlight/checkstyle/. - If the field Configuration File Name is empty, looks for
config.xmlin that directory on the Pulse server. - If the field Configuration File Name is empty, and
config.xmldoes not exist, uses a built-in configuration based on Sun Coding Conventions.
Expert Configuration in a Chain
When you add this expert to an expert chain in Pulse modify the following configuration field:
| Field Name | Description | Required |
|---|---|---|
| Configuration File Name | The filename of a configuration file that you created on the Pulse server in the specified directory. | No |
Checkstyle operates on source code files so add the Checkstyle expert to a chain that populates a workspace.
SonarQube Expert
Overview
The SonarQube expert is a bundled expert that runs static analysis against source code in a repository and reports findings and metrics. You can use it to analyze your source code on every changeset, or on a regular schedule, and optionally record the defects and metrics in your SonarQube server.
Prerequisites
The SonarQube expert requires the SonarQube Runner, a command line application, to be installed and configured on the Pulse server. For more details see the SonarQube web site: http://docs.sonarqube.org/display/SONAR/Installing+and+Configuring+SonarQube+Runner
For more information about using SonarQube Runner see: http://docs.sonarqube.org/display/SONAR/Analyzing+with+SonarQube+Runner
The SonarQube server must be installed on your network (not necessarily on the Pulse server) for this expert to connect to. See: http://docs.sonarqube.org/display/SONAR/Installing
SonarQube expert uses the Web Service Java Client to make REST requests to a SonarQube server and has been tested with the SonarQube 5.0 server.
The server configuration file ${dataDir}/conf/experts/com.serena.starlight/sonarqube/sonarqube-pulse-expert.properties
must be present and set up correctly before you can use SonarQube expert.
Configuration
Server Configuration Files
The SonarQube expert properties file is mandatory and is located in: ${dataDir}/conf/experts/com.serena.starlight/sonarqube/sonarqube-pulse-expert.properties
The first two properties in the table below identify the location of the SonarQube runner and SonarQube server and must be specified. The other properties are optional.
| Property Name | Description | Required | Example |
|---|---|---|---|
| sonar.host.url | SonarQube Server URL | Yes | http://localhost:9000 |
| pulse.sonar.agent.path | Full path to the SonarQube Runner application | Yes | C:\\sonarrunner\\bin\\sonar-runner.bat |
| sonar.jdbc.url | JDBC connection URL for the SonarQube database | No | jdbc:h2:tcp://localhost:9092/sonar |
| sonar.jdbc.username | Database user for the JDBC connection | No | sonar |
| sonar.jdbc.password | Database password for the JDBC connection | No | sonar |
| pulse.results.delay | When SonarQube analyzes code that produces a very large number of findings (~2000 +) a short delay is needed before the results can be fetched. This delay is normally only required on the first run; on subsequent runs only the delta needs to be updated. Default: 30 seconds | No | 30 |
If an optional property is not set SonarQube Runner uses the value in ${SONAR_RUNNER_HOME}/conf/sonar-runner.properties.
If the value is not present the default value is used.
You can configure additional supported parameters in ${SONAR_RUNNER_HOME}/conf/sonar-runner.properties
Expert Configuration in Chain
When you add this expert to an expert chain in Pulse modify the following configuration fields:
| Field Name | Description | Required | Example |
|---|---|---|---|
| Username | Username for the web server connection. | No | admin |
| Password | Password for the web server connection. | No | admin |
| Analysis mode | Select an analysis mode:
|
Yes | analysis |
| Project name | The name of the SonarQube project that will be displayed in the web browser. Conventionally, the <name> if using Maven for your build. |
Yes | Example project |
| Project key | The unique SonarQube project key. Conventionally, the <groupId>:<artifactId> if using Maven for your build. |
Yes | example-key or com.example:project1 |
| Project version | The SonarQube project version. Conventionally, the <version> if using Maven for your build. |
Yes | 1.0 |
| Source folder | The relative stream folder in the workspace to run the analysis against. | Yes | src/main/java |
The properties Username and Password are optional and are only required in specific security situations, see this SonarQube web site for details: http://docs.sonarqube.org/display/SONAR/Analyzing+with+SonarQube+Runner#AnalyzingwithSonarQubeRunner-Security
The SonarQube Runner operates on source code files so add the SonarQube expert to a chain that populates a workspace.
Jenkins Expert
Overview
The Jenkins expert is a bundled expert that can invoke a Jenkins job on a remote Jenkins server. For examle, use it to run a CI build against each changeset as it is delivered and report the build time.
Prerequisites
The Jenkins server must be installed on your network (not necessarily on the Pulse server) for this expert to connect to. See http://wiki.jenkins-ci.org/display/JENKINS/Installing+Jenkins for more information about installing Jenkins.
You must define a Jenkins job on your Jenkins server that the expert will invoke.
Optionally add build parameters to the job so that information about the Dimensions CM stream and changeset are available in your build. Alternatively, allow the Jenkins expert to make any configuration change to the Jenkins job automatically (no manual changes to your Jenkins job are needed).
If you add the build parameters manually select the option This build is parameterized in your job configuation page and add each build parameter as a String Parameter. The values of Default Value and Description in Jenkins are not important.
| Parameter Name | Description | Required |
|---|---|---|
| cmkey | An opaque value that uniquely identifies the build run to the Jenkins expert. Although shown as Required in this table, the Jenkins expert can automatically add this parameter to your Jenkins job and no manual job configuration is needed. |
Yes |
| repo | An opaque value that is different for each SCM repository. | No |
| stream | The name of the stream or project to which there was a delivery. | No |
| version | The stream or project version that the delivery created. | No |
| changeset | The repository (forest) version of the changeset for the delivery. | No |
Configuration
Expert Configuration in Chain
When you add this expert to an expert chain in Pulse modify the following configuration fields:
| Field Name | Description | Required |
|---|---|---|
| Jenkins Job Location | Enter the URL for the Jenkins job (the location of the continuous integration server, including the job name). | Yes |
| Username | Jenkins username; may be required if using Jenkins authentication. | No |
| Password | Jenkins password or API token of the Jenkins user; may be required if using Jenkins authentication. | No |
| Automatically add build parameters to Jenkins Job | Automatically reconfigure the Jenkins job to add the mandatory build parameter cmkey. You can also add parameters manually (see above) if you prefer that the Jenkins expert does not touch your job. | No |
| Record Jenkins Job build result | Specifies whether the Jenkins expert should monitor the Jenkins job and record the state when the job completes. | No |
| Check Jenkins Job status every (seconds) | If Record Jenkins Job build result is selected, specifies how often the Jenkins expert checks if the Jenkins job has completed. | No |
- Select your name at the top-right of the Jenkins page.
- From the Actions menu select Configure.
- Click Show API Token.
If your Jenkins job requires a build authentication token before it can be triggered (see this
Jenkins wiki page for details)
add the token to the end of the Jenkins URL, for example: http://hostname:port/jenkins/job/MyProject/?token=buildtoken
The Jenkins expert uses the parameters after the ? in build requests sent to the Jenkins server.
Jenkins manages its own workspaces so you can add the Jenkins expert to a chain that does not populate a workspace.
PMD Expert
Overview
The PMD expert is a bundled expert that scans Java source code (and other languages) and looks for potential problems such as possible bugs, dead code, suboptimal code, overcomplicated expressions, and duplicate code. You can use it to find common programming flaws during your code review process. PMD is configurable and can find many different issues, for more information see the Online Documentation link at: http://pmd.sourceforge.net.
This expert has no prerequisites (the PMD 5.2.3 libraries are embedded in the expert, so there are no external tools to install).
Configuration
Expert Configuration in Chain
When you add this expert to an expert chain in Pulse modify the following configuration fields:
| Field Name | Description | Required | Example | PMD command line option | Notes |
|---|---|---|---|---|---|
| Source folder | Enter the relative stream folder to run the analysis against. | Yes | src/main/java | -dir | Should be a relative path. |
| Rules | Enter a comma separated list of rulesets names to use. | Yes | rulesets/internal/all-java.xml | -rulesets | Check the full list of possible rulesets: http://pmd.sourceforge.net/pmd-5.2.3/. You can also use a custom ruleset. |
| Project classpath | Specify the classpath for libraries used by the source code. | No | commons-collections.jar;derby.jar | -auxclasspath | |
| Source encoding | Specify the source code encoding. | No | UTF-8 | -encoding | |
| Source language | Specify the source code language. | No | Java | -language | |
| Language version | Specify the language version. | No | 1.7 | -version | |
| Show suppressed | Show suppressed findings. | No | false | -showsuppressed | |
| Suppress marker | Specify the suppress marker. | No | NOPMDNEWMARKER | -suppressmarker |
The PMD command line option column above shows how each PMD expert configuration field maps to the PMD command line tool. For details see: http://pmd.sourceforge.net/pmd-5.2.3/usage/running.html.
PMD operates on source code files so add the PMD expert to a chain that populates a workspace.
Kiuwan Expert
Overview
The Kiuwan expert is a bundled expert that integrates with Kiuwan Software Analytics in the Cloud, an online code quality and security service. Use this expert if your organization has signed up to the Kiuwan service and wants to use it to track the quality and security of your changesets and make that information visible in Pulse reviews and reports.
Prerequisites
You must have an active account (username and password) for the Kiuwan service, have logged into the service, and configured an application name for your stream.
You must install the Kiuwan Local Analyzer on the Pulse server.
Configuration
Server Configuration Files
The Kiuwan expert's properties file is mandatory and is located in: ${dataDir}/conf/experts/com.serena.starlight/kiuwan/kiuwan-pulse-expert.properties
The properties are:
| Property Name | Description | Required | Example |
|---|---|---|---|
| kiuwan.agent.command | Full path to the Kiwuan Local Analyzer's agent launcher (agent.cmd or agent.sh not kiuwan.cmd or kiuwan.sh). | Yes | C:\\KiuwanLocalAnalyzer\\agent.cmd |
| kiuwan.poll.interval | Specifies how often to check whether an analysis has completed in seconds. | Yes | 180 |
| kiuwanUsername | Username (email) used to log into the Kiuwan service. | No | cibuild@example.com |
| kiuwanPassword | Password to log into the Kiuwan service. | No | I@m!S3cR3t |
| kiuwanAnalysisApplication | The application name that has been configured in the Kiuwan account. | No | Qlarius |
Normally kiuwanAnalysisApplication will vary based on the stream, however, if you always use the same application name you can specify it globally in the server properties file.
Expert Configuration in Chain
When you add this expert to an expert chain in Pulse modify the following configuration fields:
| Field Name | Description | Required | Example |
|---|---|---|---|
| Username | Username for the Kiuwan account. | No | cibuild@example.com |
| Password | Password for the Kiuwan account. | No | I@m!S3cR3t |
| Application | The application name to register analysis results against in your Kiuwan account. | No | Qlarius |
The properties Username, Password and Application are only optional if they have been configured in the global server properties file (see above).
The Kiuwan Local Analyzer operates on source code files so add the Kiuwan expert to a chain that populates a workspace.
SDA Deployment Expert
Overview
The SDA Deployment expert is a bundled expert that allows you to integrate Pulse with Serena Deployment Automation (SDA) and to publish and deploy artifacts in a Dimensions CM stream.
You can use the SDA Deployment expert to automate your path to production for your application. For example, it can support continuous delivery by:
- Publishing files from a stream to an SDA server as a new component version.
- Adding an SDA status to a new published version.
- Deploying the new published version.
Prerequisites
The SDA server must be installed on your network, not necessarily on the Pulse server, where this expert can connect to it. SDA Deployment expert has been tested with SDA server version 6.0.0.
You will need a working application process configured in your SDA server for the SDA Deployment expert to invoke.
Configuration
Server Configuration Files
The following SDA Deployment expert properties file is usually required:
${dataDir}/conf/experts/com.serena.starlight/sdadeploy/sda-pulse-expert.properties
The property below identifies the location of the SDA server, if the default value shown is correct you do not need to edit it:
| Property Name | Description | Required | Example |
|---|---|---|---|
| sdaServerUrl | URL to the SDA server web application | Yes | http://localhost:8080/serena_ra |
Expert Configuration in Chain
When you add this expert to an expert chain in Pulse modify the following configuration fields:
| Field Name | Description | Example | Required |
|---|---|---|---|
| Username | Enter the username of an SDA server administrator. | admin | Yes |
| Password | Enter the password of the SDA server administrator. | admin | Yes |
| Component Name | Specify the name of the SDA component that will be published. | my_component_1.5 | Yes |
| Artifact directory | Specify the relative path in the stream where assets are located. | target\ | Yes |
| Include | To only publish specific files enter one or more Ant patterns (one per line). To publish all files leave blank. | *.war *.jar |
No |
| Exclude | To exclude specific paths from being published enter one or more Ant patterns (one per line). To publish all files leave blank. | *.java *.html *.xml |
No |
| Add Status | Select this option to display the field Status Name. | No | |
| Status Name | (Visible if Add Status is selected) Specifies the SDA status to move the new component version to. | STATUS_SUCCESS | Yes (if Add Status is selected) |
| Deploy | Select this option to display fields that specify how the new component version will be deployed. | No | |
| Application Name | Specify an SDA application (contains a component to be deployed). | my_application | Yes (if Deploy is selected) |
| Application Process Name | Specify the SDA application process to be executed. | my_deploy_app_process | Yes (if Deploy is selected) |
| Environment Name | Specify the SDA environment to deploy to. | my-environment | Yes (if Deploy is selected) |
| Deploy Properties | Specify deploy properties that will be used to run the SDA application process. Enter one pattern per line in this format: prop_name=prop_value. |
set_up_db=true use_logging_level=trace |
No |
SDA normally operates on binary files so add the SDA Deployment expert to a chain that populates a workspace with built artifacts.
SDA Generic Process Expert
Overview
The SDA Generic Process expert is a bundled expert that allows you to integrate Pulse with Serena Deployment Automation (SDA) and run a SDA global process on a specific SDA resource. For example, you can use this expert to run a regular repeated process when updated artifacts are delivered.
Prerequisites
The SDA server must be installed on your network, not necessarily on the Pulse server, where this expert can connect to it. SDA Generic Process expert has been tested with SDA server version 6.0.0.
You will need a working global process configured in your SDA server for the SDA Generic Process expert to invoke.
Configuration
Server Configuration Files
The following SDA Generic Process expert properties file is usually required:
${dataDir}/conf/experts/com.serena.starlight/sdaprocessexecutor/sda-pulse-expert.properties
The property below identifies the location of the SDA server, if the default value shown is correct you do not need to edit it:
| Property Name | Description | Required | Example |
|---|---|---|---|
| sdaServerUrl | URL to the SDA server web application | Yes | http://localhost:8080/serena_ra |
Expert Configuration in Chain
When you add this expert to an expert chain in Pulse modify the following configuration fields:
| Field Name | Description | Example | Required |
|---|---|---|---|
| Username | Enter the username of an SDA server administrator. | admin | Yes |
| Password | Enter the password of the SDA server administrator. | admin | Yes |
| Generic Process Name | Specify the name of the SDA global process to be run on the SDA server. | setup_net_process | Yes |
| Resource Name | Specify the name of the SDA resource on which the global process will be run. | machine_without_net_resource | Yes |
| Process Properties | Specify properties that will be used to run the SDA global process. Enter one pattern per line in this format: property_name=property_value |
set_up_db=true use_logging_level=trace |
No |
SDA normally operates on binary files so add the SDA Generic Process expert to a chain that populates a workspace with built artifacts.
Dependency Vulnerabilities Expert
Overview
The Dependency Vulnerabilities expert is a bundled expert that integrates the Open Web Application Security Project (OWASP) dependency-check tool that can scan Java, .NET, and Python applications and their dependent libraries.
This expert identifies vulnerable dependencies in the analyzed stream and displays the findings in the Experts section of a Pulse Review page. One finding per vulnerability is displayed and there can be multiple vulnerabilities for each dependency. Each finding contains the ID of the vulnerability and the name of the dependency where it was found. A report file can be viewed from the Review page.
Prerequisites
There is no external software to install (the dependency-check 1.2.11 library is embedded in the Dependency Vulnerabilities expert). However, the expert relies on data from the National Vulnerabilities Database (NVD) web site to find vulnerabilities and requires access to the internet to download and update data.
On the first run the expert creates:
- The folder
${dataDir}/conf/experts/com.serena.starlight/dependencyvulnerabilities/data/ - The file
cve.2.9.h2.dbthat is updated by CVE vulnerabilities data. Each run automatically updates the CVE data if autoupdate in the properties file is set to true.
Configuration
Server Configuration Files
The properties file is optionally located in ${dataDir}/conf/experts/com.serena.starlight/dependencyvulnerabilities/dependencycheck-pulse-expert.properties.
It contains configuration properties for both the Dependency Vulnerabilities expert and its embedded dependency-check library.
You only need to create this file if you need to override one of the default values.
| Property Name | Description | Example Value | Default Value | Required |
|---|---|---|---|---|
| pulseWarningCvssThreshold | Vulnerabilities with a CVSS score less than the specified value are treated as a WARNING. | 3.0 | 4.0 | No |
| pulseErrorCvssThreshold | Vulnerabilities with a CVSS score less than the specified value are treated as an ERROR. The value must be bigger than pulseWarningCvssThreshold. | 9.0 | 7.0 | Yes |
| autoupdate | Automatically updates the CVE data. | Yes |
Expert Configuration in Chain
When you add this expert to an expert chain in Pulse modify the following configuration fields:
| Field Name | Description | Example Value | Default Value | Required |
|---|---|---|---|---|
| Application name | Enter the application name to be displayed in the report file. | My-App | Yes | |
| Application version | Enter the application version to be displayed in the report file. | 1.5 | Yes | |
| Include | To only include specific paths enter one or more Ant patterns (one per line). To include all paths leave blank. | *.war **/*.jar |
**/* | No |
| Exclude | To exclude specific paths enter one or more Ant patterns (one per line). To include all paths leave blank. | target/*.class | <empty> | No |
| Suppression file | Enter the relative path in the stream to the suppression file. | conf/suppression.xml | <empty> | No |
| CVE Suppression List | Enter a comma-separated list of CVE IDs to suppress. | CVE-2008-0732,CVE-2011-5034 | <empty> | No |
| Enable Archive analyzer | Files types scanned: ZIP, EAR, WAR, JAR, SAR, APK, NUPKG, TAR, GZ, TGZ | Yes | No | |
| Enable Jar analyzer | Files types scanned: JAR, WAR | Yes | No | |
| Enable Assembly analyzer | Files types scanned: EXE, DLL | Yes | No | |
| Enable Central analyzer | Checks for Maven GAV (Group/Artifact/Version) information in the scanned area. | Yes | No | |
| Enable Nexus analyzer | Checks for Maven GAV (Group/Artifact/Version) information in the scanned area. | Yes | No | |
| Enable Nuspec analyzer | Files types scanned: NUSPEC | Yes | No | |
| Enable Python package analyzer | Files types scanned: py, zip, PKG-INFO, METADATA | Yes | No | |
| Enable Python distribution analyzer | Files types scanned: whl, egg, zip | Yes | No | |
| Unstable threshold | If there are vulnerabilities with a CVSS score higher than the value you specify, the expert result is UNSTABLE. If no value is set the result is SUCCESS. | 7.0 | <empty> | No |
| Failure threshold | If there are vulnerabilities with a CVSS score higher than the value you specify, the expert result is FAILURE. If no value is set the result is SUCCESS. | 9.0 | <empty> | No |
This external web page has more information about analyzers.
The Dependency Vulnerabilities expert may report false-positive dependencies. For example, you consume a vulnerable library but you do not use the vulnerable functionality, or the vulnerability only applies in circumstances that does not apply to you. You can suppress any CVE by passing the suppression XML file with CVE suppressions (Suppression file property) or the CVE ID list (CVE suppression list property). This external web page has more information about suppression.
The dependency-check analyzers operates on binary files so add the Dependency Vulnerabilities expert to a chain that populates a workspace with built artifacts.
CM Build Expert
Overview
If your team uses Dimensions Build and you have existing build configurations, the bundled CM Build expert enables you to run the configurations in Pulse. Dimensions Build is a build management, execution, and monitoring tool that is part of Dimensions CM. For details see the Dimensions CM Build Tools User's Guide.
Prerequisites
A build configuration, created in Dimensions Build, for each stream that you are going to build.
Configuration
Expert Configuration in Chain
You can configure the CM Build expert in Pulse by modifying the fields or by specifying parameters for the BLD command.
| Field Name | Description | Required | Example |
|---|---|---|---|
| Server | Enter the name of a Dimensions CM server where you want to run the build. | Yes | cm_server |
| Dimensions CM base database name | Enter a database name and connection string for the CM server. | Yes | CM_TYPICAL@DIM14 |
| User name | Specify a user name that is registered with this CM server. | Yes | |
| Password | Enter the password for the user. | Yes | |
| Configure using command line | Toggle to Yes if you want to use the Dimensions CM command line to specify build parameters. | ||
| Build parameters | Specify build parameters for the BLD command. Only displayed if Configure using command line is set to Yes. |
QLARIUS:JAVA_BRANCH_STR /NOAUDIT /NO CAPTURE /BUILD_CONFIG=”ANT_JAVA_BUILD;6” | |
| Build based on request(s) | Restrict the build to sources that are related to CM requests that you specify. Enter a comma separated list of requests. Leave blank if you do not want to restrict the build. | QLARIUS_CR_21,QLARIUS_CR_56 | |
| Area type | Select a Dimensions CM area type:
|
||
| Area name | Specify the area to be used for this build. Default: all areas associated with the build configuration or stage. | ||
| Stage | Specify the stage where the targets will be built. Only displayed if you select a Deployment area. |
DEV | |
| Build configuration name | Specify the build configuration, and version, that you want to build. If you do not specify a version, by default the latest is used. | Yes | ANT_JAVA_BUILD;6 |
| Build area user | Enter the Dimensions CM credential set that has access to the build area. Only displayed if you select a Work area. |
<MY_CREDENTIAL_SET> | |
| Populate the work area with all files | Select this option to populate the work area with all the files that are related to the build. Only displayed if you select a Work area. |
||
Check in built items
|
Select one of the following options:
Only displayed if you select a Deployment area. |
||
| Target stream name | Specify the stream where the collected and built items will be delivered. Default: the same stream as the sources. Only displayed if you select a Deployment area and are checking in built items. |
QLARIUS:JAVA_BRANCHA_STR | |
| Relate build items to requests | Specify a comma separated list of requests to which new items created from the final build targets will be related. Only displayed if you select a Deployment area and are checking in built items related to custom requests. |
QLARIUS_CR_24,QLARIUS_CR_18 | |
| Build options | Select one of these options:
Only displayed if you select a Deployment area. |
||
| Target selection |
For details see the BLD command in the Dimensions CM Command-Line Reference. |
||
| Poll rate | Specify how often (in seconds) that the expert checks if the build has completed. | Yes | 50 |
CM Build manages its own workspaces so you can add it to a chain that does not populate a workspace.
Troubleshoot
Administration Issues
Pulse displays 404 errorIf Pulse displays a 404 Page Not Found error see the Pulse section of the Dimensions CM Administrator's Guide. The most common reason is a missing or inaccessible database at application startup time. The logs in the Pulse data directory on the server contain more information.
Reviews not created automatically when deliveries are made to CM- If your Dimensions CM server is correctly configured to emit ALF events when a delivery is made, check that your repository connection has been setup properly and that Pulse can connect to it.
- In the stream's settings check that:
- The delivery filter is not set to exclude the changeset.
- Create/Attach to a Review is set to Yes.
- If a delivery references a Dimensions CM request, or has a review label in the format [Q100] in the delivery message, the changeset may be associated with an existing review at the Draft or Rework state and will not create a new review.
- Check that the avatar server is configured properly.
- Clear your local browser cache and wait a few minutes for Pulse's server-side avatar image cache to cycle.
Expert chains do not start when deliveries are made to CM
- Check that the stream is configured to automatically run expert chains.
- Check whether your chain is configured to run on a schedule rather than every delivery.
- Check the Pulse server logs as described in the Dimensions CM Administrator's Guide.
Expert chains run but results are not displayed
- Check that the parameters in Jenkins are configured correctly. Builds will run in Jenkins even if parameters are not configured correctly, but the results will not be sent to Pulse. For more information about configuring Jenkins see the Dimensions CM Build Tool User's Guide.
Other Issues
Reviewers are not as expected
If the reviewers assigned to a new review are not as expected:
- Check that the design parts that own the files being reviewed are correct.
- Check who holds the Reviewer role on those design parts.
- A Pulse administrator can configure the Reviewer role for each repository.
- Pulse assigns reviewers differently to the way that roles are assigned to CM requests:
- Pulse takes a union of the users holding the role on the items' owning design parts.
- CM requests take the role assignments from a common ancestor design part in the design part hierarchy.
In the Dimensions CM administration console check that:
- The item's data format is set correctly.
- The data format has an appropriate MIME type set. Items that have a data format with a MIME type beginning text/ are displayed as inline text, MIME types beginning with image/ are displayed as images.
- Select Administration | Repositories.
- Select the review's repository and click Defaults.
- In the Reviewer role name in CM field see what CM role that has been specified. Users that hold this role can be selected as reviewers in Pulse.
- If the CM request does not have a user that holds this CM role, no changes are made in Pulse.
- If the CM request does have a user hold this CM role, the role assignment should have been copied to the review. However, the review rule script for the stream also determines if the review changes its state.
Check the ALF event configurations and Pulse server logs, see the Dimensions CM Administrator's Guide for details.
Pulse reviews change state but the corresponding CM requests are not actioned
- Select Administration | Repositories.
- Select the review's repository.
- Click Defaults.
- In the Approved state in CM and Rework state in CM boxes check the state names are correct.
- Click Cancel.
- Click Connection Details.
- In the Credentials section check that the specified user can log into Dimensions CM and that the user account has privileges in Dimensions CM to action requests to the necessary states.
In addition:
- If a request in Dimensions CM requires mandatory attributes, enter them manually. Pulse cannot automatically populate the attributes unless the credentials on the repository are for an account that has privileges in Dimensions CM to bypass this requirement.
- Delegate any role assignments on requests in Dimensions CM that are required before the request can be actioned to the next state. Pulse does not change the role assignments on requests in Dimensions CM, even for the Reviewer role of the repository.
- Only reviews that change their state from In Review to Rework, or from In Review to Approved or Completed, cause their corresponding CM requests to be actioned. If a review is associated with multiple requests, all the requests are actioned. If a request is associated with multiple reviews, the request is actioned more than once.
- Check the Pulse server logs at the DEBUG level, see the Dimensions CM Administrator's Guide for details.
- Pulse uses Markdown syntax for formatting user comments. If you are expecting a new line in your comment, try ending the previous line with two spaces or using an extra blank line.
-
For security reasons the following are removed:
- Links or images that do not point to an URL of the type http:// or https://
- Unsafe or unbalanced HTML tags.
PMD Expert
If the compilation unit (*.java file):
- Is not syntactically correct PMD does not report any findings therefore sources must be compiled successfully.
- Is very large, for example 10,000 lines, and there are multiple bugs PMD may take a long time to complete.
SonarQube Expert
If you have problems with SonarQube Runner see this web site: http://docs.sonarqube.org/display/SONAR/Analyzing+with+SonarQube+Runner#AnalyzingwithSonarQubeRunner-Troubleshooting
If you receive the state Aborted check that:
- The expert property file is in:
${dataDir}/conf/experts/com.serena.starlight/sonarqube/sonarqube-pulse-expert.properties - All required properties are specified in the property file.
- The SonarQube server and database are up and running.
- The connection details to the SonarQube server and SonarQube database are correct in the property file.
- The path to the SonarQube Runner command line tool is correct in the property file.
Check the Pulse log file.
SDA Experts
Check the following:
- The configuration is set up properly, for example, the correct SDA object names are specified.
- Property file is not found or is not set up correctly, for example, the wrong SDA server URL is specified.
- The SDA server version is unsupported.
- The SDA agent or resource is offline.
Dependency Vulnerabilities Expert
Check the following:
- If autoupdate in the properties file is set to false, CVE data is not updated on the first, or any, run and the expert will not report anything.
- The OWASP Dependency Check tool does not always work correctly with analyzer options and you may have to disable them. To exclude specific paths use the Exclude UI property.
Contact Serena Support
Serena provides technical support for all registered users of this product, including limited installation support for the first 30 days. If you need support after that time, contact Serena Support and follow the instructions. Language-specific technical support is available during local business hours. For all other hours, technical support is provided in English.