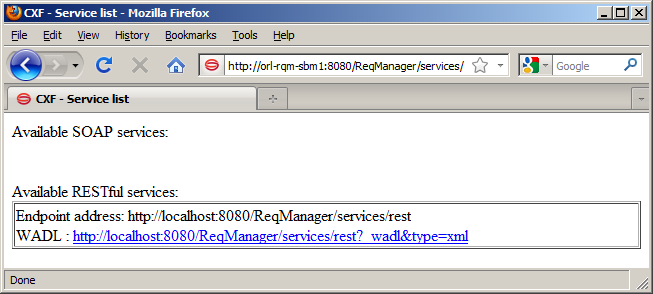
To verify that the ReqManager .war file has been successfully installed into Tomcat, enter the following in a web browser:
http://ServerName:8080/ReqManager/services/
The result should resemble the following:

| ‹ | Installing Serena Dimensions RM | | | LAST | ›| |
The Serena Requirements Control installer installs files to the SBM installation directory path, including the Java war files and the SBM solution file for Serena Requirements Control.
Serena Requirements Control must be installed on the same machine as the SBM Server.
The installer comes in two versions: 32-bit and 64-bit. Be sure that you have the correct version for your system.
Running the installer:
On the SBM Server, run the installer executable.
You may be asked to install the Windows Installer, in which case:
Click Install.
When asked if you want to reboot your machine, click Yes.
The Welcome screen of the installer appears.
Click Next.
The License Agreement screen appears.Select the option to accept the license agreement and click Next. The Destination Folder screen appears.
Accept the default destination folder, or click the Change button to browse to a different folder.
The folder must share the same root folder as the SBM installation. For example, if SBM is installed to, C:\Program Files\Serena\SBM, then the destination folder would be, C:\Program Files\Serena\Solutions\Requirements Control.
Click Next. The Setup Type screen appears.
Accept the default option of a Complete installation, or select the Custom option, in which case the Custom Setup screen appears and you can select or deselect the following features to install:
ALM Foundation Services: This must be installed on the same system as the SBM server (the default), or on a system accessible from the SBM server.
This installs a Serena specific configuration of Tomcat to the default port of 8080, unless it already exists.
Requirements Control Process Application: This must be installed on the same system as the SBM server.
Click Next. The Configuration Details screen appears.
Confirm that the required integration components were found. Click Next. The Ready to Install the Program screen appears.
Click Install. The Installing Serena Requirements Control screen appears. This screen includes a Status bar denoting the progress of the installation process. Once complete, the InstallShield Wizard Completed screen appears.
Review the installation summary. Optionally, select the Show the Windows Installer log to open the log in Notepad when you exit the installer.
Click Finish to complete the installation and exit the installer.
The installer will restart Tomcat.
To verify that the ReqManager .war file has been successfully installed into Tomcat, enter the following in a web browser:
http://ServerName:8080/ReqManager/services/
The result should resemble the following:
