Installing Serena Development Control
The Serena Development Control installer copies necessary files to the SBM installation directory path. The files copied include the Java war files and the SBM solution file. Serena Development Control needs to be installed on the machine where the SBM Server is installed in order to import the solution file. It is recommended for performance reasons, however, that the DVM web services be installed on the server where Dimensions CM is installed.
|
|
|
NOTES
If you are using the DVM Connect for Quality Center, you will need to have HP Quality Center installed, and download and install the Quality Center modules on the SBM Server before running the Development Control Installer. For details, see Installing and Registering Quality Center Modules in the Development Manager Connector for HP Quality Center / ALM Implementation Guide. There are also some post-installation steps you will need to carry out.
When installing Development Control via Remote Desktop access to a Windows 2003 system, installation may fail if you include the Connector to Quality Center option. To avoid this issue, run Remote Desktop in Console or Administration mode by running one of the following commands:
mstsc /admin
or
mstsc /console
|
|
There is sample data provided with Development Manager that consists of Dimensions CM sample data and SBM sample data. These sets of data are interrelated in that the items/objects in the SBM data and Dimensions CM data reference each other. You can install one or the other, or both sets of data.
-
If you require the Dimensions CM sample data, you need to run the Development Control installer on the server on which you have installed Dimensions CM.
-
If you require the SBM sample data, this will need to be installed when you run the Development Control installer on the SBM server.
|
|
|
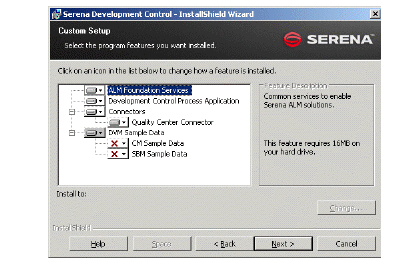
NOTE This option is not selected by default, so you will have to select a custom install and make sure the option is selected.
|
|
To install Serena Development Control:
-
On the SBM Server, run the installer executable, Development Control.exe or Development Control 64-bit.exe depending on your server type.
You may be asked to install Windows Installer 4.5, in which case:
-
Click Install.
-
When asked if you want to reboot your machine, reply Yes.
The Welcome page appears.
-
Click Next.
The License page appears.
-
Confirm and click Next.
The Destination Folder page appears.
-
Accept or change the destination folder. This should be the location where SBM is installed. For example if SBM is installed in C:\Program Files\Serena\SBM, it should be:
C:\Program Files\Serena\Solutions\Development Control
-
Click Next.
The Setup Type page appears.
|
|
|
NOTE If you want to install the sample SBM data, this option is deselected by default. To install this option, you will need to:
-
Run this installer on the machine on which the local Oracle or SQL database serving the SBM instance is installed.
-
Choose Custom, and select the SBM Sample Data option.
The SBM sample data can only be installed on Oracle 11gR2 and MSSQL 2008 R2.
|
|
If you want to change any of the options to be installed:
-
Select Custom.
-
Click Next.
-
On the Custom Setup page, select or deselect the required item(s).
-
Click Next.
-
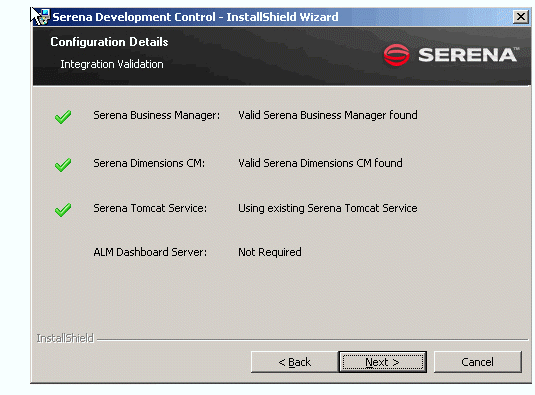
The Configuration Details page appears..
The installer checks whether a valid version of SBM and the Serena common Tomcat Web server are installed. It installs Tomcat if needed.
-
Click Next.
-
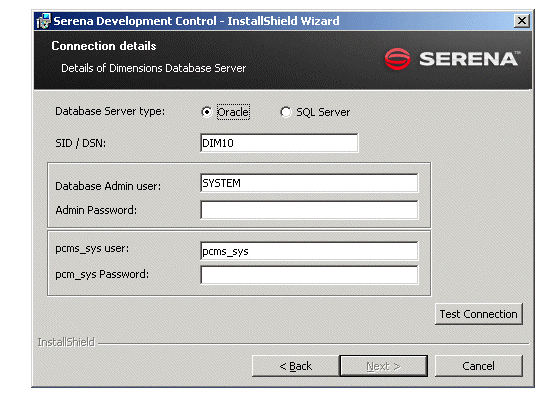
If you are installing on the server where Dimensions CM is installed, and you have not deselected the CM Sample Data option, the Connection Details page appears asking you for the Details of the Dimensions database server.
-
Select the Type of database you are using, and enter the login credentials for the Admin User. If you have selected Oracle, also enter the credentials for the pcm_sys user.
-
Click Test Connection to test the connection. Click OK on the message box.
-
Click Next.
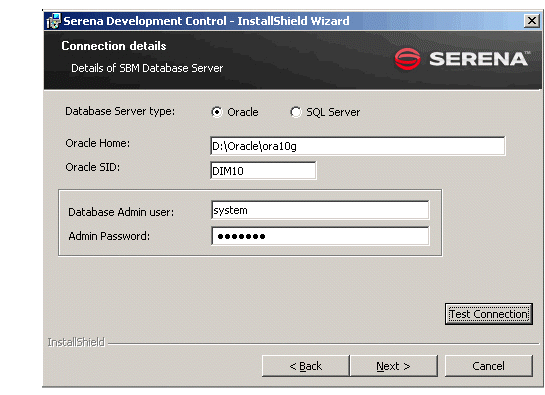
If you are installing on the server where SBM is installed, and you have selected the DVM Sample Data option, the Connection Details page appears asking you for the details of the SBM database server.
-
Select the Type of database you are using, and enter the login credentials for the Admin User.
-
Click Test Connection to test the connection.
-
Click Next.
-
The Ready to Install page appears.
-
Click Install.
A page appears informing you files are being copied.
If you have chosen to install the Quality Centre connector, after a short time, a Welcome to the InstallShield Wizard for Serena Connector for HP Quality Centre appears.
-
Click Next.
-
Accept the License agreement and click Next.
-
Select the installed SBM version, which should be SBM 2009 R4 or later.
-
Click Next.
-
On the Ready to Install Program page, click Install.
-
Some files are copied and then an InstallShield Wizard Completed page appears.
-
Click Finish.
-
Click Finish.
Serena Development Control creates the following file and folders under the Serena Development Control installation directory path. For example:
..\Program Files (x86)\Serena\Solutions\Development Control\
\solution (contains the solution file)
\war (contains the DevManager.war file)
com.serena.dvm.sbm.shell.zip (contains the custom UI for DVM)
The installer does the following:
-
Copies the DevManager.war file to the Tomcat Web server and restarts Tomcat
-
If you have selected this option, the installer creates a database for the sample data for Dimensions CM. The database/connection string is dvm_demo@dim10.
-
If you have selected this option, the installer creates a database for the sample data for SBM. The database name is dvm_sample.
To check that DevManager is installed into Tomcat, enter the URL:
http://<severname>:8080/DevManager/services/
in a web browser
.


