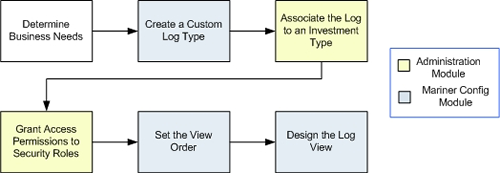
Add log type
- Name the custom log type Feedback
- Select the following options: Allow users to assign these log items to resources, Allow users to create work items from these log items, and Allow users to create items from these log items
- Specify the item types to which conversions will be allowed, such as Project, Request, and Service
- Specify the attributes by which feedback will be assesed, such as ones that capture impact, identify issues resolutions, likelihood of occurance, identify mitigation strategies, project status, and so on
To add a log type
- From the top-level navigation, open the Admin module.
- Select Customization.
- Select the View Management tab.
- Select the Log Views tab.
-
Click New
 .
.
- In the New Log Type dialog box, name the new log type. Select an icon with which to associate the new log type. You can allow items tracked in the new log view to be escalated, transitioned into item types, be assigned to resources, and become a work item.
- If you chose to allow the log view to be transitioned into an item type, under Allowed Conversions, select the item types into which this log type can be transitioned.
- Under Attribute Assignments, select the attributes that you want to associate with the log view.
-
Click Save
 .
.
Associate log type
A log type must be associated with at least one item type. In this scenario, since you are creating a custom log type to capture and track feedback, associate any item type for which you want to capture feedback with this this log type.
To associate a log type with an item type
- From the top-level navigation, open the Admin module.
- Select Customization.
- Select the Types Setup tab.
- Select the Investment Types tab.
-
Click New .
- Name the item type. Select an icon and/or a color to which the item type will be associated.
- Select Active to make this item type available; only active item type can be used to create new items.
- Select Creatable to make this item type available in the New Investment dialog box and in the Investment Type list on an item request page. Use this option to limit the type of items users can create.
- Under Work Type, select the work type option: None, Task-based, or Activity-based. Resources can only be allocated against task- or activity-based items. Once saved, an item's work type can not be changed.
- Select Inherit Allocations to have task and work item assignments be made based on other task-based item types in the item hierarchy. This option is only available for task-based work types.
- Select Timesheet Disabled to disable the timesheet for this item type. This option is only available for task-based work types.
- Select Lock Completed Assignments to prevent team members from submitting time on assignments when the associated task has been marked as complete by a project manager. This option is only available for task-based work types.
- Select Self Assign to allow team members to assign themselves to tasks or work items in items created from this item type. This option is only available for task-based work types.
- Select Self Allocate to allow team members to allocate themselves to tasks or work items in items created from this item type. This option is available for task- and activity-based work types.
- On the Attributes tab, move the attributes you want to be associated with this item type to the right column. Required attributes cannot be removed.
- On the Containment tab, select the item type's parent and child item types.
- On the Set Views tab, associate the views that will be available in the Projects module when team members are working on this item.
- On the Breakeven Attributes tab, select the positive and negative attributes that will be used to generate a Breakeven chart in the Financials view.
-
Click Save .
Grant access
After a custom log type has been added it must then be associated with the security roles that contain the users who will need to access the items associated with the custom log type. Without being granted permission to the view and all the appropriate actions available, no users will be able to access the new log type.
You can use security roles to limit access to the tasks users can perform using this log type. For example, if you only want project managers to be able to convert feedback to an item, you would select the Convert to Item check box for the project manager security role, but clear the check box for all other roles. The task icon is made available to the view when you created the log type, but it is only enabled if the permission is granted. If you want certain users to have read-only access to the view, select only the Feedback (View) check box for that security role, and clear the check box for all other roles.
To grant security roles access to the log type
- From the top-level navigation, open the Admin module.
- Select System Settings.
- Select the Security tab.
- Select the Roles tab.
- Select a role.
- Make your changes.
- Click Save .
Set the view order
With the feedback log type created, associated to an item, and permissioned so that users in your organization may use it, you can position this view in the desired order for the list of views associated with an item type.
To set the view order
- From the top-level navigation, open the Admin module.
- Select Customization.
- Select the View Management tab.
- Select the View Order tab.
- From the Module name drop-down, select the module in which you want to re-order views.
- Under Available views, select a view and click Up or Down for each view you want to move.
-
Click Save .
Design the log view
The last step in the process of creating a custom log view is to design the actual view itself. This is done using the View Designer. You can create a new view from scratch, or you can copy an existing view. For this example, since the log type for feedback is similar to other log types you can create the view by copying an existing one.
To design the log view
- From the top-level navigation, open the Admin module.
- Select Customization.
- Select the View Designer tab.
- Under View Layout, select the summary view that contains the form you want to copy.
- In
Forms, select the form and then click
Copy
 .
.